
Pie Carrier Sewing Pattern

Creating a Rainbow Star Mini Quilt is a fun and rewarding project for quilting enthusiasts of all levels. This vibrant and colorful quilt pattern is perfect for adding a pop of brightness to any space.
Whether you’re a beginner or an experienced quilter, this tutorial will guide you through the process of making a stunning Rainbow Star Mini Quilt. By following these steps, you’ll learn the essential techniques needed to craft a visually appealing and high-quality quilt.
A Rainbow Star Mini Quilt is a smaller version of a traditional star quilt but incorporates a lively rainbow color scheme. This pattern is ideal for wall hangings, table toppers, or as a thoughtful handmade gift. The combination of colors and star patterns makes it an eye-catching piece that stands out in any setting.
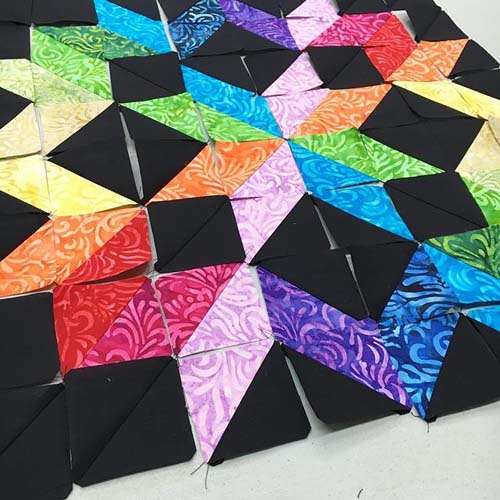
In this tutorial, we will cover everything you need to know to complete your Rainbow Star Mini Quilt, from selecting fabrics to assembling and finishing the quilt. By the end of this guide, you’ll have a beautifully crafted mini quilt that showcases your creativity and quilting skills.
Selecting the right materials is crucial to achieving a stunning Rainbow Star Mini Quilt. The colors and fabric quality will determine the final look of your project.
Once you have all your materials, it’s time to cut and piece the quilt blocks that will form the Rainbow Star Mini Quilt.
After the blocks are pieced together, it’s time to assemble the entire Rainbow Star Mini Quilt and begin quilting.
The final steps involve adding finishing touches and preparing your Rainbow Star Mini Quilt for display.
Q1: What size should a Rainbow Star Mini Quilt be? A: Typically, mini quilts range from 12″x12″ to 24″x24″, but you can adjust the size to fit your preference.
Q2: Can I make this quilt using scraps? A: Absolutely! A Rainbow Star Mini Quilt is a great way to use up leftover fabric scraps in different colors.
Q3: What is the best batting for a mini quilt? A: A lightweight cotton or polyester batting works best for a mini quilt as it provides structure without being too bulky.
Q4: How can I quilt this design without a longarm machine? A: You can use a domestic sewing machine with a walking foot or try hand quilting for a more traditional look.
Q5: How do I keep my quilt blocks from shifting while sewing? A: Use quilting clips or pins to hold pieces in place, and sew slowly to maintain accuracy.
Q6: Can I wash my Rainbow Star Mini Quilt? A: Yes! Wash it on a gentle cycle with mild detergent and air dry or tumble dry on low.
Join our VIP broadcast list and gain access to exclusive patterns, all for free. As a VIP member, you’ll receive the best patterns daily, delivered directly to your device. ✨📱 It’s a unique opportunity to stay up-to-date with the latest trends and designs, curated just for you. Don’t miss out on enhancing your projects and discovering new inspirations with the best patterns every day! 🎨🔝
Creating a Rainbow Star Mini Quilt is a delightful project that allows you to explore colors and quilting techniques. By following this tutorial, you now have the knowledge to craft a stunning mini quilt that can brighten up any space. Whether you keep it for yourself or gift it to a loved one, this quilt is sure to be cherished.
We hope this guide has been helpful! If you have any thoughts, questions, or suggestions, feel free to leave a comment. Happy quilting!


