
Pie Carrier Sewing Pattern

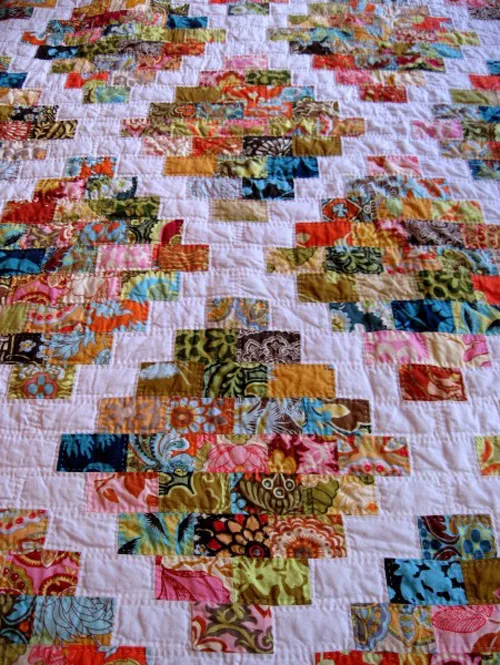
The God’s Eye Quilt Block – Free Tutorial is a fun and unique quilting project that allows you to create a beautiful and intricate block for your quilts.
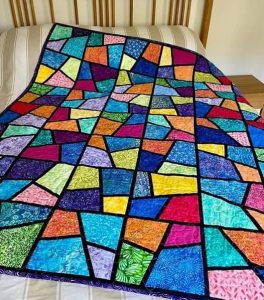
This pattern, often called a “Eye of God” design, has been used for centuries in various cultures, and it is known for its striking geometric look.
Whether you’re new to quilting or have been sewing for years, this tutorial will guide you through the steps to create your own version of the God’s Eye Quilt Block.

The God’s Eye Quilt Block is a great pattern for quilters looking to try something different. Its combination of straight lines and angles creates a mesmerizing visual effect that can add a lot of character to any quilt.
With the right materials and a bit of patience, you’ll be able to create a block that showcases your skill and creativity. This tutorial will provide you with clear, step-by-step instructions so that you can make your own God’s Eye Quilt Block with ease.
Whether you’re making a quilt for yourself or as a gift, this block is sure to make a statement. The God’s Eye Quilt Block – Free Tutorial is perfect for beginners who are comfortable with basic quilting techniques, but also offers room for more experienced quilters to explore new possibilities with color and fabric. Let’s dive in and learn how to create this stunning quilt block!
Before you get started on your God’s Eye Quilt Block, it’s important to gather the right materials. Having everything ready will help make your quilting process smoother and more enjoyable. Here’s what you’ll need:
Now that you have all your materials ready, it’s time to start creating your God’s Eye Quilt Block! Follow these steps carefully for a successful project.
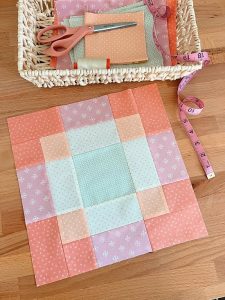
Creating the God’s Eye Quilt Block involves several straightforward steps. The beauty of this design lies in the geometric shapes, and once you understand the basic structure, you’ll be able to replicate it with ease. Let’s break down the process:
The first step is to cut your fabric into the necessary shapes. You’ll need to cut a square for the center of the block and smaller triangles for the surrounding sections. The size of the pieces will depend on your desired finished block size. For a standard 12.5” block, cut a center square of about 4” x 4”. Then, cut eight smaller triangles that will form the outer part of the block.
Start by sewing the center square onto the background fabric. This square is the focal point of the God’s Eye Quilt Block, so make sure it is perfectly centered. Use a 1/4” seam allowance for a clean, neat look.
Next, take the eight smaller triangles you’ve cut and begin attaching them to the edges of the center square. Each triangle should be placed with its right angle at the corners of the center square, and the long sides of the triangle should face outward. Sew each triangle to the center square, ensuring the edges align perfectly.
Once all the triangles are sewn on, you will notice the characteristic “eye” shape that forms the signature look of this block. Press the seams carefully to ensure that each section lies flat. The next step is to sew the outer triangles to each other to complete the outer edge of the quilt block.
After all the pieces are sewn together, it’s important to trim the edges and square up the block to ensure uniformity. Use your quilting ruler and rotary cutter to trim the edges of the block to the desired size.
Once your God’s Eye Quilt Block is complete, you can begin assembling it into your quilt. If you’re making a larger quilt, you can repeat this process to create multiple blocks, then sew them together to form your quilt top.
While the God’s Eye Quilt Block pattern is relatively simple to create, there are several tips you can follow to ensure your block turns out perfectly:
Q1: Can I use this pattern for a smaller or larger quilt block?
Yes, the God’s Eye Quilt Block pattern can be adapted to any size. Simply adjust the dimensions of the center square and the surrounding triangles to suit your desired block size.
Q2: Do I need to use a specific type of fabric for the quilt block?
No, you can use any quilting fabric you prefer. However, using cotton fabric is recommended for ease of sewing and durability.
Q3: How do I prevent my seams from puckering?
To avoid puckering, make sure to press your seams as you go, and avoid pulling the fabric while sewing. If you’re using a machine, make sure the tension is set correctly.
Q4: Can I make the God’s Eye Quilt Block without a rotary cutter?
While a rotary cutter makes the cutting process much easier and more precise, you can also use scissors if needed. Just be sure to measure carefully and cut accurately.
Q5: Can I add embroidery or other embellishments to the block?
Absolutely! You can add embroidery, beads, or other embellishments to personalize your God’s Eye Quilt Block. Just be mindful of the overall design and size of the quilt.
Join our VIP broadcast list and gain access to exclusive patterns, all for free. As a VIP member, you’ll receive the best patterns daily, delivered directly to your device. ✨📱 It’s a unique opportunity to stay up-to-date with the latest trends and designs, curated just for you. Don’t miss out on enhancing your projects and discovering new inspirations with the best patterns every day! 🎨🔝
The God’s Eye Quilt Block – Free Tutorial is a wonderful and easy-to-follow guide for creating a striking quilt block that adds elegance and depth to any quilt. By following these steps and tips, you’ll be able to create a beautiful quilt block that showcases your quilting skills and creativity. Whether you’re making a quilt for yourself or as a gift, this pattern will surely impress.
We hope this tutorial has inspired you to try the God’s Eye Quilt Block. If you have any questions or suggestions, feel free to leave a comment below. We’d love to hear your thoughts and see how your quilt turns out!


