
Pie Carrier Sewing Pattern

The Double Four Patch Quilt Block Tutorial is an excellent starting point for quilters who want to experiment with intricate patterns without overwhelming themselves with complex designs.
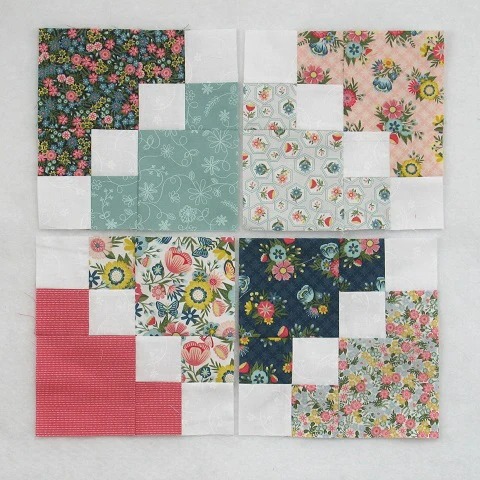
This classic block is composed of smaller four-patch blocks that come together to create a beautiful, geometric pattern. The Double Four Patch is not only simple to make but also offers a great deal of versatility in its design, making it ideal for a variety of quilting projects, from blankets to decorative pillows.
When you begin your Double Four Patch Quilt Block project, you’ll find that it is the perfect combination of ease and creativity. While the individual pieces are relatively easy to assemble, the end result is a striking quilt block that can add charm and texture to any quilt.
Whether you are creating a large quilt or a small, individual block for a decorative piece, mastering the Double Four Patch is an essential skill for every quilter.
This tutorial will guide you step-by-step through the process of making the Double Four Patch Quilt Block, from fabric selection to sewing the pieces together. By the end of this guide, you’ll have the confidence to create beautiful quilt blocks that can be used for any project. Let’s get started with the basics!
Before you can start your Double Four Patch Quilt Block Tutorial, it’s essential to gather all the necessary materials. Having everything ready ensures that your project flows smoothly and efficiently. Here’s what you’ll need:
Once you have all your materials gathered, you are ready to begin the Double Four Patch Quilt Block Tutorial!
Now that you have your materials ready, let’s dive into the process of creating your Double Four Patch Quilt Block. This tutorial will guide you through each step to ensure a seamless and enjoyable quilting experience.
Start by cutting your fabric into the required pieces. For a 12-inch finished block, cut:
Be sure to use a quilting ruler and rotary cutter for precise cutting, as accuracy is key to making sure all your pieces fit together properly.
To create the Four Patch units, start by pairing up the smaller 2.5-inch squares from fabric A and fabric B. Lay them out in a grid of two rows and two columns. Sew the squares together in pairs, creating two small strips. Press the seams open.
Next, sew the two strips together to form a four-patch block. Make sure to match up the seams carefully so that the block lies flat. Repeat this process for all four smaller blocks. Each of these four-patch blocks should measure 4.5 inches square once finished.
Now that you have your four smaller four-patch blocks, it’s time to sew them to the larger 5-inch squares. Lay out your block so that the four-patch blocks are arranged in the center, with the larger squares surrounding them.
Sew the smaller four-patch blocks to the sides of the larger squares, ensuring the seams are aligned. Press the seams open to reduce bulk and ensure the block lays flat.
Once you have sewn the four-patch blocks to the large squares, you’ll need to sew everything together into one finished block. Sew the top and bottom sections of the block first, then attach the two sections together.
Make sure to pin the pieces in place before sewing to ensure everything is aligned correctly. After sewing, press the seams open to achieve a clean and crisp block. The final Double Four Patch Quilt Block should measure 12.5 inches before the seams are sewn.
After sewing the block together, it’s important to trim any excess fabric along the edges. Use a quilting ruler to measure the block and trim the edges evenly. This ensures that your quilt block is the correct size and ready to be incorporated into your quilt top.
If you are making multiple blocks for a larger quilt, repeat these steps for each block. You can mix and match different fabrics to create a unique and colorful quilt top. The Double Four Patch Quilt Block Tutorial is a versatile pattern that can be customized to fit your personal style.
While the Double Four Patch Quilt Block is relatively simple to make, there are several tips you can follow to ensure your block turns out perfectly every time:
Q1: What size will my Double Four Patch block be after sewing?
The finished size of your Double Four Patch Quilt Block will be 12 inches square after sewing, with a 12.5-inch block before the seams are sewn.
Q2: Can I use this pattern for a smaller or larger quilt?
Yes, you can easily scale the Double Four Patch Quilt Block pattern to create larger or smaller blocks. Simply adjust the size of the squares used in the pattern.
Q3: How do I prevent fabric from shifting while I sew?
To prevent fabric from shifting, use pins to secure the pieces together before sewing. You can also use a walking foot on your sewing machine to help feed the fabric evenly.
Q4: Can I hand-sew the Double Four Patch Quilt Block?
Yes, you can hand-sew the Double Four Patch Quilt Block if you don’t have a sewing machine. Just make sure to use a small, even stitch and press your seams as you go.
Q5: What other quilt patterns can I make using the Four Patch block?
The Four Patch block is a versatile pattern that can be used in many different quilt designs. You can use it to create larger blocks, or combine it with other quilt blocks to make a beautiful quilt top.
Join our VIP broadcast list and gain access to exclusive patterns, all for free. As a VIP member, you’ll receive the best patterns daily, delivered directly to your device. ✨📱 It’s a unique opportunity to stay up-to-date with the latest trends and designs, curated just for you. Don’t miss out on enhancing your projects and discovering new inspirations with the best patterns every day! 🎨🔝
The Double Four Patch Quilt Block Tutorial provides a simple and effective way to create a stunning quilt block that can be used in a variety of projects. By following the steps outlined in this tutorial and using the tips provided, you can create beautiful, geometric blocks that add texture and charm to any quilt.
We hope this tutorial has inspired you to try the Double Four Patch Quilt Block in your next project. Feel free to leave a comment below with any questions or suggestions, and share your finished quilt block with us! Your feedback and thoughts are always welcome.


