
Crochet Multi-Purpose Blouse, Shawl, Runner Model

The Wiggly Crochet Rug is a unique and fun project that can add a touch of whimsy and creativity to any room in your home. This crochet technique is not only visually appealing but also offers the flexibility to customize your rug with different colors, shapes, and sizes.
Whether you’re a beginner or an experienced crocheter, creating a Wiggly Crochet Rug can be a rewarding experience that brings a personal and handmade touch to your living space.
One of the key features of the Wiggly Crochet Rug is its wavy, textured design, which adds dimension and movement to the otherwise flat surface of a typical rug.
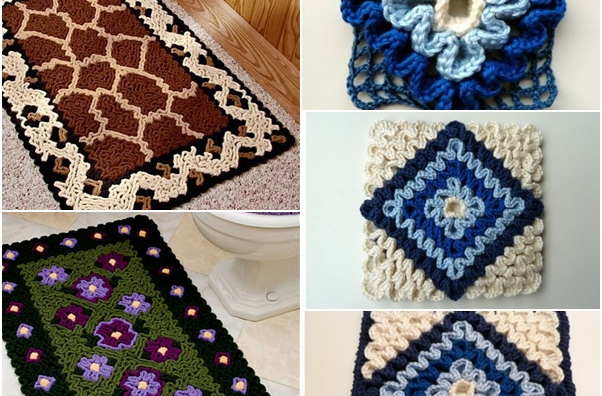
The waves can be created using simple crochet stitches, but the result is a stunning and intricate pattern that is sure to catch the eye.
This rug works well in a variety of settings, including bedrooms, living rooms, bathrooms, and entryways. Its playful design makes it a perfect choice for anyone looking to add a bit of fun and flair to their home décor.
In this tutorial, we’ll take you through the process of creating a Wiggly Crochet Rug from start to finish. We’ll cover the materials you need, step-by-step instructions on how to make the rug, tips for customizing your design, and even some answers to frequently asked questions. Let’s dive into this exciting project and create something beautiful for your home!
Before you begin your Wiggly Crochet Rug project, it’s important to gather all the necessary materials. Having everything ready will make the process smoother and more enjoyable. Here’s what you’ll need:
With all the materials in hand, you’re ready to start working on your Wiggly Crochet Rug!
Now that you have your materials ready, let’s walk through the process of creating your very own Wiggly Crochet Rug. This simple and fun crochet pattern is easy to follow, even for beginners, and offers a lot of room for creativity.
To begin, create a foundation chain that is the desired length of your rug. The foundation chain will determine the width of the rug, so make sure to chain enough stitches to create a width that works for your space. For example, if you want a rug that is 3 feet wide, you’ll need to chain enough stitches to reach that length.
Make sure to work loosely as you chain, as tight stitches can cause the rug to curl and lose its shape.
Once you’ve completed the foundation chain, it’s time to start creating the wavy texture of the Wiggly Crochet Rug. To do this, you’ll be using a combination of double crochet and chain stitches to create the waves.
For the first wave, yarn over and insert your hook into the second chain from the hook. Work a double crochet into that stitch, then chain 2 and skip 2 stitches. Repeat this process across the row, making sure to end with a double crochet stitch. This will create a nice wave pattern that will be the base of your rug.
For the next row, turn your work around and continue the wave pattern. Yarn over and insert your hook into the top of the first double crochet from the previous row. Continue working double crochet stitches into each wave, using chain 2 to create the gaps between each wave.
Repeat this process for several rows until your rug reaches the desired length. You can make the waves as large or as small as you like, depending on the look you’re going for.
Once you’ve crocheted your rug to the desired length, it’s time to finish it off. To do so, cut the yarn, leaving a long tail, and use a slip stitch to secure the end. Weave in the loose ends using a yarn needle, making sure to hide the yarn tails inside the stitches for a neat finish.
If you’ve used rug backing, you can now sew the crocheted portion onto the backing fabric for added durability.
The best part about creating a Wiggly Crochet Rug is the ability to personalize it to match your style. Experiment with different colors, patterns, and textures to create a one-of-a-kind rug. You can even incorporate stripes, ombre effects, or other fun patterns to make your rug even more unique.
If you plan to place your rug on a hard surface, like wood or tile, it may be a good idea to add a non-slip backing to keep the rug in place. There are many options available, such as rubber or fabric-backed rug pads, that can be attached to the bottom of your rug to prevent it from sliding.
While the Wiggly Crochet Rug is a relatively easy project, there are several tips that can help ensure your rug turns out perfect:
Q1: How long does it take to crochet a Wiggly Crochet Rug?
The time it takes to crochet a Wiggly Crochet Rug depends on the size of the rug and your crochet speed. A small rug may take a few hours, while a larger rug can take a few days to complete.
Q2: Can I use different types of yarn for a Wiggly Crochet Rug?
Yes, you can use different types of yarn for your rug. However, thicker yarn works best for creating a durable and cushy texture.
Q3: How do I prevent my Wiggly Crochet Rug from curling?
To prevent curling, crochet loosely and avoid tight stitches. Using bulky yarn can also help the rug stay flat and maintain its shape.
Q4: Can I machine wash my Wiggly Crochet Rug?
It depends on the type of yarn you use. Some yarns are machine washable, while others may need to be hand-washed. Always check the care instructions for the yarn you use.
Q5: How can I make my Wiggly Crochet Rug more durable?
Using a thicker yarn and adding a non-slip rug backing will help increase the durability and longevity of your rug.
Join our VIP broadcast list and gain access to exclusive patterns, all for free. As a VIP member, you’ll receive the best patterns daily, delivered directly to your device. ✨📱 It’s a unique opportunity to stay up-to-date with the latest trends and designs, curated just for you. Don’t miss out on enhancing your projects and discovering new inspirations with the best patterns every day! 🎨🔝
Creating a Wiggly Crochet Rug is a fun and creative project that can add personality and charm to any room in your home. By following the steps outlined in this tutorial and experimenting with different yarns and colors, you can create a beautiful and functional rug that reflects your unique style.
We hope this guide has inspired you to start your own Wiggly Crochet Rug. If you have any questions or suggestions, feel free to leave a comment below. We’d love to hear about your experience and any additional tips you have for fellow crafters!


