Miniraitablokki – Mini stripe block

Advertising

Creating quilt blocks can be an exciting and fulfilling craft, especially when working with unique designs like the Miniraitablokki – Mini Stripe Block.

This free pattern offers quilters a chance to experiment with colors, fabrics, and layouts to create something truly stunning. Whether you’re a beginner or an experienced quilter, this pattern is an excellent addition to your collection.

Advertising

The Mini Stripe Block is a versatile design that works well for various quilting projects, including bed quilts, wall hangings, and table runners.

Image from google.

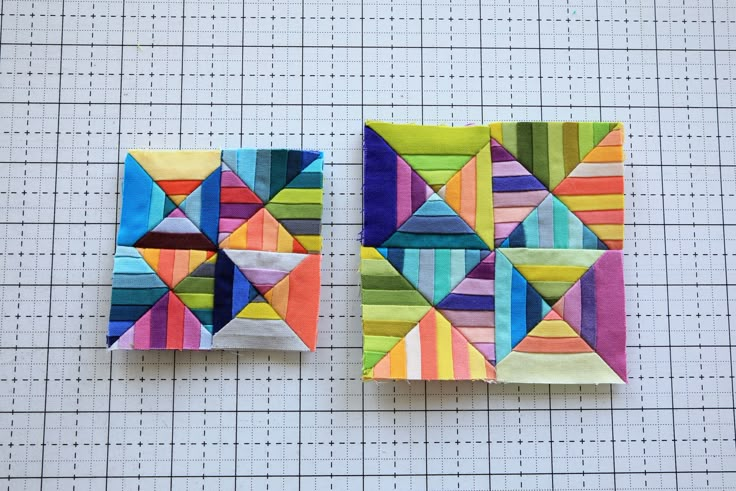
Its clean, modern lines make it a favorite among contemporary quilters, while its traditional strip-piecing technique ensures it’s accessible to all skill levels.

If you’re ready to explore this delightful pattern, keep reading to learn about materials, cutting instructions, sewing techniques, and creative layout ideas. Let’s dive into the wonderful world of Miniraitablokki – Mini Stripe Block quilting!

1. Materials and Tools Needed

Before you start, gathering the right materials and tools will ensure a smooth quilting process.

Advertising
  • Fabric choices: Choose at least three contrasting colors or prints.
  • Rotary cutter and mat: Essential for precise fabric cutting.
  • Quilting ruler: Helps in achieving straight and accurate cuts.
  • Sewing machine: A reliable machine with a quarter-inch presser foot is ideal.
  • Iron and ironing board: Pressing your seams is crucial for a polished finish.
  • Thread and needles: High-quality cotton thread ensures strong seams.

Having these tools prepared will make the quilting process seamless and enjoyable.

2. Cutting Instructions

Accurate cutting is crucial to ensure all pieces fit together perfectly.

  1. Prepare your fabric: Wash, dry, and press before cutting to avoid shrinkage.
  2. Cut the strips: Measure and cut strips of equal width from each fabric choice.
  3. Trim edges: Ensure all edges are straight and even.
  4. Organize the strips: Arrange them in a pleasing order before sewing.
  5. Label your pieces: If using multiple colors, marking them will help maintain consistency.
  6. Check measurements: A final check ensures accuracy before assembly.

3. Sewing the Block Together

Follow these steps to assemble your Mini Stripe Block efficiently.

  1. Sew strip pairs: Take two strips and sew them together using a quarter-inch seam allowance.
  2. Press the seams: Use an iron to press seams open or to one side.
  3. Continue adding strips: Attach additional strips while ensuring straight edges.
  4. Square the block: Trim any excess fabric to achieve the correct size.
  5. Check alignment: Make sure all seams are lined up properly.
  6. Reinforce stitching: A final press and stitch reinforcement will secure the block.

4. Creative Layout Ideas

The versatility of the Mini Stripe Block allows for multiple quilt layouts.

  1. Traditional Rows: Arrange blocks in neat horizontal or vertical rows.
  2. Diagonal Layout: Tilt the blocks diagonally for a dynamic effect.
  3. Checkerboard Pattern: Alternate stripe directions for a contrasting look.
  4. Rainbow Gradient: Use color variation for an ombré effect.
  5. Scrappy Look: Mix different fabrics for a patchwork appeal.
  6. Modern Minimalist: Stick to a monochrome palette for a sleek aesthetic.

Frequently Asked Questions (FAQ)

1. What size should my strips be?

  • You can adjust the size to your preference, but standard strips are 2.5 inches wide.

2. Can I sew this pattern by hand?

  • Yes! While a sewing machine is faster, hand sewing is possible with precise stitching.

3. What types of fabric work best?

  • Cotton quilting fabric is the best choice, but linen or blends can also be used.

4. How do I make my seams perfect?

  • Use a quarter-inch presser foot and press seams carefully after sewing.

5. Can I use this block for other projects?

  • Absolutely! It’s perfect for pillows, table runners, or even clothing embellishments.

Join our VIP broadcast list and gain access to exclusive patterns, all for free. As a VIP member, you’ll receive the best patterns daily, delivered directly to your device. ✨📱 It’s a unique opportunity to stay up-to-date with the latest trends and designs, curated just for you. Don’t miss out on enhancing your projects and discovering new inspirations with the best patterns every day! 🎨🔝

Conclusion

The Miniraitablokki – Mini Stripe Block is an exciting pattern that blends simplicity with creativity. By following this guide, you can create beautiful quilt blocks that showcase your personal style and fabric choices. Whether you’re making a full quilt or a small decorative project, this pattern is a fantastic addition to any quilter’s collection.

Have you tried this pattern? Share your thoughts, tips, or suggestions in the comments!

Advertising
Botão Messenger
Scroll to Top