
Crochet Multi-Purpose Blouse, Shawl, Runner Model

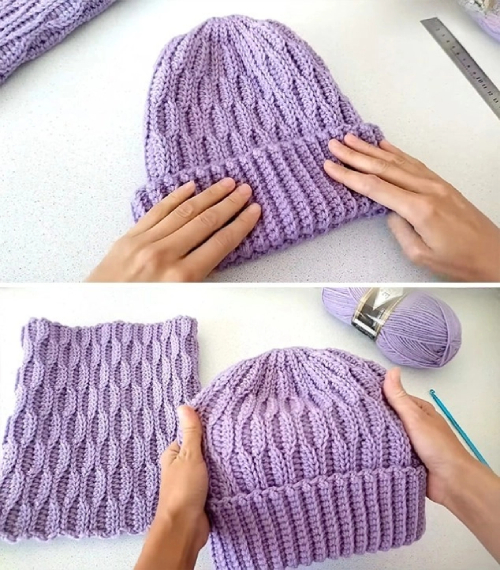
The Stunning Honeycomb Crochet Hat is an elegant and cozy accessory, perfect for chilly weather. With its intricate texture resembling a honeycomb, this hat is both stylish and warm, making it a must-have for any crochet lover’s wardrobe. Whether you’re making it for yourself or as a heartfelt handmade gift, this pattern is sure to impress!
Crochet enthusiasts of all skill levels can enjoy this project. While the honeycomb stitch may seem challenging at first, with a bit of patience and the right guidance, it becomes an enjoyable and rewarding experience.
This free pattern will walk you through each step, ensuring that you can create a beautiful and professional-looking hat with ease.
If you’re excited to dive into this pattern, grab your favorite yarn and hook, and let’s get started! Keep reading to learn about the materials you’ll need, step-by-step instructions, and helpful tips to make your honeycomb crochet hat a stunning masterpiece.
Before you begin your honeycomb crochet hat, gather the necessary materials to ensure a smooth crochet experience.
Having all these materials ready will make the crocheting process smoother and more enjoyable. Selecting the right yarn and tools is essential for achieving the perfect texture and shape.
The honeycomb stitch creates a beautiful, textured effect that mimics the look of a beehive. Here’s what you need to know before starting:
By mastering these basics, you’ll find it much easier to complete your honeycomb crochet hat with confidence.
Now, let’s start crocheting your stunning honeycomb hat! Follow these steps carefully:
Your honeycomb crochet hat is now complete!
Make your honeycomb crochet hat unique with these creative ideas:
With these personal touches, your honeycomb crochet hat will be a fashionable statement piece!
1. Can beginners make this honeycomb crochet hat? Yes! While the honeycomb stitch requires some practice, beginners who understand basic crochet stitches can follow this pattern with patience.
2. What type of yarn is best for this pattern? A worsted weight (category 4) yarn, such as acrylic or wool blends, works best for warmth and structure.
3. How do I make the hat larger or smaller? Adjust the starting number of stitches and rounds for the crown. Using a larger or smaller hook can also alter the size.
4. Can I sell hats made from this pattern? Yes! You can sell finished hats, but please credit the original pattern if sharing online.
5. How do I wash my honeycomb crochet hat? Hand wash with cold water and lay flat to dry to maintain its shape and texture.
Join our VIP broadcast list and gain access to exclusive patterns, all for free. As a VIP member, you’ll receive the best patterns daily, delivered directly to your device. ✨📱 It’s a unique opportunity to stay up-to-date with the latest trends and designs, curated just for you. Don’t miss out on enhancing your projects and discovering new inspirations with the best patterns every day! 🎨🔝
Creating a Stunning Honeycomb Crochet Hat is a fun and rewarding experience. With its intricate texture and stylish design, this hat is perfect for personal use, gifting, or even selling. By following the step-by-step instructions and adding your own creative touches, you can make a unique crochet masterpiece.
Have you tried this pattern? Share your thoughts, suggestions, or even photos of your finished honeycomb crochet hat in the comments! We’d love to hear from you!


