
Crochet Multi-Purpose Blouse, Shawl, Runner Model

Waffle Stitch Crochet Tutorial is a perfect guide for both beginners and seasoned crocheters who want to explore texture in their work.
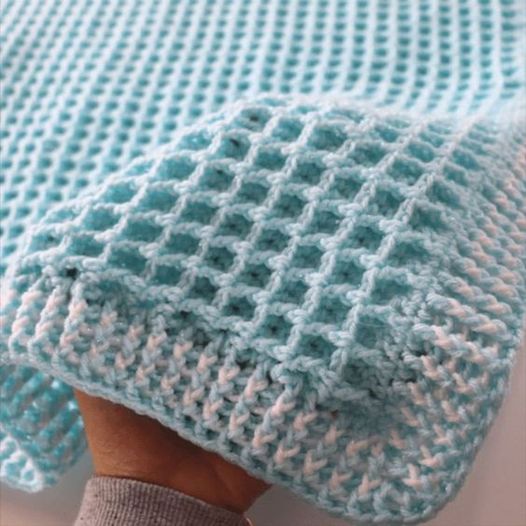
This stitch is incredibly versatile, eye-catching, and works beautifully in a variety of projects like blankets, dishcloths, scarves, and even garments. With a deep, plush look, the waffle stitch gets its name because it mimics the shape and texture of a breakfast waffle.
In this article, we will dive into a complete Waffle Stitch Crochet Tutorial, breaking it down into simple steps that anyone can follow.
We’ll also cover materials, pattern variations, and tips to avoid common mistakes. By the end of this guide, you’ll be ready to create stunning textured pieces that will impress and comfort.
Whether you’re just starting your crochet journey or looking for new inspiration, the Waffle Stitch Crochet Tutorial will bring something special to your craft. Let’s explore this delightful stitch and give your hooks something exciting to work on!
The waffle stitch is all about combining front post double crochets with regular double crochets to create that distinctive grid. The texture is raised and squishy, making it ideal for cozy projects. One of the great things about it is that it’s easy to memorize once you get the rhythm.
This stitch works best with yarns that highlight texture, like cotton or worsted weight yarn. You’ll also want a crochet hook that complements your yarn weight. Typically, a 5.0mm (H-8) hook works well for most yarns used with this stitch.
When learning the Waffle Stitch Crochet Tutorial, it’s helpful to start with a small swatch. This way, you can practice the technique without committing to a full project right away. Don’t worry if it looks uneven at first—like all stitches, it smooths out with consistency.
The stitch is built on a multiple of 3 plus 2 chains, which means you can easily adjust the size of your project. Want a larger blanket or a smaller dishcloth? Just follow the formula and you’re good to go.
Another plus of this stitch is its thickness. If you’re making something for warmth, like a winter scarf or baby blanket, the waffle stitch adds both texture and insulation. It creates a substantial fabric that feels satisfying and luxurious.
You’ll love that once you’ve got the hang of it, the stitch pattern becomes quite relaxing to work with. That makes this Waffle Stitch Crochet Tutorial a great way to unwind while still being productive.
To begin this Waffle Stitch Crochet Tutorial, you’ll need yarn, a compatible crochet hook, and a yarn needle for weaving in ends. Let’s get started with the basic steps that form the foundation of this cozy stitch.
First, chain a multiple of 3 plus 2. For example, chain 14 (which is 12 + 2). This will create a small square swatch perfect for practice. The extra 2 chains are for turning and starting the first row properly.
In the first row, make a double crochet (dc) in the third chain from the hook. Continue making a double crochet into each chain across. This row sets up your base for the waffle texture.
The second row is where the magic begins. Chain 2 and turn. Make one double crochet in the first stitch. Then, make one front post double crochet (fpdc) around the next stitch, one regular dc in the next two stitches. Repeat this pattern until the end of the row, ending with a dc.
For the third row, chain 2 and turn. Make a double crochet in the first stitch. Then, make two front post double crochets, one double crochet in the next stitch. Repeat the pattern to the end. This alternating row setup creates the grid effect that looks like a waffle.
Continue repeating rows 2 and 3 for the desired length. The texture will become more defined with each row. The key is consistency in your stitch height and tension.
Finish off your swatch with a final row of double crochets to keep the edge straight and clean. Then, fasten off and weave in your ends. Congratulations—you’ve completed your first sample from this Waffle Stitch Crochet Tutorial!
Once you’ve mastered the Waffle Stitch Crochet Tutorial, it opens the door to many creative possibilities. The thick, textured fabric is excellent for making warm and stylish home accessories and garments.
Waffle stitch blankets are a favorite among crocheters. They are cozy, weighty, and have a beautiful texture that adds interest without needing color changes. Choose soft yarn for a baby blanket or bulky yarn for a warm winter throw.
Dishcloths and washcloths are another great way to use this stitch. The raised texture makes them excellent for scrubbing, and they’re quick to make. They’re also perfect gifts for housewarmings or holidays.
You can also try scarves and cowls using the waffle stitch. These accessories look sophisticated and provide warmth and comfort. Use variegated yarns for a colorful twist or keep it neutral for a more classic look.
For something unique, use the stitch in garment panels. A waffle stitch vest or sweater can add a modern and stylish texture to your wardrobe. Just make sure to swatch and block accordingly to maintain shape.
Home décor items like pillow covers or rugs benefit from the dense structure of this stitch. They hold their shape well and provide a soft, tactile feel that’s ideal for cozy spaces.
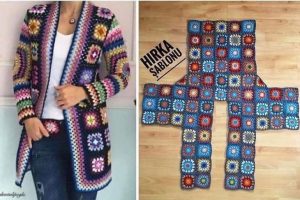
Finally, don’t hesitate to mix the waffle stitch with other patterns. Combining it with granny squares or simple stitches can result in a dynamic and exciting project that shows off your creativity and versatility.
Even the best Waffle Stitch Crochet Tutorial benefits from some insider tips. These tricks can save you time and improve your stitch quality, especially as you take on larger projects.
First, always count your stitches! Since the waffle pattern repeats over three stitches, it’s easy to accidentally skip or add one. Use stitch markers if needed to keep your rows even and symmetrical.
Blocking your project is essential, especially if the fabric curls at the edges. A gentle steam block or wet blocking method will help the waffle texture open up and settle into place beautifully.
Choose the right yarn. While the waffle stitch works with many types of yarn, it looks best in solid colors or lightly variegated yarns where the texture is the star. Avoid overly busy color patterns that may hide the texture.
Tension matters. If your stitches are too tight, the fabric will feel stiff instead of soft and plush. Practice until you find a comfortable, consistent tension that allows the waffle pattern to breathe.
Weaving in ends neatly is important, especially for wearable items. Because the fabric is thick, you can easily hide your yarn tails within the ridges. Just be sure to secure them well so they don’t slip out with wear.
Lastly, don’t give up if it looks uneven at first. With practice, you’ll gain confidence. The waffle stitch is forgiving and even a slightly imperfect piece will still look and feel wonderful once finished.
What is the waffle stitch best used for?
The waffle stitch is ideal for cozy projects like blankets, scarves, dishcloths, and textured garments. Its thick, plush nature makes it great for warmth and durability.
Is the waffle stitch good for beginners?
Yes! While it uses front post double crochets, it’s easy to learn with a little practice. This Waffle Stitch Crochet Tutorial breaks it down step-by-step for any level.
Can I use any yarn for waffle stitch projects?
You can use most yarns, but worsted or bulky weight yarns show off the texture best. Solid or lightly variegated colors help highlight the waffle effect.
Why is my waffle stitch curling?
Curling can happen due to tension or edge stitches. Make sure your turning chains are consistent and consider adding a border or blocking the piece to flatten it.
How do I keep track of the pattern?
Stitch markers and row counters are helpful, especially in larger projects. Repeating the stitch pattern aloud as you crochet can also help memorize the steps.
Can I mix the waffle stitch with other crochet patterns?
Absolutely! It pairs beautifully with simpler stitches or borders to create contrast and visual interest in larger projects.
Join our VIP broadcast list and gain access to exclusive patterns, all for free. As a VIP member, you’ll receive the best patterns daily, delivered directly to your device. ✨📱 It’s a unique opportunity to stay up-to-date with the latest trends and designs, curated just for you. Don’t miss out on enhancing your projects and discovering new inspirations with the best patterns every day! 🎨🔝
The Waffle Stitch Crochet Tutorial gives you everything you need to master this beautifully textured stitch. We explored how to create it, the materials needed, various projects to try, and essential tips to ensure your crochet journey is successful and enjoyable.
Whether you’re making a heartfelt gift or adding a new piece to your home, the waffle stitch brings warmth, elegance, and depth to your creations. It’s a rewarding stitch that’s as fun to work as it is stunning to look at.
We hope this guide has inspired you to give the waffle stitch a try! If you’ve followed this tutorial or have any tips of your own, leave a sincere comment below and share your thoughts. Your feedback helps us grow and keeps the crochet community thriving!


