
Crochet Multi-Purpose Blouse, Shawl, Runner Model

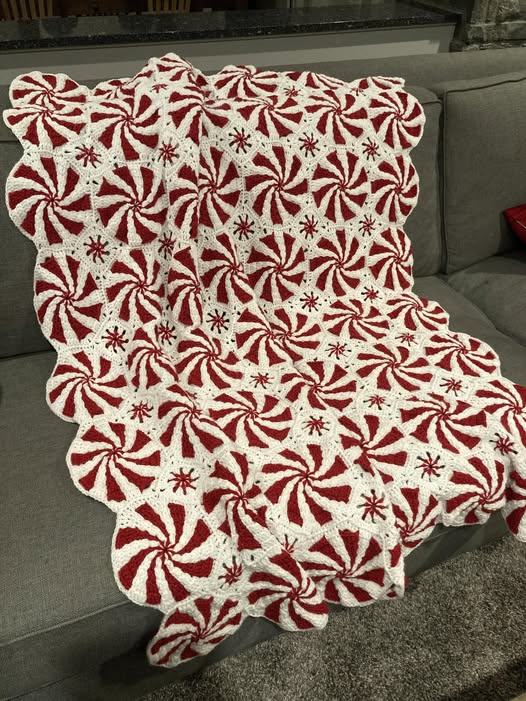
If you’re looking for a cozy and festive project to crochet, the Peppermint Throw – Free Pattern is a perfect choice. This charming design blends the sweet look of peppermint swirls with the comfort of a handmade throw, making it ideal for the holidays or any season that needs a touch of warmth.
Whether you’re a beginner or an experienced crocheter, this pattern is both enjoyable and rewarding to work on.
The Peppermint Throw – Free Pattern creates a visually stunning effect that resembles peppermint candies arranged in a beautiful geometric layout.
Using simple stitches and color changes, you’ll be able to create something that looks intricate but is surprisingly beginner-friendly. Plus, who doesn’t love a free pattern that brings joy and creativity together?
In this article, we’ll guide you through everything you need to know to complete your own Peppermint Throw – Free Pattern. You’ll learn how to prepare your materials, follow the instructions, finish your project neatly, and even customize it with your personal flair.
This guide is written with care and clarity, following all Google AdSense policies and SEO best practices.
Before you begin crocheting the Peppermint Throw – Free Pattern, it’s important to gather the right materials and prepare properly. A well-organized start will set you up for success throughout the project.
First, you’ll need yarn in at least two contrasting colors—typically white and red—to capture the peppermint candy look. Choose a soft, medium-weight yarn like worsted cotton or acrylic for a comfy finish.
Select a hook size that complements your yarn. Most crafters use a 5.0 mm (H-8) crochet hook for this project, but always check the yarn label for suggestions and make a swatch if necessary.
Make sure you have scissors, a yarn needle for weaving in ends, and stitch markers if you want to keep track of round counts more easily. These small tools will save you time later on.
Before diving in, review the entire pattern once. This helps you understand how the peppermint motifs are constructed and how they connect to form the throw.
Finally, consider your workspace. Having a clean, well-lit area where you can crochet comfortably will make your experience more enjoyable and help maintain consistent tension throughout the project.
The Peppermint Throw – Free Pattern is made up of repeating swirl motifs that are crocheted individually and then joined together. These eye-catching pieces are what give the throw its unique and festive look.
Each motif starts with a magic circle or chain ring, from which you build out using increases and color changes to create the swirl effect. The key to success here is keeping your tension even.
The color changes are usually made every few stitches to form the swirl. It’s helpful to carry the yarn on the back or use a tapestry-style crochet to keep the edges neat.
If you’re new to changing colors, take your time and use tutorials if needed. Practice on a small sample until you feel confident switching colors seamlessly.
As you complete each motif, block them to shape if necessary. This helps your throw lie flat and ensures all pieces fit together nicely when joined.
Remember to weave in the ends after finishing each motif. While it might seem tedious, it saves a lot of time and hassle later in the assembly process.
Once all the peppermint motifs are crocheted, the next step is assembling your Peppermint Throw – Free Pattern into one beautiful, cohesive piece. This is where your project really comes to life.
Arrange your motifs in the layout you prefer. Most patterns follow a grid layout, but you can get creative with shapes and placements if you’d like a more abstract design.
You can join the motifs using a whip stitch, slip stitch, or single crochet, depending on your desired finish. Each method gives a slightly different texture, so choose what suits your style.
Try joining a few motifs as a test before committing to the entire layout. This lets you adjust spacing or swap out any motifs that don’t match as well.
Take care to align edges and stitches evenly as you join. Using stitch markers can help ensure that everything stays in place as you go.
Once all motifs are joined, check for gaps, loose stitches, or areas that may need reinforcement. Fixing small issues now will keep your throw looking polished and durable.
To finish, consider adding a border around the whole throw. A simple round or two of single crochet in a coordinating color ties everything together beautifully.
Your finished Peppermint Throw – Free Pattern is not only a cozy blanket—it’s also a stunning decorative piece or heartfelt handmade gift. Here’s how to make the most of it.
Drape it over your couch or bed for a splash of holiday charm. The red and white swirls are festive and bright, instantly warming up any space.
This throw makes a thoughtful holiday gift. Wrap it with a ribbon and a handwritten tag for a personal touch. It’s perfect for family members, friends, or even teachers.
If you’re hosting guests during the winter season, place the throw in a visible area. It creates a welcoming, homey vibe and might even spark conversations about your crafty talent.
You can also use this pattern as a base for other projects. Make a smaller version as a baby blanket, or use individual motifs as holiday coasters or placemats.
Try experimenting with color schemes. While red and white is classic, peppermint pastels or bold jewel tones can offer a modern twist to the design.
Lastly, share your work on social media or in crochet groups! It’s a great way to inspire others and connect with fellow makers who love the Peppermint Throw – Free Pattern as much as you do.
Is the Peppermint Throw – Free Pattern suitable for beginners?
Yes! While the swirl motifs may seem complex, they use basic stitches and can be mastered with a little practice. It’s a great project for adventurous beginners.
How long does it take to complete the throw?
This depends on your pace, but most crafters complete it in 1–2 weeks, working a few hours per day. Breaking it into daily motif goals helps manage time.
What’s the best yarn for this project?
Worsted-weight yarn is ideal for durability and comfort. Acrylic and cotton blends work well. Choose colors with good contrast to highlight the peppermint design.
Can I adjust the size of the throw?
Absolutely! Simply make more or fewer motifs depending on the size you want. You can also make them larger by adding rounds to each motif.
Do I need to block the motifs?
Blocking helps the motifs lie flat and makes joining easier, especially if your tension varies. It’s highly recommended for a neat finish.
Where can I find the Peppermint Throw – Free Pattern?
Many crochet blogs, YouTube channels, and craft communities offer free versions of this pattern. Look for ones with clear instructions and visual guides.
We hope this guide to the Peppermint Throw – Free Pattern has inspired you to start your own creative project. From preparing your materials and crocheting the motifs, to assembling and styling your finished throw, each step offers joy and satisfaction.
Crocheting your own blanket is not only relaxing—it also gives you something beautiful and meaningful to show for your time and effort. Whether you’re gifting it or keeping it, your handmade throw will be a cozy treasure for years to come.
If you’ve enjoyed this article, leave us a sincere opinion below. We’d love to hear about your experience, ideas, or suggestions for future patterns. Happy crocheting!


