
Crochet Multi-Purpose Blouse, Shawl, Runner Model

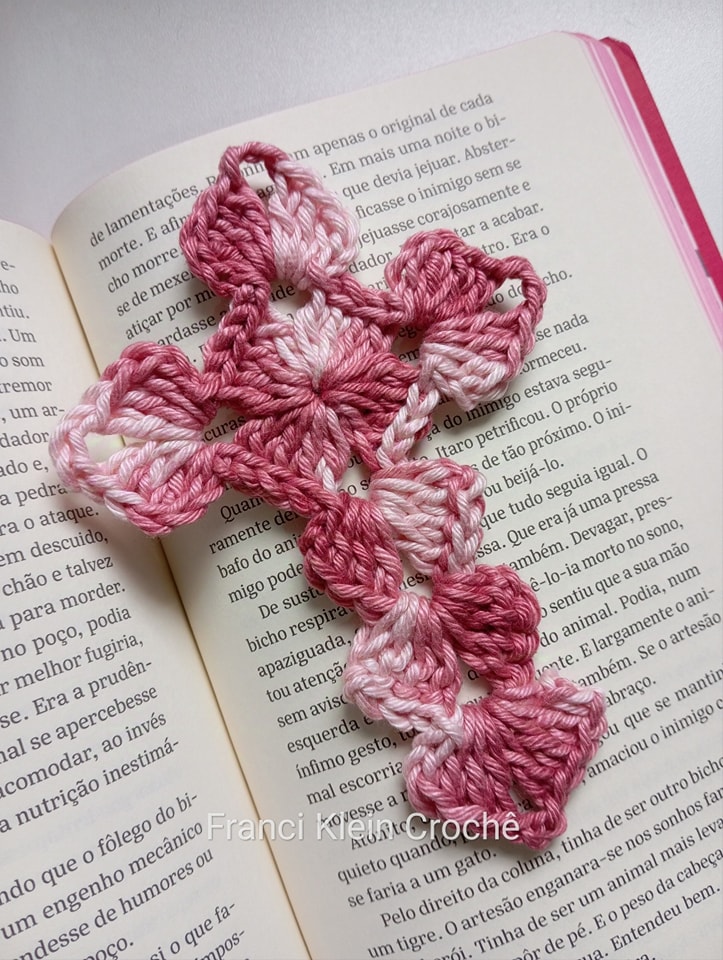
Creating a CROCHET CRUCIFIX FOR APPLICATION, BOOKMARK OR KEYCHAIN – STEP BY STEP is a beautiful way to combine your love for crochet with meaningful symbolism.
Whether you’re making it as a gift, a keepsake, or a decorative item, this crochet crucifix pattern is versatile, quick, and deeply personal. In this step-by-step guide, we’ll walk you through how to make your own delicate and charming crochet crucifix.
The crochet crucifix is perfect for multiple uses. You can use it as a religious embellishment on garments or blankets, a bookmark for your Bible, or a unique keychain that you carry daily.
These small yet detailed projects are also great for craft fairs or church events, making them a favorite among beginner and seasoned crocheters alike.
In this article, you’ll find detailed instructions to help you crochet your own crucifix from scratch. We’ll cover the necessary materials, tips for working the pattern, and how to adapt it for different uses.
Our step-by-step guide ensures you’ll be confident at every stage, even if you’re just starting your crochet journey.
To get started on your CROCHET CRUCIFIX FOR APPLICATION, BOOKMARK OR KEYCHAIN – STEP BY STEP project, you’ll need just a few simple materials. Choose a yarn that’s easy to handle, preferably cotton or another smooth fiber, as it helps highlight the stitches.
Small crochet hooks are ideal for this project, typically in sizes 1.5mm to 2.5mm, depending on your chosen yarn. Since the crucifix is a small project, even leftover yarn from previous works can be reused here, making it a budget-friendly creation.
For added structure, especially for bookmarks or keychains, consider using a light fabric stiffener or blocking your finished piece. This helps maintain the shape of the crucifix and gives it a polished finish.
You’ll also want to keep scissors, a yarn needle, and optional embellishments like beads or tassels close at hand. These extras can elevate your piece and personalize it even further.
Color choice can reflect your intentions—white and gold are traditional, but pastel or bright tones can make your crucifix more unique or thematic. Think about the final use when selecting your palette.
If you plan to gift or sell your pieces, attaching a keyring or ribbon can add a special touch and transform the piece from simple art to functional accessory.
Begin your CROCHET CRUCIFIX FOR APPLICATION, BOOKMARK OR KEYCHAIN – STEP BY STEP by chaining a foundation that creates the vertical part of the cross. This is typically a longer chain to serve as the base.
Once the chain is ready, use basic stitches such as single crochet or half-double crochet to build up the spine of the cross. Maintain tension and stitch count for a neat finish.
Next, you’ll create the horizontal arms of the crucifix. Skip a few stitches from the top and attach your yarn to one side. Chain outwards, then work back into the chain with matching stitches.
Repeat this process on the opposite side of the vertical base. Make sure both arms are symmetrical in length and position to achieve a balanced look.
Add final decorative details, like a picot edge or shell stitch border. These embellishments help define the shape and give a delicate feel to your finished piece.
Finish by weaving in all ends carefully and blocking the crucifix flat. At this stage, you can decide whether to stiffen it or leave it soft depending on the final purpose—application, bookmark, or keychain.
One of the joys of making a CROCHET CRUCIFIX FOR APPLICATION, BOOKMARK OR KEYCHAIN – STEP BY STEP is its versatility. With a few changes, your crochet crucifix can serve many different roles.
Attach a jump ring and lobster clasp to the top of the cross to make a unique and heartfelt keychain. It’s an ideal small gift with spiritual meaning that’s easy to carry everywhere.
As a bookmark, simply block the crucifix flat and consider adding a tassel or beaded end to the bottom. It will lay beautifully between pages without damaging them.
For garment or home decor applications, sew the finished cross onto pillows, tote bags, or church garments. Choose a matching thread and sew carefully to keep it secure and invisible.
You can also string a few crochet crucifixes onto garland and use them as festive decorations during holidays like Easter or Christmas. Add lights or beads for extra charm.
Try making miniature versions using thinner thread and hook sizes. These tiny crucifixes are perfect for card embellishments, rosaries, or small keepsake boxes.
Finally, pair your finished crucifix with a handwritten note or prayer card to create a thoughtful and personalized gift set for friends, family, or church members.
Personalizing your CROCHET CRUCIFIX FOR APPLICATION, BOOKMARK OR KEYCHAIN – STEP BY STEP can make it even more meaningful. Start by choosing colors that reflect the recipient’s personality or religious significance.
Adding initials or a small embroidered detail can make your project feel special and one-of-a-kind. Use embroidery thread to stitch a tiny symbol or name onto the back.
If gifting as part of a set, consider making a small pouch to match the crucifix. This can hold the bookmark or keychain and serve as a protective keepsake bag.
Use small tags or printed cards to describe the meaning behind your gift. These can include prayers, quotes, or dedication messages to personalize it further.
For church events or special occasions like baptisms, confirmations, or weddings, batch-make crucifixes and attach them to favor bags or invitation cards.
Lastly, wrap your finished crucifix in a soft tissue paper or organza bag. Presentation matters, and your handmade creation deserves to be gifted in a way that reflects its spiritual beauty.
What is the best yarn for a crochet crucifix?
Cotton yarn is highly recommended for its smooth texture and durability. Mercerized cotton gives a slight sheen and holds its shape well, making it perfect for bookmarks and keychains.
Can beginners make this crochet crucifix pattern?
Yes! The CROCHET CRUCIFIX FOR APPLICATION, BOOKMARK OR KEYCHAIN – STEP BY STEP guide uses basic stitches, making it beginner-friendly. Patience and attention to detail are more important than advanced skills.
How do I stiffen the crochet crucifix for a bookmark?
Use a light fabric stiffener or white glue diluted with water. Gently shape the crucifix and pin it onto a flat surface, letting it dry overnight.
Can I wash the crochet crucifix?
If made with cotton yarn, it’s washable by hand in cool water. Avoid rubbing or wringing to keep its shape. Dry flat on a towel to maintain structure.
How long does it take to crochet a crucifix?
Depending on your speed and experience, it usually takes 30–60 minutes to complete one piece. This makes it ideal for quick gifts or bulk projects.
Can I sell crochet crucifixes I make using this pattern?
Yes, handmade items are allowed for sale. However, be respectful if the original pattern was provided by a designer who requests credit when you sell.
In this tutorial, we learned how to make a CROCHET CRUCIFIX FOR APPLICATION, BOOKMARK OR KEYCHAIN – STEP BY STEP using simple stitches and thoughtful techniques. We explored different ways to use and personalize your crucifix, from keychains to bookmarks and beyond.
Whether you’re making this for yourself, gifting it to someone special, or preparing for a church event, this project is both spiritually meaningful and creatively satisfying. The best part? It’s quick, easy, and endlessly adaptable.
We hope you’ve enjoyed this guide! If you tried this pattern, we’d love to hear from you. Leave a sincere comment below with your thoughts, tips, or suggestions. Your feedback helps us create better content for the community. Happy crocheting!


