
Pie Carrier Sewing Pattern

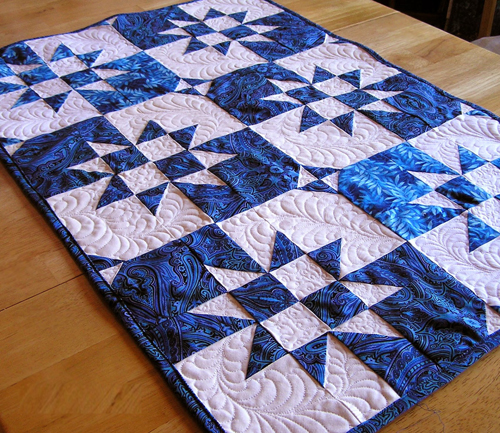
The Disappearing Hourglass Quilt is a stunning and versatile pattern that has become a favorite among quilters of all levels. From its unique visual effect to the endless color combinations you can use, this quilt block pattern is the perfect blend of tradition and creativity.
If you’re looking for a way to elevate your quilting skills while producing a piece that looks far more complex than it actually is, this is the pattern for you.
What makes the Disappearing Hourglass Quilt so special is how it transforms a classic block into something completely new.
By cleverly cutting and rearranging the traditional hourglass block, quilters can create beautiful and dynamic designs that look like advanced patchwork—but with simple techniques anyone can master.
It’s the kind of project that gets a lot of compliments and questions like, “How did you do that?”
Whether you’re sewing for fun, gifting a quilt to someone special, or entering a quilt show, the Disappearing Hourglass Quilt offers a chance to experiment with color, symmetry, and contrast in new ways.
Best of all, it’s a highly rewarding project that doesn’t require advanced skills, just a love for piecing and a willingness to try something fresh.
The Disappearing Hourglass Quilt is based on the classic hourglass block, which is made by joining two half-square triangles. After sewing the traditional block, quilters then cut the block into nine equal sections and rearrange those pieces to form a completely different design.
This “disappearing” method gives the illusion of complex piecing and intricate patchwork without the need for tiny seams or fussy techniques. It’s a brilliant approach that makes a big visual impact with minimal stress.
Quilters love this block because it’s easy to learn and incredibly versatile. You can use it to create a full quilt, a pillow cover, a table runner, or even as a central motif in a larger quilt design.
The Disappearing Hourglass Quilt is also a wonderful stash buster. You can make it with pre-cuts like charm packs or layer cakes, or simply dive into your scrap basket and mix prints and solids for a scrappy, modern effect.
Color placement plays a big role in how the final quilt looks. High contrast fabrics make the shapes pop, while low contrast gives a softer, more blended result. That flexibility makes this a favorite for experimenting with new fabric combinations.
Even if you’re a beginner, the disappearing hourglass block is approachable. With just a few cuts and a little rearranging, you’ll be amazed at what you can create. It’s also a great block to make in batches if you enjoy chain piecing.
To start making the Disappearing Hourglass Quilt, begin with two contrasting squares of fabric. These will form the basis of your hourglass block. Most quilters use 10-inch squares, but you can adjust based on your preferred block size.
First, place the squares right sides together and sew a quarter-inch seam around all four sides of the square. This is a quick and efficient way to prepare your block for the hourglass cut.
Next, cut the sewn square diagonally from corner to corner, both ways. You’ll end up with four triangle units. Press them open and trim to square them up—these now form your hourglass units.
Now arrange the units so the light and dark sides create the traditional hourglass pattern. Sew them together to make one large hourglass block, then press your seams.
Once you have a full hourglass block, it’s time for the magic: cut the block into nine equal parts using vertical and horizontal cuts. Typically, these cuts are made about 1.5 inches from each edge, depending on the size of your block.
Rearrange the nine pieces into a new layout. This is where creativity kicks in. You can rotate center or corner blocks to create a new visual pattern. When you’re satisfied, sew the pieces back together row by row.
One of the best things about the Disappearing Hourglass Quilt is the creative freedom it offers. By simply turning or flipping pieces before reassembling the block, you can produce entirely new designs—even from the same original layout.
Some quilters keep the center square in place and only rotate the corner and side pieces. Others switch the center with a corner or rotate the center for a pinwheel effect. Each method creates a slightly different, equally striking design.
Playing with color and fabric contrast is a huge part of the appeal. Bold colors and dark-light pairings can give your quilt a graphic, modern look, while soft pastels or florals result in a romantic, vintage style.
For a truly cohesive quilt, use a limited palette of two or three coordinating colors. If you’re going for a scrappy look, keep one element consistent—such as a white background—to tie everything together.
Repeating the same layout for every block creates a clean and symmetrical quilt. But if you like an eclectic look, try using several different block layouts in one quilt top.
Borders and sashing can add another layer of design. A thin sashing between blocks helps each design stand out, while a border frames the quilt and gives it a finished appearance.
When quilting the final project, echoing the shapes within the blocks adds texture and enhances the visual movement created by the disappearing hourglass effect. Free-motion quilting, straight-line quilting, or custom motifs all work beautifully here.
For best results with your Disappearing Hourglass Quilt, start with accurate cutting and pressing. Since the block involves multiple small pieces, even slight inaccuracies can add up. Take your time with trimming and seam alignment.
Using starch or fabric stabilizer before cutting can help minimize stretching or distortion, especially when working with bias edges after cutting the block into nine sections.
Chain piecing can speed up the process if you’re making multiple blocks. Prepare several hourglass units in advance and then batch your cutting and piecing steps.
Press seams carefully after each step. Pressing to the dark side or open, depending on the block, will help reduce bulk and allow for cleaner joins.
Consider labeling your cut pieces before rearranging them. This makes the sewing process smoother and avoids mistakes during assembly.
If you’re new to quilting, start with a small project—like a wall hanging or table runner—to practice the technique. Once you’re comfortable, you can scale up to a full-size quilt with confidence.
What size should my starting squares be?
Most quilters use 10″ squares for simplicity, especially if working with layer cakes. You can adjust the size as needed, just remember your cuts will scale accordingly.
Is this pattern beginner-friendly?
Yes! It looks complex but is based on simple techniques like sewing straight seams, cutting, and reassembling. It’s perfect for confident beginners.
Do I need special tools?
Not at all. A rotary cutter, ruler, and cutting mat are helpful, but no specialty tools are required. Precision is more important than anything fancy.
Can I use scraps?
Absolutely. Scraps work wonderfully, especially if you add a consistent background fabric to unify the blocks.
How should I quilt the finished top?
You can use straight lines that follow the block shapes, or get creative with custom quilting that highlights the disappearing effect.
Can I make other quilt items with this block?
Yes! It’s great for pillows, table runners, bags, and more. Once you learn the block, the possibilities are endless.
The Disappearing Hourglass Quilt offers a fresh, modern twist on traditional patchwork. It’s a rewarding and creative project that allows quilters to explore design, color, and layout in new and exciting ways. From its beginner-friendly construction to its dramatic finished look, this quilt pattern is a must-try.
If this tutorial inspired you, please leave your honest opinion and share any suggestions or tips in the comments. We’d love to see how your version of the Disappearing Hourglass Quilt turned out!


