
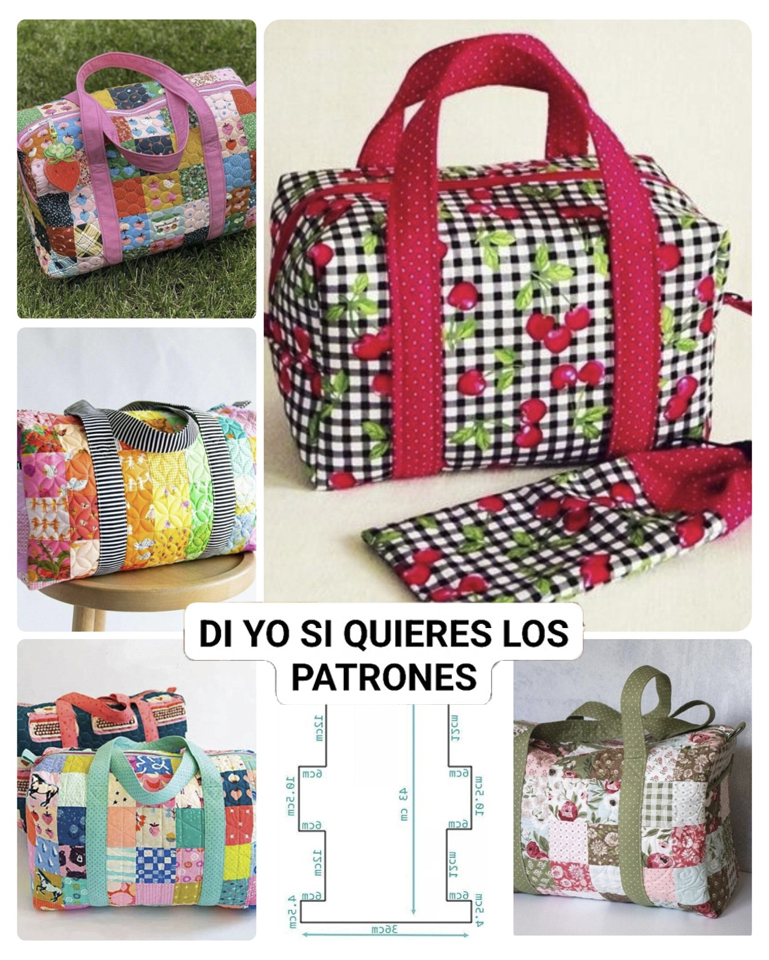
Pie Carrier Sewing Pattern

How to Make Travel Bags – free tutorial is the perfect guide for anyone who loves to travel and wants to create a personalized, functional, and stylish accessory.
Whether you’re planning a weekend getaway or an international adventure, having the right travel bag makes all the difference. And what could be better than a bag made by your own hands?
In this article, we’ll walk you through how to make travel bags, offering a complete free tutorial that is beginner-friendly but also enjoyable for experienced sewists.
The joy of crafting something practical with your own creativity brings a sense of accomplishment—and you’ll always carry a piece of that joy wherever you go.
Keep reading as we explore each step in the process, from choosing the best fabric to adding clever compartments. This tutorial is designed to help you build something that’s both durable and stylish. Let’s get into the heart of how to make travel bags – free tutorial and discover just how rewarding it can be.
The first step in how to make travel bags is selecting the right materials. Your choice of fabric determines the bag’s durability, flexibility, and appearance. For travel, it’s best to choose fabrics like canvas, denim, or nylon because they’re sturdy and resistant to wear and tear.
You’ll also need to think about the lining. A waterproof lining can be very practical, especially for travel items that might be exposed to different weather conditions. Look for options like PUL or coated cotton.
Don’t forget the hardware. Zippers, buckles, D-rings, and straps can add both function and flair to your bag. Opt for strong metal components rather than plastic ones when possible.
Stabilizers are also important for structure. Fusible interfacing or foam will give your travel bag that professional, sturdy shape that helps it hold up to frequent use.
Finally, think about your thread. Strong polyester thread works well for travel bags because it can handle weight and tension without snapping.
Gathering high-quality supplies sets the tone for a successful project. It’s a big part of creating a bag that will last trip after trip.
Once you’ve chosen your materials, it’s time to cut and prepare them. Use a pattern or create your own based on the size and style of travel bag you want. Common dimensions are around 18” x 12” x 8” for a weekender-style bag.
Lay your fabric flat and secure it with pins or weights. Use a rotary cutter and cutting mat for clean, accurate cuts. This step is essential in the how to make travel bags – free tutorial journey because precision will affect how everything lines up during sewing.
Don’t forget to cut out pieces for inner pockets, handles, and the bottom panel. Some people also add padding to the bottom to protect what’s inside.
Mark all your sewing lines using a washable fabric marker. Take your time in this phase—it’s better to double-check your measurements now than to fix mistakes later.
If you’re using interfacing or stabilizer, apply it according to the product instructions. This step adds body and durability to your travel bag.
Organizing your fabric pieces before sewing ensures a smoother, more enjoyable construction process. You’ll thank yourself later for keeping everything in order!
Now it’s time to sew! Start by putting together any interior elements first. Sew in your pockets and zippers where needed. This is a great way to add organization to your travel bag without adding bulk.
Next, join the main body pieces together. Always use a 1/4” to 1/2” seam allowance depending on your pattern. Be sure to backstitch at the start and end of every seam for added strength.
Sew the lining separately before attaching it to the main outer fabric. Turn the bag inside out to align everything and get a clean finish. This part of the how to make travel bags – free tutorial is where you’ll really see the project take shape.
Reinforce any stress points, especially where handles and straps are attached. Double stitching or even a small X-pattern can help the straps bear more weight.
Add closures like zippers or magnetic snaps. This step can be a little tricky, so take it slow and pin everything in place before stitching.
Finally, topstitch around the edges to give your travel bag a polished, finished look. It also strengthens the seams and helps the bag keep its shape.
One of the best parts about making your own travel bag is the customization. You can personalize it with fabric choices, monograms, or fun accents that reflect your personality.
Add extra compartments if you like to keep your items organized. Interior zip pockets, mesh compartments, or even a shoe divider can be incredibly helpful while traveling.
Decorative stitching or applique can give your travel bag a creative edge. Don’t be afraid to experiment with color or patterns to make your bag truly unique.
Consider adding a key leash or hidden pocket for valuables. These thoughtful details can make your travel bag even more useful and enjoyable to use.
Adjustable shoulder straps or padded handles are practical upgrades that can enhance comfort. When you’re carrying your bag through airports or train stations, every detail counts.
Once everything is sewn and secure, give your bag a good press with an iron. This will help it look crisp and professional—like something you’d buy in a store!
What fabric is best for making travel bags?
Sturdy fabrics like canvas, denim, and nylon are best. They offer durability and are ideal for frequent use.
Can I sew a travel bag without a sewing machine?
It’s possible but more challenging. A sewing machine speeds up the process and gives stronger, cleaner results.
How long does it take to make a travel bag?
Depending on the complexity, it may take 4–8 hours for a beginner. With more experience, you’ll work faster.
What tools do I need for this project?
You’ll need scissors or a rotary cutter, sewing pins, fabric, thread, a sewing machine, zippers, and straps.
Can I wash a handmade travel bag?
Yes, but make sure your fabric and lining are washable. Air drying is usually recommended to preserve shape.
Is this project beginner-friendly?
Yes! This how to make travel bags – free tutorial is designed to be accessible, even for beginners with basic sewing knowledge.
Learning how to make travel bags – free tutorial is more than just a fun craft—it’s a practical way to create something beautiful and useful. We covered how to choose materials, cut and prepare fabric, assemble the bag, and add finishing touches to make your project shine.
Whether you’re new to sewing or already love making things by hand, crafting your own travel bag is a satisfying and worthwhile endeavor. Plus, nothing beats the feeling of carrying a bag you made yourself.
We’d love to hear your thoughts! Leave a sincere opinion in the comments, share your experience, or suggest what you’d like to see in future tutorials. Your feedback helps us grow and create even better content just for you.


