
Crochet Multi-Purpose Blouse, Shawl, Runner Model

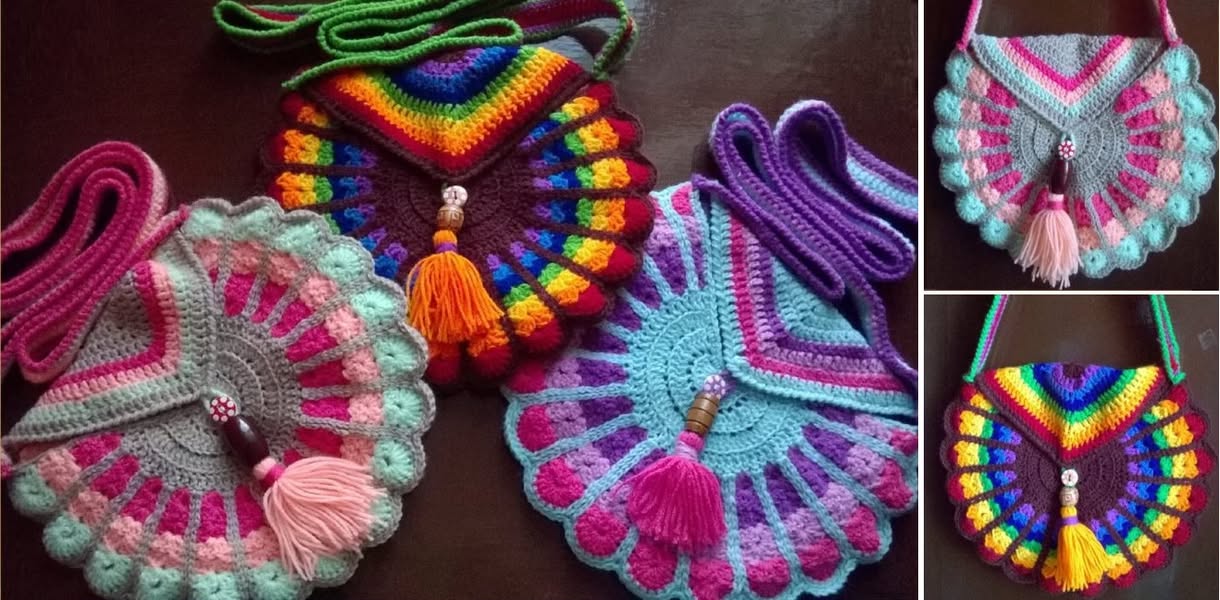
The Crochet Peacock Bag is a stunning handmade accessory that blends artistry and function in one delightful project. Inspired by the majestic beauty of peacock feathers, this bag captures attention with its vibrant colors, elegant design, and charming handmade appeal.
Whether you’re looking to add a statement piece to your wardrobe or create a thoughtful gift, the Crochet Peacock Bag offers a perfect mix of creativity and practicality.
Creating your own Crochet Peacock Bag is a rewarding experience. The detailed design, which often features fan or feather motifs, makes this a fun and slightly challenging project for intermediate crocheters.
Yet with a good pattern and clear steps, even confident beginners can achieve stunning results. It’s not just about crochet—it’s about bringing something magical and artistic to life with your hands.
In this article, we’ll guide you through every aspect of making a Crochet Peacock Bag. From choosing the right materials and mastering the feather-like pattern, to customizing it with colors and embellishments, you’ll find everything you need to create your own masterpiece. Let’s dive into the details of this eye-catching project.
Before starting your Crochet Peacock Bag, having the right materials will set you up for success. Quality tools and yarn make a difference in the outcome and durability of the bag.
Start by choosing a medium to heavy-weight yarn. Cotton yarn is a great option for structure and durability, while acrylic yarn offers a broad range of colors and softness. For a more luxurious feel, consider a cotton-bamboo blend.
You’ll need a crochet hook that matches your yarn weight—typically 4.0mm to 5.5mm. Using a slightly smaller hook than recommended will give your stitches a tighter, more defined texture, which is ideal for bags.
Consider adding a fabric lining inside your bag to help it hold its shape and to prevent items from poking through the stitches. Lining also gives a polished, professional finish.
Don’t forget accessories like a button or zipper for closure. Magnetic snaps are a popular choice and are easy to install.
Handles are also important. You can crochet them, use leather straps, or purchase pre-made handles to attach. Make sure they are sturdy enough to support the weight of the bag.
Lastly, gather your tapestry needle and stitch markers. These tools will help with finishing, joining parts, and keeping your pattern on track.
The most iconic feature of the Crochet Peacock Bag is the feather motif. This eye-catching design can be created using fan stitches, shell patterns, or layered textures that resemble a peacock’s plumage.
To create the feather shape, you’ll typically work in rounds or semi-circular motifs that use increases and layered colors. Vibrant jewel tones like teal, emerald, gold, and purple are popular to reflect the true peacock palette.
Fan stitches and puff stitches give depth to the feathers. These stitches not only create texture but also help simulate the layered look of real feathers.
Color changes play a big role in achieving the peacock effect. Work in rows or motifs with multiple colors to make each feather segment stand out. Consider carrying the yarn or using the tapestry method to switch colors cleanly.
You can work the feather motifs as individual pieces and then sew them onto a plain bag base, or incorporate them directly into the bag’s body as part of a repeating pattern.
Blocking your feather motifs helps even out the stitches and shapes. Pin them into the correct form and lightly steam or wet-block to set them before joining.
Don’t forget to weave in your ends carefully. With so many color changes, a tidy finish will make the bag look neat and professional.
Once the feather motifs or main body is complete, it’s time to assemble and shape your Crochet Peacock Bag. This step ensures the bag is both beautiful and functional.
Start by forming the base. Some patterns use a flat oval or rectangular bottom to give the bag structure. Use single crochet or tight half double crochet stitches to keep the foundation firm.
Join the sides of the bag by crocheting in the round or sewing separate panels together. Reinforce the seams with tight stitching so the bag can hold items securely.
If you’ve made feather appliqués separately, now is the time to attach them. Use a whipstitch or mattress stitch to secure them to the bag’s surface.
Next, consider the lining. Cut a piece of fabric to match the dimensions of your bag, fold and sew the edges, and attach it inside using fabric glue or a hand-sewn whipstitch.
Handles come next. If using crocheted straps, double them up for strength. For leather or wood handles, use reinforced stitch loops or metal rings to attach them securely.
Lastly, add any finishing touches like closures, tassels, or beads. These small details enhance the elegance and complete the Crochet Peacock Bag look.
What makes the Crochet Peacock Bag so special is how customizable it is. You can easily make it your own by adjusting colors, sizes, and embellishments.
Color choice is key. While traditional peacock colors are beautiful, don’t be afraid to experiment with pastels, monochromes, or even ombré effects for a modern twist.
Want a boho vibe? Add fringe along the bottom edge. A few extra rows of yarn tied and brushed out can give your bag a relaxed, festival-ready style.
Change the bag’s size by adding or reducing rows in the base and body. A small clutch version is perfect for evenings, while a large tote is ideal for shopping or the beach.
Add personal flair with appliqués, initials, or even embroidery. These elements make the bag unique and meaningful, especially if gifting it to someone special.
For those who love sparkle, consider using metallic threads or beads in the feather details. A little shimmer can take your bag from daywear to evening-ready.
Even the strap style can vary. Try a crossbody strap, a double handle, or a drawstring top to change the entire silhouette and function of your bag.
Is the Crochet Peacock Bag pattern suitable for beginners?
This project is best for intermediate crocheters, but confident beginners can follow along with patience and attention to detail.
What’s the best yarn type for the Crochet Peacock Bag?
Cotton or cotton blends are ideal due to their durability and stitch definition. You can also use acrylic for a softer feel or mix yarns for texture.
How long does it take to complete a Crochet Peacock Bag?
It varies by experience level and pattern complexity, but generally 10–15 hours spread over a few days.
Can I wash the Crochet Peacock Bag?
Yes, but it’s best to hand wash and air dry, especially if it includes multiple colors or embellishments.
Should I line the bag?
Lining is optional but highly recommended. It adds strength, prevents stretching, and helps keep the bag’s shape over time.
Can I sell bags made from this pattern?
Yes, most free patterns allow selling finished items, but check the designer’s policy and always give credit if required.
The Crochet Peacock Bag is not just a fun project—it’s a work of wearable art. With its bold design, creative stitches, and customizable features, this bag stands out wherever you take it. It’s a joyful blend of color, texture, and craftsmanship that every crochet enthusiast should try at least once.
Throughout this guide, we covered everything from materials and feather motif techniques to customization ideas and detailed finishing steps. With the right approach and a little patience, you’ll be amazed at what you can create.
Now it’s your turn! If you enjoyed this article, let us know in the comments. Share your experience, questions, or suggestions—your input helps us grow and inspire more creators like you. We can’t wait to see your version of the Crochet Peacock Bag!


