
Crochet Multi-Purpose Blouse, Shawl, Runner Model

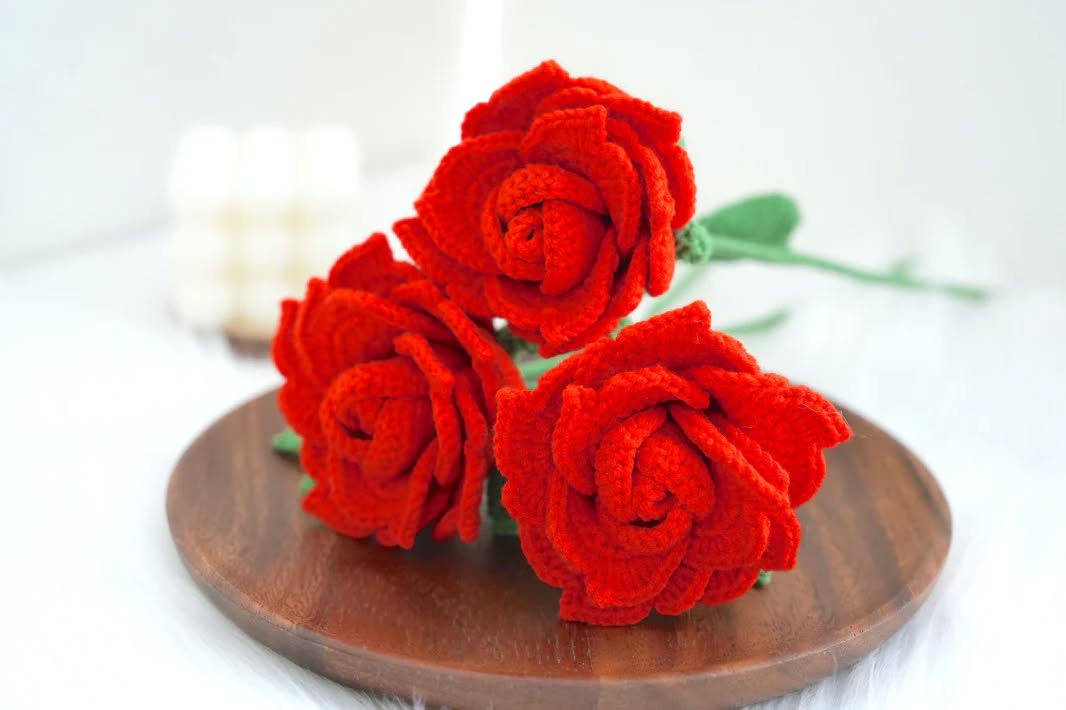
If you’re looking to add a romantic and timeless piece to your crochet collection, this Crochet Rouge Rose Pattern Free guide is the perfect starting point. Roses have always symbolized beauty, love, and care, and creating one with your own hands adds an even deeper meaning to this classic flower.
This pattern is ideal for crocheters who want to explore floral designs, whether to use as home décor, a thoughtful gift, or a personal project.
The Crochet Rouge Rose Pattern Free is not only charming but also versatile. With just a few stitches and a bit of patience, you can craft a lifelike rose in rich red tones that will never wilt.
The final result can be used in countless creative ways—attached to headbands, brooches, garlands, or centerpieces. Because it’s handmade, every rose you create carries your personal touch, making it truly one-of-a-kind.
In this tutorial, we’ll walk through every step of the process, from choosing yarn and tools to forming petals and assembling your rose.
The article is written in a friendly and humanized tone while being fully optimized for SEO and compliant with Google AdSense content policies. Let’s bring this flower to life!
To begin your Crochet Rouge Rose Pattern Free, gather your materials so you’re fully prepared before starting the project.
Choose a soft, worsted-weight yarn in shades of red or burgundy to replicate the natural color of a rose. Acrylic yarn is an affordable option, while cotton yarn offers excellent stitch definition.
A 3.5 mm to 4 mm crochet hook is typically recommended for floral patterns. This hook size helps keep the petals firm and structured while still easy to shape.
You’ll also need a yarn needle for weaving in ends, sharp scissors for trimming, and floral wire if you plan to create a stemmed version of the rose.
For more decorative roses, consider using metallic thread to highlight the edges of the petals or combining different shades of red for depth and contrast.
If you’re making the rose into an accessory, you might need glue, brooch pins, or headband bases, depending on how you intend to display your finished piece.
Having everything on hand before you begin ensures you can follow the pattern smoothly and enjoy each step without interruption.
The magic of the Crochet Rouge Rose Pattern Free lies in its petals. Their layered appearance creates a natural and realistic rose shape that blossoms beautifully.
Start with a chain of around 40 to 60 stitches, depending on the desired rose size. This chain will be the base for your rose petals.
Work in the second row by using a combination of single crochets, half double crochets, and double crochets to form different-sized petals across the chain.
Each petal is made by increasing and decreasing stitches gradually. For example, a small petal may be [sc, hdc, dc, hdc, sc], while a larger petal might extend into triple crochets.
Continue along the chain, alternating petal sizes to make the final rose look more natural. Don’t worry if the pattern seems repetitive—it’s building toward a beautiful result.
Once you finish the petal row, gently roll the entire strip into a spiral, starting with the smaller petals at the center. Secure the base with stitches or glue.
Take your time shaping the rose, spreading out the petals as you roll. The more you arrange and fluff the petals, the more lifelike and elegant your flower will appear.
Every rose deserves its leaves, and this Crochet Rouge Rose Pattern Free wouldn’t be complete without them. Adding leaves enhances the realism and provides balance to your design.
To crochet a simple leaf, begin with a chain of 10 to 12 stitches. Work up one side of the chain with single and double crochets, increasing in the middle for a pointed tip.
Turn and mirror the stitch pattern on the opposite side to create an oval shape with a gentle point. This gives the leaf a natural look, ready for placement.
Make two or three leaves for each rose to add dimension. These can be sewn to the base of the rose or attached with floral wire if you’re making a bouquet.
If you’d like to make a stemmed rose, wrap green floral tape around a piece of floral wire and attach it to the base of the rose. Add leaves along the wire as you wrap.
This type of rose is perfect for arrangements and vases, and unlike real flowers, it will last forever and never require water.
You can also crochet multiple leaves in different shades of green for a more realistic bouquet or even create a rosebud version by reducing the petal strip size.
Once your Crochet Rouge Rose Pattern Free project is complete, you’ll find countless ways to use and display your handcrafted rose.
Attach a finished rose to a hair clip or barrette to create a unique floral accessory. These make beautiful handmade gifts for birthdays, weddings, or Valentine’s Day.
Use a group of crocheted roses to make a romantic garland. Hang them across windows, headboards, or wedding arches for a cozy and elegant atmosphere.
Add roses to crochet blankets, scarves, or bags as embellishments. Just a few small roses can transform an ordinary piece into something magical.
Frame your finished rose in a shadow box or embroidery hoop and hang it as wall art. This is a great idea for showcasing your work in craft fairs or as gifts.
Consider creating themed color sets—red for love, pink for friendship, and white for purity. These are ideal for special events and personal celebrations.
Whatever you decide, your handcrafted rose will surely bring joy and admiration from anyone who sees it.
1. Is the Crochet Rouge Rose Pattern Free suitable for beginners?
Yes! While it includes shaping and layering, the stitches involved are mostly basic. Beginners can follow the instructions with patience and practice.
2. How long does it take to make one crochet rose?
A single rose can be completed in 1 to 2 hours, depending on the size and your crochet speed. With practice, the process becomes even faster.
3. Can I use different yarn types or sizes?
Absolutely. Just remember that yarn type and hook size will affect the final rose size and texture. Cotton yarn gives more structure, while acrylic offers more flexibility.
4. Can I wash crocheted roses?
It’s best to spot-clean them with a damp cloth, especially if you’ve added wire or embellishments. If made entirely from yarn, gentle hand washing is fine.
5. Can I sell roses made from this pattern?
Yes, you can sell your finished crochet roses. Be sure to credit the source if required, and always add a handmade label for authenticity.
6. What if my petals don’t look even or are curling too much?
Try blocking the petals lightly or adjusting your tension. Curling can often be fixed by reshaping or using a bit of steam.
The Crochet Rouge Rose Pattern Free is a rewarding project that combines beauty, creativity, and craft in a timeless design. With just a few tools and some yarn, you can create a stunning flower that adds elegance to any setting or gift.
We explored everything from materials and petal construction to adding leaves and finding creative uses for your roses. Whether you’re crafting one bloom or a bouquet, this pattern helps you create something special and lasting.
If this guide helped you or inspired your next crochet project, please leave your honest opinion and suggestions in the comments below. Your feedback makes this creative space even better, and we can’t wait to see your beautiful roses bloom!


