
Crochet Multi-Purpose Blouse, Shawl, Runner Model

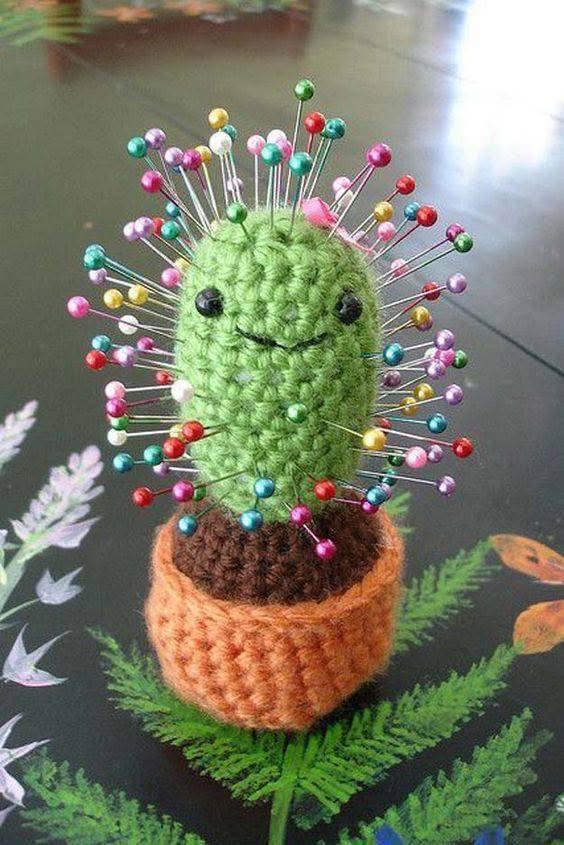
If you’re looking for a fun and creative project, this Crochet Cactus to Put on Pin – Pattern is the perfect choice. This cute and compact cactus is not only decorative but also a charming way to personalize your pins, jackets, backpacks, or even bulletin boards.
It’s quick to make, beginner-friendly, and a fantastic way to use up your yarn scraps while crafting something that brings a smile.
The Crochet Cactus to Put on Pin – Pattern is designed with simplicity in mind. You don’t need to be an expert crocheter to bring this project to life.
With just a few basic stitches and minimal sewing, you can create a tiny cactus that looks adorable and can be customized with different pot colors, flower embellishments, and even facial expressions if desired.
Throughout this tutorial, we’ll go step by step through the materials, the crochet instructions, customization options, and practical tips to help your cactus pin come out perfectly every time. Whether you’re making these as gifts, for craft fairs, or just to decorate your own collection, this project is sure to become a favorite.
To begin your Crochet Cactus to Put on Pin – Pattern, you’ll need only a small selection of materials, many of which you may already have in your crochet stash.
Start with some worsted weight or cotton yarn. You’ll need green for the cactus, brown or terra cotta for the pot, and optionally, pink or yellow for a small flower embellishment.
Use a crochet hook that suits your yarn size—usually between 2.5 mm and 3.5 mm. The goal is to create tight stitches so the stuffing doesn’t show through your work.
You’ll also need a small amount of fiberfill stuffing to give the cactus its plush shape. Don’t overstuff; just enough to give form and structure.
A yarn needle is essential for sewing the cactus parts together and weaving in ends. Choose one with a blunt tip and wide eye for easy use.
For the pin backing, use a flat metal brooch pin or safety pin. These can be found at any craft store and can be hot-glued or sewn to the back of your finished piece.
Lastly, scissors, stitch markers (if desired), and a touch of fabric glue (optional) for securing small parts will make the crafting process smoother and more enjoyable.
Now that you have your supplies, it’s time to dive into the actual creation of your Crochet Cactus to Put on Pin – Pattern. This section provides a simple breakdown of each piece and how to assemble them.
Start by making the cactus body. Using green yarn, chain 2, then work 6 single crochets (sc) into the second chain from the hook. Continue working in rounds, increasing evenly until you have 18 to 24 stitches around, depending on how big you want your cactus.
Next, crochet even rounds without increasing to build the cactus height. Usually, 6–8 rounds are enough to give it a cylinder-like shape. Fasten off and stuff lightly with fiberfill.
For the base, switch to brown yarn and repeat the beginning steps to create a small round. Once you reach the width of your cactus bottom, crochet one or two rows without increasing to make a shallow “pot.” Do not stuff this piece.
To assemble, sew the cactus body to the center of the pot base using the yarn needle and matching yarn. Make sure it’s centered and secure.
If you’re adding a flower, use pink yarn and create a tiny rosette by chaining 12, working single crochets across, then rolling it into a spiral and stitching the base. Sew it to the top of the cactus.
Finally, attach your pin backing to the pot using strong fabric glue or sewing thread. Make sure it’s positioned to allow the cactus to sit upright when worn or pinned.
The charm of the Crochet Cactus to Put on Pin – Pattern lies in how easily it can be personalized. These little accessories can reflect your unique style or be adapted to seasonal themes.
Try different shades of green for your cactus—sage, emerald, mint, or even variegated yarns—for a whimsical touch. Each change gives a different personality to your pin.
For the pot, go bold with colors like mustard yellow, deep red, or even striped combinations. It’s a fun way to use up yarn scraps and match your cactus to outfits or bags.
Add embellishments like mini pom-poms, seed beads as “spines,” or embroidery details to give your cactus more texture and visual interest.
You can also shape the cactus differently—make two arms to form a saguaro, or create a round ball-style cactus with a flower on top for a blooming effect.
Consider turning your cactus into a keychain or zipper pull by attaching a keyring instead of a pin. This expands its use and makes for excellent gifts.
Personal touches like little faces (using embroidery floss for eyes and a smile) turn your cactus into a kawaii-style accessory that’s sure to be loved by kids and adults alike.
Even with an easy pattern like the Crochet Cactus to Put on Pin – Pattern, small errors can happen. Let’s go over a few tips to ensure your crafting process is smooth and enjoyable.
If your cactus looks lopsided, double-check your stitch count. Inconsistent increases or skipping stitches can alter the shape. Always count before finishing each round.
Use tight tension when crocheting the cactus body. Loose stitches can let stuffing peek through, while too tight stitches might make sewing difficult. Find a balanced grip.
When attaching the flower or other embellishments, sew them securely to avoid them coming off with regular use. Avoid just gluing them—stitching is safer for wearables.
Make sure your pin backing is flat and well-positioned. If it’s too low or too high, the cactus may tilt when worn. A center-back placement typically works best.
Block your cactus lightly if the shape needs adjusting. Pin it down and steam gently to reshape without flattening it completely.
Always weave in your yarn ends neatly and securely. This not only gives a polished finish but ensures your creation withstands handling and wear over time.
Q: Is this pattern suitable for absolute beginners?
A: Yes! This Crochet Cactus to Put on Pin – Pattern uses basic stitches like single crochet and is small enough to finish in one sitting, making it ideal for beginners.
Q: Can I wash my crochet cactus pin?
A: Spot cleaning is best. Since the pin may be metal and glued, submerging it in water isn’t recommended. Use a damp cloth to gently clean.
Q: How do I make a larger version of the cactus?
A: Add more increase rounds at the base and more height rounds before shaping the top. Just maintain the same stitch pattern throughout.
Q: What other items can I make with this pattern?
A: You can turn it into keychains, magnets, plant markers, or use them as party favors and handmade gifts.
Q: How do I attach the pin securely?
A: Use a strong fabric or craft glue and let it cure completely. For added security, sew it with strong thread through the pinholes.
Q: Can I sell items made with this pattern?
A: Yes, handmade items made using this pattern can typically be sold. If you’re using someone else’s design, just be sure to give proper credit if required.
The Crochet Cactus to Put on Pin – Pattern is a delightful and simple project that brings joy to any crocheter’s day. With just a few materials and some creativity, you can craft a cute, colorful cactus that adds personality and charm wherever it goes. Whether you’re making one for yourself or as a gift, this project offers endless fun and customization options.
We’ve covered all the essentials in this article—from gathering your tools, following the step-by-step crochet instructions, adding your own unique flair, to troubleshooting common issues. Now it’s your turn to grab your hook and give it a try!
We’d love to hear from you. Did you enjoy making your cactus pin? Do you have ideas or suggestions to share with the community? Leave your honest feedback in the comments and tell us what kind of patterns you’d love to see next!


