
Crochet Multi-Purpose Blouse, Shawl, Runner Model

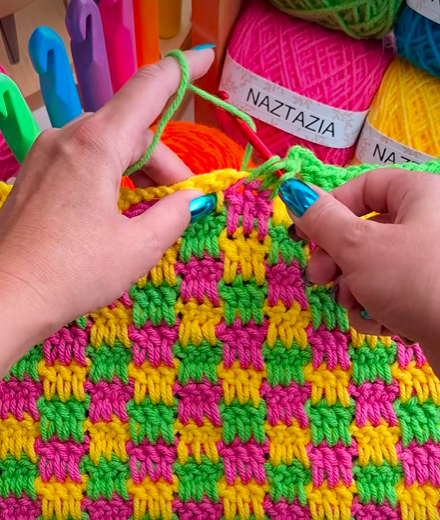
If you’re looking for a fresh and stylish pattern to add to your crochet projects, HOW to CROCHET MINI CHECK PLAID STITCH – Easy Block Stitches is a fantastic choice. This stitch creates a charming miniature plaid effect that’s perfect for blankets, scarves, and even home décor.
Whether you’re a beginner or someone wanting to expand their skills, learning HOW to CROCHET MINI CHECK PLAID STITCH – Easy Block Stitches can open up a world of creative possibilities.
The beauty of this stitch lies in its simplicity and the textured pattern it forms, resembling tiny checks. This design adds depth and visual interest without being too complicated or time-consuming.
If you want to create something unique and eye-catching, mastering this stitch is a great way to go. Plus, it works well with various yarn types and colors, so you can customize it to fit your style.
Before diving into the detailed steps, it’s essential to understand the basics of block stitches and how they work together to form the mini check plaid pattern.
This article will walk you through the entire process, ensuring you get comfortable with the technique and achieve beautiful results every time you try the HOW to CROCHET MINI CHECK PLAID STITCH – Easy Block Stitches.
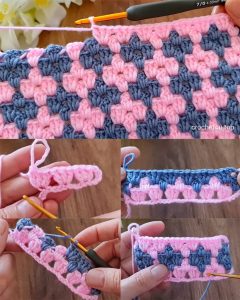
The first thing to know when learning HOW to CROCHET MINI CHECK PLAID STITCH – Easy Block Stitches is that it is made using basic block stitches, which alternate between front post and back post double crochets.
This technique creates a textured pattern that looks like small squares or checks, giving your project a neat and polished appearance.
The key to success is mastering the front post and back post stitches, as these are the building blocks of the mini check plaid stitch. Front post double crochet involves working around the post of the stitch from the front, while back post double crochet wraps around the stitch from the back. Alternating these stitches creates the raised blocks that define the pattern.
Because the stitch uses block techniques, the finished fabric tends to be thicker and warmer, making it perfect for cozy accessories and blankets. It also provides a slight stretch, which adds comfort and flexibility to your crochet projects.
The color combination plays a significant role in enhancing the mini check plaid effect. While the stitch looks great in a single color, using contrasting colors for different rows or sections can make the pattern pop and resemble a true plaid design.
To get started, you’ll want to practice the foundation chain and the first few rows of alternating block stitches until you feel confident with the rhythm of the pattern. Patience is key here, and once you get the hang of it, you’ll find this stitch both enjoyable and rewarding.
Before starting your project using HOW to CROCHET MINI CHECK PLAID STITCH – Easy Block Stitches, gathering the right materials is crucial. Choosing the correct yarn and hook size will affect the final look and feel of your creation.
For beginners, a medium-weight yarn like worsted weight is recommended as it provides good stitch definition without being too bulky or too thin. Cotton or acrylic yarns work well, but you can experiment with blends depending on your desired softness and durability.
Your crochet hook should match the yarn weight, typically between 5.0mm to 5.5mm for medium-weight yarns. Using the right hook size helps maintain consistent tension and makes the block stitches easier to work with.
Having a pair of scissors, stitch markers, and a yarn needle for weaving in ends will make your crafting process smoother. Stitch markers can be especially helpful to mark the beginning of rows or pattern repeats.
Lighting and a comfortable workspace also contribute to your success with this stitch. Since the mini check plaid stitch involves texture and precise stitch placement, good lighting will help you see each stitch clearly.
Finally, patience and practice are your best tools. Don’t rush through the first few attempts; mastering HOW to CROCHET MINI CHECK PLAID STITCH – Easy Block Stitches takes some time but results in a beautiful textured fabric that’s worth the effort.
To begin your journey with HOW to CROCHET MINI CHECK PLAID STITCH – Easy Block Stitches, start with a foundation chain. The stitch pattern works well with multiples of 4 plus 2 chains, allowing for a balanced and symmetrical design.
Row 1 is typically a base row of double crochets to establish a sturdy foundation. Work one double crochet in each chain across, turning your work at the end of the row.
Row 2 introduces the block stitch pattern, alternating between front post and back post double crochets. This row sets the stage for the mini checks that will develop as you continue.
In Row 3, you reverse the order of the post stitches to maintain the checkered effect. The blocks alternate, creating the signature plaid texture.
Repeating Rows 2 and 3 builds the fabric, and with each additional row, the mini check plaid pattern becomes more prominent and textured.
Practice counting your stitches carefully to keep the pattern consistent. Any missed or extra stitches can disrupt the visual rhythm of the checks.
With practice, you’ll be able to crochet this stitch confidently, producing a fabric that’s both beautiful and sturdy.
Once you’ve mastered HOW to CROCHET MINI CHECK PLAID STITCH – Easy Block Stitches, you can explore a variety of projects that showcase this unique texture. Blankets are a popular choice because the stitch’s thickness adds warmth and coziness.
Scarves and cowls benefit from the stretch and texture, creating accessories that are both fashionable and functional. The mini check plaid stitch lends a modern twist to classic winter accessories.
Home décor items like cushion covers and table runners also look stunning with this stitch. The pattern adds a handmade touch with a polished finish, making your home feel inviting and stylish.
Bags and totes are another creative way to use this stitch. The sturdy texture supports the shape of the bag and provides visual interest that sets your handmade item apart.
Don’t hesitate to experiment with colors. Using two or three complementary shades can enhance the plaid effect and make your projects more dynamic.
By incorporating this stitch into your crochet repertoire, you open up countless possibilities for crafting beautiful, textured pieces that stand out.
FAQ
What yarn is best for HOW to CROCHET MINI CHECK PLAID STITCH – Easy Block Stitches? Medium-weight yarn like worsted weight works best for this stitch because it highlights the texture without being too bulky.
Is this stitch suitable for beginners? Yes, with some basic knowledge of double crochet and post stitches, beginners can learn this stitch. It might take a little practice, but it’s very achievable.
How do I maintain consistent tension? Using the correct hook size and practicing regularly helps maintain even tension, which is important for the block pattern to look neat.
Can I use this stitch for garments? Absolutely. The mini check plaid stitch works well for warm garments like sweaters and cardigans due to its texture and thickness.
How do I fix mistakes in the pattern? Carefully unravel the stitches row by row. Using stitch markers helps prevent mistakes and makes corrections easier.
Can I change colors in this pattern? Yes, color changes can be done at the beginning of rows to create a more vibrant plaid look.
In this article, we explored HOW to CROCHET MINI CHECK PLAID STITCH – Easy Block Stitches, a versatile and attractive pattern perfect for many crochet projects. You learned about the materials needed, step-by-step instructions, and creative ways to use this stitch in your crafting.
The mini check plaid stitch adds texture, warmth, and a modern twist to your handmade items. I encourage you to try this stitch in your next project and share your experience. Please leave your honest feedback and any suggestions for future tutorials — your input helps us improve and inspire more creative crochet ideas!


