
Crochet Multi-Purpose Blouse, Shawl, Runner Model

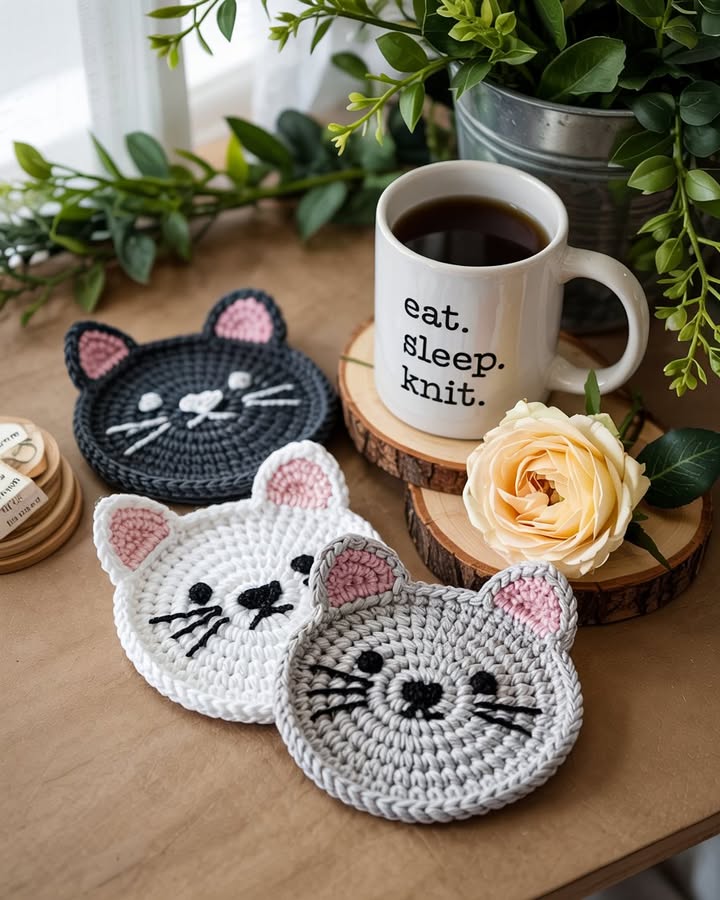
If you’re searching for a fun and functional crochet project, this Crochet Cat Coasters – Tutorial is exactly what you need. These adorable coasters shaped like cats are perfect for adding a cozy, handmade touch to your home or for gifting to fellow cat lovers.
Not only are they incredibly cute, but they also serve the practical purpose of protecting your furniture from hot or cold drinks.
Making your own Crochet Cat Coasters is a relaxing and enjoyable way to spend your time. These projects are great for beginners who want to practice basic stitches and for experienced crocheters looking for a quick and creative challenge.
The best part? You can customize your cat coasters with different yarn colors and details to match your décor or personality.
In this Crochet Cat Coasters – Tutorial, we’ll walk you through everything you need to know—from the materials required, to step-by-step instructions, to helpful tips for perfecting the design. By the end of this guide, you’ll be confident enough to make your own set of cute and durable coasters.
Before diving into the steps of this Crochet Cat Coasters – Tutorial, it’s essential to gather all the necessary supplies. Having the right materials will make the process smoother and ensure your finished coasters are sturdy and adorable.
Start with a medium-weight cotton yarn, which is ideal for coasters because it absorbs moisture well and holds its shape. Cotton yarn also resists heat, making it perfect for protecting your tabletops from hot mugs and cold glasses.
You’ll need a crochet hook that matches your yarn weight. A 4mm (G-6) or 4.5mm (7) hook is commonly used for this kind of project. Using the correct hook size helps maintain even tension and produces the right coaster size.
Other tools to have on hand include scissors for trimming the yarn, a yarn needle for weaving in the ends, and stitch markers if you want to keep track of your rounds more easily. A measuring tape can also help ensure consistent sizing.
Choose your yarn colors based on the type of cats you want to make—classic gray, black, white, or even whimsical colors like pastel pinks and blues for a fun twist. You can add facial features using black yarn, embroidery floss, or even small felt pieces if you like a mixed-media touch.
Make sure your working area is well-lit and comfortable, especially if you’re planning to create multiple coasters in one sitting. With these tools ready, you’re set to start crafting your own Crochet Cat Coasters.
This part of the Crochet Cat Coasters – Tutorial will guide you through the process of creating each part of the coaster, starting from the base to the ears and the optional tail. Take your time and enjoy the process.
Start with a magic ring and chain 2. Work 12 double crochets into the ring and join with a slip stitch. This forms the center of your cat’s face. For beginners, a magic ring might be tricky at first, but it’s a neat way to create a tight center with no gaps.
In the second round, work 2 double crochets into each stitch around, totaling 24 stitches. This increases the size of the circle and gives a nice round face to your coaster. Join with a slip stitch to the first stitch.
For round three, alternate 1 double crochet and 2 double crochets in the next stitch to evenly expand the circle. You should end up with 36 stitches. If you want a slightly larger coaster, you can add a fourth round using a similar increase pattern.
To make the ears, you can crochet small triangles separately and sew them onto the top of the circle, or create them directly onto the coaster by chaining and working back in the same stitch. Either method works, depending on your preferred look.
The tail can be made by chaining 10 and working slip stitches back down the chain, then sewing it onto the side or bottom of the coaster. This is optional but adds a whimsical detail that really makes your Crochet Cat Coasters stand out.
After all parts are assembled, weave in all yarn ends securely and block your coaster gently if needed. This helps it lay flat and maintain its shape after washing or use.
One of the best parts of following a Crochet Cat Coasters – Tutorial is the opportunity to personalize your work. You can easily make each coaster unique by adjusting small design elements.
Consider changing yarn colors to match the coats of your favorite cats. Use stripes, patches, or even ombré yarns to give your coasters a one-of-a-kind look. This makes the coasters more fun and personal.
Add tiny embroidered eyes, whiskers, and noses using black or pink yarn for added personality. If you’re skilled with embroidery, you can create detailed faces that look like specific breeds or even your own pet.
Want a more playful touch? Try making the ears in different positions—one up and one flopped over, or both folded down—to create expressions. Small changes like these make your coasters feel more alive and charming.
You can also experiment with different stitch textures. For instance, using half double crochet instead of double crochet for the body may give your coasters a denser, tighter texture.
If you enjoy mixed media, attach tiny felt ears or use safety eyes for a toy-like appearance. Just make sure any additions are secure, especially if the coasters will be used around children or pets.
Finally, consider making a matching set in various colors for gifting. A set of four or six personalized Crochet Cat Coasters makes a thoughtful handmade present for birthdays, housewarmings, or holidays.
Once your Crochet Cat Coasters are complete, it’s important to know how to care for them properly so they last a long time and stay looking fresh. These small items are easy to maintain with just a little attention.
Since they’re made with cotton yarn, you can wash them gently by hand using mild soap and cold water. If you prefer machine washing, use a mesh laundry bag and a gentle cycle to avoid fraying or stretching.
Lay the coasters flat to dry after washing. This helps maintain their shape and prevents curling or warping, which is important for functionality and appearance.
Avoid using high heat when drying or ironing. Cotton can shrink, and added decorative elements like felt or embroidery may get damaged with excessive heat.
Store your coasters flat in a drawer or display them in a coaster holder. If you’re giving them as gifts, consider tying a ribbon around a set and adding a small handmade tag for a personal touch.
These Crochet Cat Coasters are not only perfect for cups and mugs—they can also be used under small plant pots, candles, or decorative figurines. They add a soft touch to any table or shelf.
Regularly check for loose threads or wear, especially if they’re being used often. With proper care, your handmade coasters will bring joy and charm to your home for many years.
Can beginners make these Crochet Cat Coasters?
Yes! This Crochet Cat Coasters – Tutorial is beginner-friendly and uses simple stitches like double crochet. The project is small and manageable, making it a great starting point.
What type of yarn should I use?
Cotton yarn is ideal because it’s durable, absorbent, and holds shape well. Avoid stretchy or fuzzy yarns that may distort the coaster over time.
How long does it take to make one coaster?
On average, one coaster takes about 30 to 45 minutes to complete, depending on your skill level and chosen design details.
Can I wash the coasters in the washing machine?
Yes, but it’s best to use a mesh laundry bag and wash on a gentle cycle with cold water. Hand washing is even better to maintain the coaster’s shape.
Can I sell the coasters I make using this tutorial?
Absolutely! Handmade Crochet Cat Coasters are popular at craft fairs and online shops. Just make sure your quality is consistent and the details are securely fastened.
Do I have to add a tail and face?
Not at all. These are optional details you can include for extra charm, but the basic round shape with ears already creates a recognizable cat design.
In this comprehensive Crochet Cat Coasters – Tutorial, you learned how to create adorable, functional, and personalized coasters from start to finish. From the materials you need, to step-by-step instructions, to ways to customize your creations, this guide covered all the essentials for making your own set of cat-themed coasters. These cute projects are perfect for gifting or enjoying at home, and they’re a fun way to practice your crochet skills.
We hope you’ve enjoyed this tutorial and feel inspired to pick up your hook and yarn! Please leave your honest opinion in the comments—let us know how your coasters turned out and feel free to share suggestions for future tutorials. Happy crocheting!


