
Crochet Multi-Purpose Blouse, Shawl, Runner Model

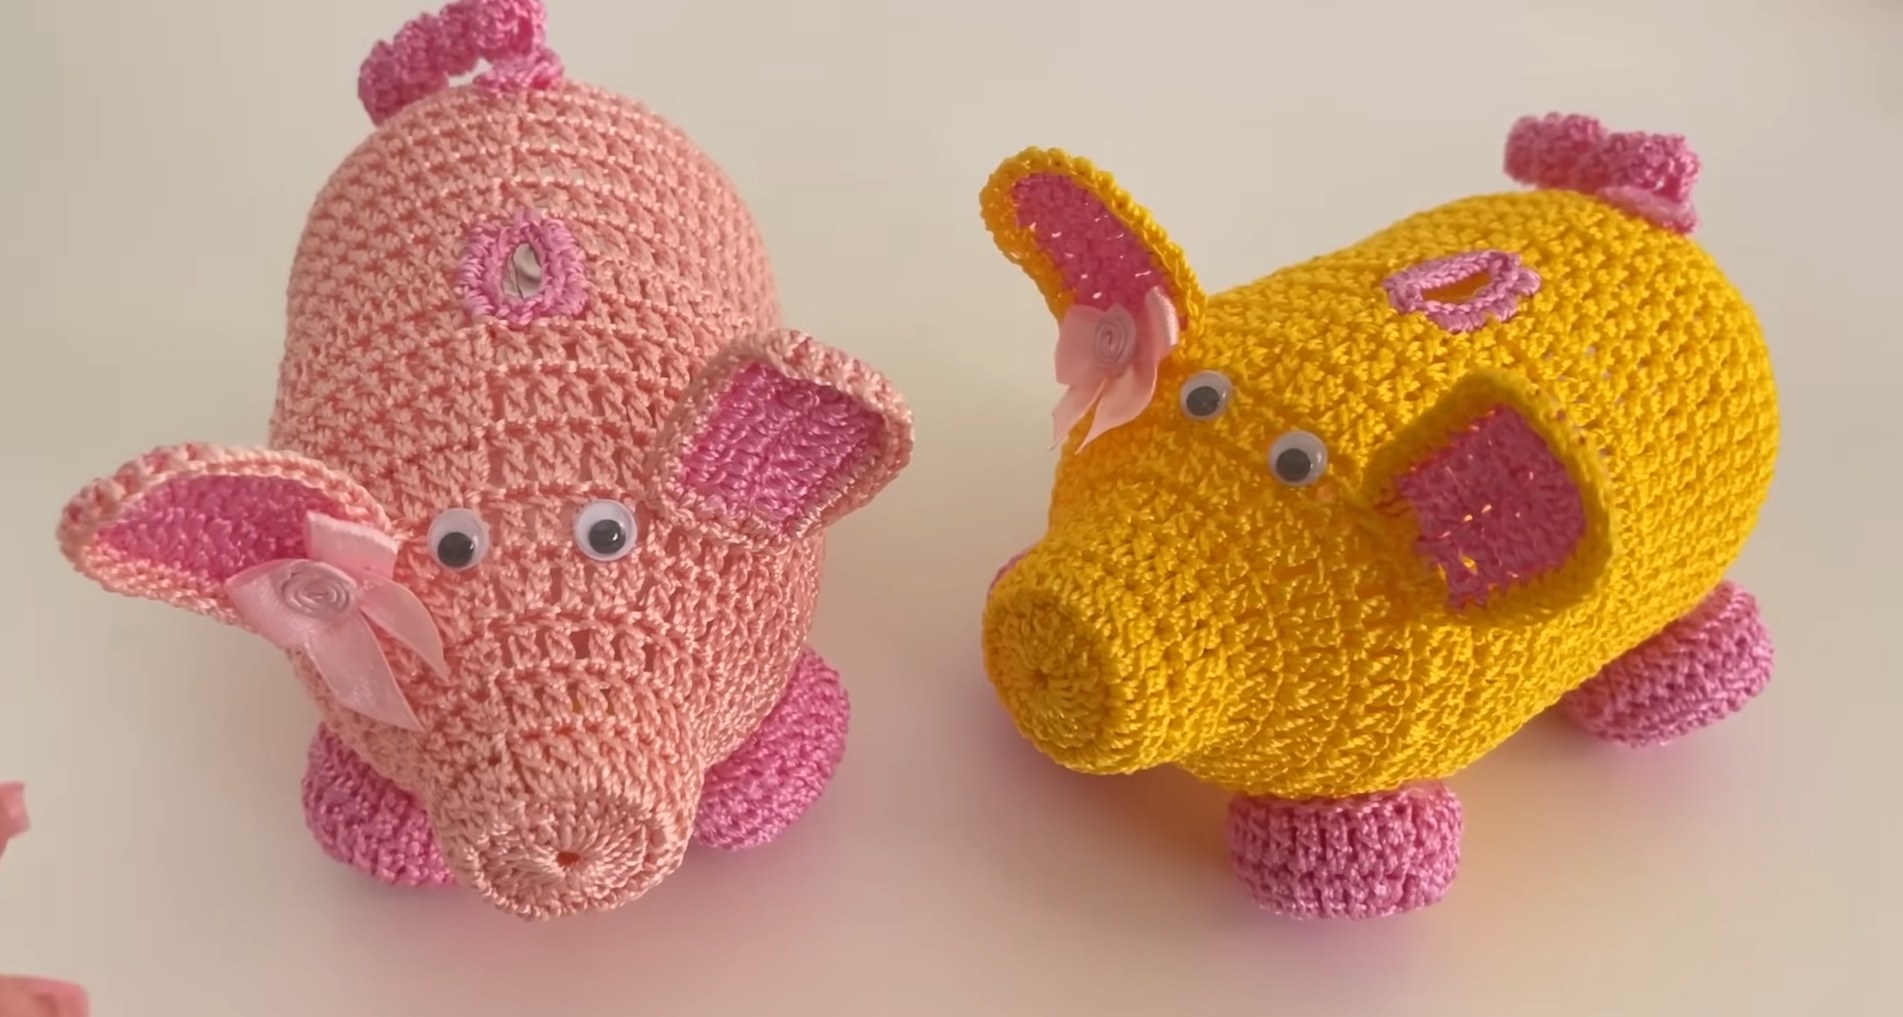
If you are looking for a cute and functional project, the crochet piggy bank is a perfect choice. This charming handmade item combines creativity with practicality, helping you or your loved ones save money in the most delightful way.
Whether you are a beginner in crochet or someone experienced, making a crochet piggy bank is both an enjoyable and rewarding craft.
The idea of creating a crochet piggy bank brings a sense of nostalgia while promoting sustainable crafting. It’s a fantastic alternative to plastic or ceramic piggy banks and makes a wonderful handmade gift for children, friends, or family members. Plus, it adds a whimsical touch to your home décor.
In this comprehensive guide, we will explore how to create your own crochet piggy bank, the materials you need, step-by-step instructions, and helpful tips to ensure your project turns out perfectly. Let’s dive in and start this fun and engaging project together.
Before you start crafting your crochet piggy bank, gathering all the necessary materials is essential. Having the right supplies will make the process smoother and much more enjoyable.
First, you’ll need yarn. Choose a medium-weight yarn in pink to mimic the classic piggy look. However, don’t be afraid to get creative with colors. Bright or pastel shades can make your crochet piggy bank unique and personalized.
Next, select the appropriate crochet hook size for your yarn. Usually, a 3.5mm to 4.5mm hook works well with medium-weight yarn. The hook size ensures that your stitches are tight enough to hold the shape.
You’ll also need safety eyes or small black buttons for the pig’s eyes. This will give your crochet piggy bank a friendly and adorable face. Alternatively, you can embroider the eyes if making it child-safe.
Polyester fiberfill is necessary for stuffing the piggy bank. It helps maintain the structure while keeping it lightweight. Without it, the piggy bank would collapse or lose its form.
For the coin slot, a small zipper or an elastic opening works perfectly. This allows coins to be inserted easily while keeping them secure inside the crochet piggy bank.
Lastly, don’t forget scissors, a yarn needle for sewing pieces together, and stitch markers to help you keep track of rounds while crocheting. Being organized with these materials ensures a smooth crafting experience.
The foundation of the crochet piggy bank starts with the basic body shape. This is usually a round or oval form that represents the pig’s belly where coins are stored.
Begin with a magic ring, which is the most effective way to start crocheting in the round. This technique ensures a tight and neat center without a hole in the middle of your crochet piggy bank.
Increase stitches evenly in each round to create a flat circle. Typically, you’ll start with 6 single crochet stitches and increase by multiples to expand the circle until it reaches the desired width.
Once the base is wide enough, start working without increasing to form the sides. This creates the depth needed for the crochet piggy bank to hold coins. Consistent stitch tension is important here.
Continue crocheting in the round until the body reaches the desired height. Check occasionally to ensure the shape resembles a soft, rounded pig belly. Adjust the number of rounds as needed.
When the body is nearly complete, remember to leave an opening for the coin slot. You can skip stitches in one round and chain over the gap, then crochet normally in the next round to create a reinforced coin slot area.
Finally, stuff the body with fiberfill before closing the top. Ensure it’s firm but not overstuffed, as too much fiberfill can distort the shape of your crochet piggy bank.
The fun part of making a crochet piggy bank is adding all the adorable features that bring it to life. These elements turn a simple shape into a recognizable and charming pig.
Start with the pig’s snout. Crochet a small round or oval piece and attach it to the front center of the body. Adding a couple of stitches to represent nostrils gives it a more realistic and cute look.
For the ears, crochet two small triangles or semi-circular pieces. Attach them symmetrically to the top of the crochet piggy bank. Make sure they are firmly sewn to withstand handling.
The legs are usually short cylindrical shapes that help the piggy bank stand upright. Crochet four identical pieces and attach them securely to the bottom.
Don’t forget the curly tail! Chain a few stitches and use slip stitches to create a spiral. Attach it to the back of your crochet piggy bank for an extra touch of cuteness.
Use safety eyes or embroidered eyes to complete the face. This adds personality and charm, making your project even more delightful and unique.
Lastly, check that all features are securely fastened. This is especially important if the crochet piggy bank is intended for children, as small parts should be safe and durable.
Personalizing your crochet piggy bank makes it a special and meaningful item. You can adjust colors, patterns, and even accessories to match anyone’s style or decor.
Try experimenting with different yarn textures. A fluffy or velvet yarn can make the crochet piggy bank feel plush and luxurious, while cotton gives a crisp and clean look.
Add decorative elements like bows, flowers, or small hats. These simple additions can transform a standard piggy into a character that reflects the owner’s personality.
You can also embroider names or initials onto the side of the crochet piggy bank. This makes it a thoughtful gift for birthdays, baby showers, or holidays.
Play with theme variations. Instead of a pig, turn the same pattern into other animals like a cow, cat, or elephant by adjusting the ears, nose, and colors.
Consider using eco-friendly or recycled yarn for a sustainable project. This adds an extra layer of purpose to your handmade crochet piggy bank, appealing to environmentally conscious makers.
Finally, document your process. Share pictures with friends or on social media to inspire others. Seeing your unique take on the crochet piggy bank might encourage others to try this delightful craft.
What is the best yarn for a crochet piggy bank?
Medium-weight cotton or acrylic yarn is ideal. Cotton holds its shape well, while acrylic offers a wider range of colors and is budget-friendly.
How do I make the coin slot in a crochet piggy bank?
You can create the coin slot by skipping a few stitches in one round and replacing them with chain stitches, then continuing the round. Another option is sewing a small zipper.
Is a crochet piggy bank safe for children?
Yes, as long as you securely attach small parts like eyes and buttons. For younger children, embroidered features are recommended instead of plastic parts.
Can I wash my crochet piggy bank?
Hand washing is recommended. Use mild detergent and reshape while drying. Avoid machine washing to maintain the piggy bank’s structure.
How long does it take to make a crochet piggy bank?
It usually takes between 4 to 6 hours, depending on your crochet skill level and the complexity of the design.
Can I sell crochet piggy banks that I make?
Absolutely! Handmade crochet piggy banks are popular at craft fairs and online shops. Just ensure that if you use a pattern from a designer, you follow their terms regarding commercial use.
In this guide, we explored everything you need to know about creating a charming crochet piggy bank. From gathering materials and crocheting the base to adding cute features and personalizing your project, each step offers creativity and joy.
The crochet piggy bank is more than just a craft project. It’s a meaningful and functional piece that promotes saving money while showcasing your handmade skills. Whether for yourself, a child, or as a gift, it’s a wonderful way to bring fun and purpose together.
I hope this tutorial has inspired you to create your own crochet piggy bank. If you enjoyed this guide, please leave your honest opinion in the comments and share any suggestions or ideas for future projects. Your feedback helps improve and grow this crafting community!


