
Pie Carrier Sewing Pattern

If you are searching for how to make a zipper tote bag, you are in the right place. Creating your own tote bag with a zipper is not only fun but also incredibly rewarding. A zipper tote bag is practical, stylish, and perfect for everyday use.
Whether you want to carry books, groceries, or personal items, this DIY project gives you the freedom to customize your tote exactly how you like.
Learning how to make a zipper tote bag might seem intimidating at first, especially if you are a beginner. But the process is simpler than you think.
With a few basic sewing skills, some essential materials, and a little patience, you’ll have a beautiful and functional zipper tote bag that you made with your own hands.
In this guide, you will learn everything from selecting the right materials to sewing techniques, attaching the zipper, and even tips for customization. Our step-by-step method is designed to be beginner-friendly while also producing professional-looking results. Let’s dive in and get started.
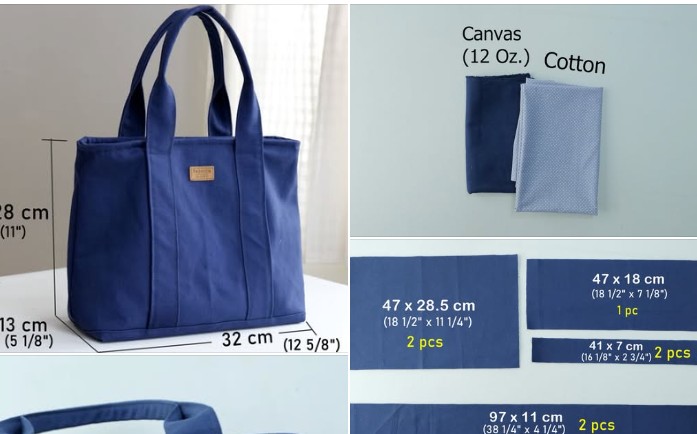
Before starting how to make a zipper tote bag, gathering the right materials is crucial. Having quality supplies will make the sewing process smoother and your finished tote more durable.
The main fabric is the first thing to choose. Cotton canvas, denim, or upholstery fabric is highly recommended because they are sturdy and can handle daily use. You can also select fun prints or solid colors depending on your style.
You will also need lining fabric. Cotton is usually a great choice for the lining because it’s lightweight but durable, and it adds a clean, professional look to the interior of your tote bag.
The zipper is one of the most important parts of this project. Make sure to choose a sturdy zipper that is at least the width of your tote bag. Nylon coil zippers are often preferred because they are easy to sew.
Fusible interfacing is optional but recommended. It adds structure and stiffness to the bag, helping it hold its shape over time. It’s especially helpful if your outer fabric is lightweight.
Basic sewing tools are essential: scissors, fabric pins or clips, a sewing machine, measuring tape, and a seam ripper. These are the tools that will help you cut, pin, and sew accurately.
Thread is also a key element. Use high-quality polyester thread that matches or contrasts nicely with your fabric, depending on the look you want for your zipper tote bag.
Let’s dive into the process of how to make a zipper tote bag step by step. This method is beginner-friendly but creates a polished, functional tote.
Start by cutting your fabric. You’ll need two pieces of outer fabric, two pieces of lining fabric, and two pieces of interfacing if you are using it. Common dimensions are 16 inches wide by 14 inches tall, but you can adjust this size as needed.
Attach the interfacing to the wrong side of your outer fabric pieces by following the manufacturer’s instructions. This step ensures your tote has enough stiffness and durability to maintain its shape.
Next, install the zipper. Place the zipper face down along the top edge of one piece of outer fabric. Then place the lining fabric face down on top of that, aligning all edges. Sew along the zipper using a zipper foot on your sewing machine.
Repeat the process with the other side of the zipper, attaching it to the second piece of outer fabric and lining. When you open the fabrics, the zipper should be neatly sandwiched between the outer and lining layers.
Topstitch along both sides of the zipper to give it a clean look and to prevent the fabric from catching in the zipper teeth when opening and closing.
With the zipper installed, open it halfway (this is important!). Then, match the outer fabrics right sides together and the lining fabrics right sides together. Pin around the edges, leaving a 4- to 5-inch opening in the bottom of the lining for turning the bag later.
Now it’s time to put everything together in how to make a zipper tote bag. This is the part where your project starts to really take shape.
Sew around the perimeter of the bag, starting from one side of the lining, around the outer bag, and back to the lining. Remember to leave the gap in the lining open for turning the bag inside out.
To create boxed corners, pinch each corner of the outer and lining fabrics so that the side seam and bottom seam line up. Measure about 2 inches from the point and sew across. This gives the bag depth and allows it to sit flat when filled.
Trim the excess fabric from the corners to reduce bulk. Be careful not to cut into the seams themselves. Repeat this step for all four corners.
Once all sides and corners are sewn, reach through the opening in the lining and gently pull the bag through, turning it right side out. Push out the corners carefully to get crisp edges.
Tuck the raw edges of the opening in the lining inward and stitch it closed with a straight stitch, either by hand for an invisible finish or with your sewing machine for speed.
Push the lining into the bag, smooth out the corners, and give your zipper tote bag a good press with an iron to set the seams. Now your tote bag is ready to use and enjoy.
One of the most exciting parts of learning how to make a zipper tote bag is personalizing it to fit your style and needs. There are endless options to make your bag truly unique.
Add pockets to the interior or exterior. You can sew a simple patch pocket or a zippered pocket for securing smaller items like keys, phones, or wallets.
Play with fabric combinations. Mix prints with solids, use color blocking, or add a pop of color with contrasting zippers or linings to create a modern, eye-catching design.
Decorate the outside with applique, embroidery, or even iron-on vinyl designs. This is a great way to add personal flair, whether it’s a name, a monogram, or a fun graphic.
Upgrade the handles by using leather straps instead of fabric, or sew padded handles for extra comfort if you plan to carry heavier items.
Adjust the size to fit your needs. Make a larger tote for groceries or beach trips, or a smaller one for everyday essentials like a wallet and phone.
Consider adding a key fob, D-ring, or strap hook inside the tote so you can easily clip your keys or accessories for quick access.
Is making a zipper tote bag beginner-friendly?
Yes, this project is perfect for beginners. While sewing a zipper may seem challenging, this guide breaks it down into simple steps anyone can follow.
What size should my tote bag be?
A common size is 16 inches wide by 14 inches tall, but you can adjust the dimensions based on your needs for a larger or smaller tote.
What type of fabric works best for a zipper tote bag?
Sturdy fabrics like canvas, denim, or upholstery fabric are ideal. Lining fabric can be cotton or lightweight polyester for a neat finish inside.
Can I sew a zipper tote bag without a sewing machine?
It is possible, but it would be time-consuming and less durable. A sewing machine makes the process faster and creates stronger seams, especially for the zipper.
How do I make the bag more durable?
Using interfacing, double stitching the seams, and choosing high-quality materials like strong zippers and durable fabrics will significantly improve the bag’s durability.
Do I need to line my tote bag?
Lining is optional but highly recommended. It gives the bag a cleaner finish, hides raw seams, and adds strength.
Now you know exactly how to make a zipper tote bag, from choosing materials to sewing, assembling, and even customizing it to suit your personal style. This beginner-friendly project is a wonderful way to build your sewing skills while creating something practical and beautiful.
I hope this guide has inspired you to try sewing your very own zipper tote bag. If you found this tutorial helpful, please share your honest feedback below. Your suggestions and opinions help make this community of creators even better. Let me know what you think, and feel free to share photos of your finished tote!


