
Crochet Multi-Purpose Blouse, Shawl, Runner Model

If you’ve ever wanted to learn how to crochet a classic granny square, you’re in the right place. This timeless crochet technique has been loved for generations.
Whether you are new to crochet or revisiting the craft, the granny square is one of the most versatile and enjoyable patterns you can make.
The beauty of learning how to crochet a classic granny square lies in its simplicity and endless possibilities. You can create colorful blankets, scarves, bags, and even clothing. With just a hook and some yarn, you can transform simple stitches into stunning projects.
In this article, you will discover a detailed, step-by-step guide on how to crochet a classic granny square, including materials, techniques, creative variations, and helpful tips.
We will also answer the most common questions in a dedicated FAQ section to help you succeed with confidence.
Learning how to crochet a classic granny square offers so many benefits to crafters of all levels. It’s one of the most beginner-friendly patterns in the world of crochet.
The repetitive pattern makes it easy to memorize. After just a few rounds, most people can crochet a granny square without even looking at a pattern.
It’s a perfect project for using leftover yarn. You can mix and match colors, creating bold, vibrant squares or soft, coordinated tones.
Granny squares are portable. Whether you’re traveling, sitting in a waiting room, or relaxing at home, you can easily bring your crochet along.
This pattern helps improve stitch consistency. Practicing double crochet stitches over and over will naturally improve your tension and technique.
Lastly, it’s a building block for larger projects. Once you know how to crochet a classic granny square, you can join them together to create blankets, pillow covers, bags, and garments.
Before diving into how to crochet a classic granny square, let’s go over the materials you’ll need. Fortunately, it doesn’t require much.
First, choose your yarn. Medium-weight yarn (category 4) like acrylic or cotton is perfect for beginners. It’s easy to work with and holds its shape well.
Next, select a crochet hook that matches your yarn. Typically, a 5.0 mm (H-8) hook works great with worsted-weight yarn, but always check the yarn label.
You’ll need scissors to cut the yarn when finishing your rounds or changing colors.
A tapestry needle is important for weaving in the yarn tails and joining squares if you plan to make a larger project.
Stitch markers can be helpful, especially when starting, to mark your beginning stitch or chain spaces.
Lastly, keep a notepad or row counter nearby if you’re working on multiple squares and want to keep track of color changes or rounds.
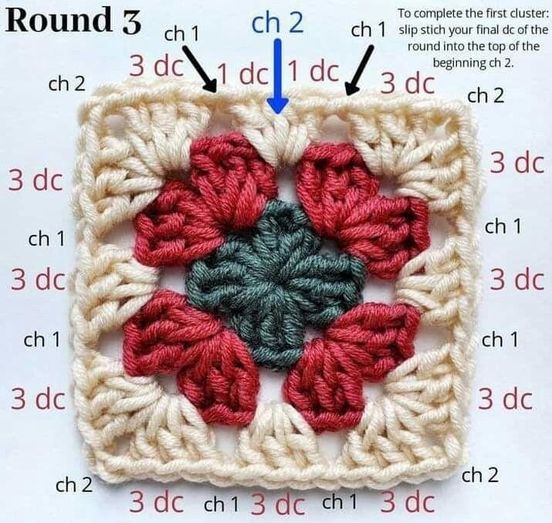
Now it’s time to learn how to crochet a classic granny square step by step. The process starts with a simple chain and builds out from the center.
Begin with a slip knot and chain 4. Then, join with a slip stitch into the first chain to form a small ring.
Chain 3, which counts as your first double crochet. Then, work 2 double crochets into the ring. This forms your first cluster.
Chain 2 to form the corner. Then, make another set of 3 double crochets into the ring. Repeat this until you have 4 sets of 3 double crochets with chain-2 spaces between each.
Join with a slip stitch to the top of your starting chain-3 to close the round. This completes your first round.
For the second round, slip stitch to the first chain space. Chain 3 (counts as your first double crochet), then work 2 double crochets, chain 2, and 3 double crochets into the same space to form a corner. Repeat this in each corner around, joining with a slip stitch at the end.
Once you understand how to crochet a classic granny square, you can expand it as large as you want or get creative with designs.
To continue growing your square, repeat the pattern: in each chain-2 corner space, make (3 double crochets, chain 2, 3 double crochets). In each side space between clusters, make 3 double crochets.
Color changes can be made at the end of any round. Simply fasten off your yarn and join a new color with a slip stitch in any corner space.
Experiment with gradient yarns for a smooth color transition, or choose bold, contrasting colors for a vibrant look.
Add texture by using different stitches. For example, swap double crochets with puff stitches or bobble stitches to create a raised, dimensional effect.
Blocking your granny square at the end will help straighten edges and perfect the shape, especially for larger projects.
Finally, connect multiple granny squares using whip stitch, slip stitch join, or even single crochet along the edges to build blankets, scarves, and bags.
Is it hard to learn how to crochet a classic granny square?
No, it’s one of the easiest crochet patterns for beginners. The stitches are repetitive and simple, making it a great starting point.
What is the best yarn to use for a granny square?
Medium-weight yarn like acrylic or cotton is ideal. It’s sturdy, affordable, and widely available in many colors.
Can I use different hook sizes?
Yes, you can. A larger hook creates a looser, softer square, while a smaller hook gives tighter stitches. Just make sure it matches your yarn weight.
How do I change colors in a granny square?
Fasten off your current color at the end of a round and join the new color with a slip stitch into any chain-2 corner space to continue.
Why are my granny squares curling or warping?
This can happen if your tension is too tight or loose. Blocking your finished squares usually helps flatten them perfectly.
Can I make a granny square with other shapes, like hexagons?
Yes! Once you master how to crochet a classic granny square, you can explore variations like hexagons, triangles, and circles using similar techniques.
Learning how to crochet a classic granny square is a joyful experience that opens the door to countless creative projects. From understanding why this pattern is so beloved to learning the exact steps and materials needed, this guide was designed to support you every step of the way.
We covered the essential tools, the step-by-step process to start your granny square, and how to expand it into beautiful, functional pieces. The FAQ section provided answers to the most common questions, ensuring you feel confident moving forward.
I hope this tutorial on how to crochet a classic granny square inspires you to pick up your hook and start crafting today. If you enjoyed this article, please leave your honest opinion, share your results, and let me know what other crochet patterns or techniques you’d love to learn next. Your feedback is always appreciated and helps grow this wonderful community of makers!


