
Pie Carrier Sewing Pattern

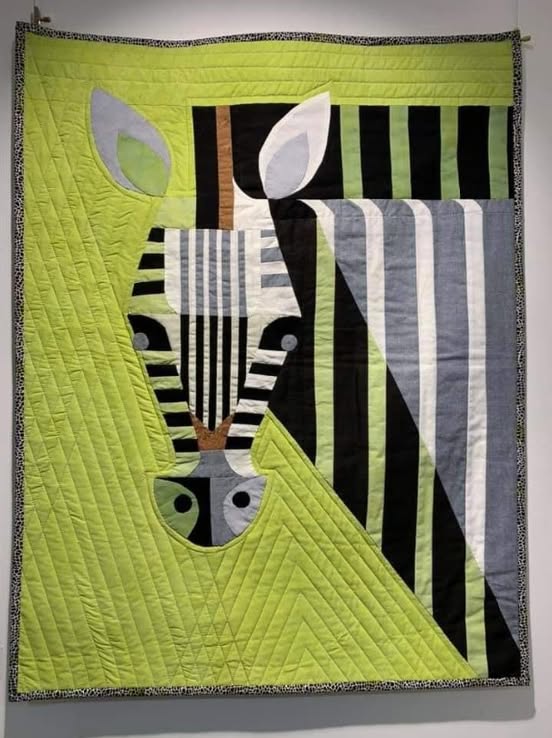
Welcome to this exciting Beautiful Zebra Quilt – Tutorial, a creative journey that will help you bring the charm of zebra patterns into your quilting projects. This quilt design is not only visually striking but also a fun project that suits quilters of all skill levels.
Whether you are a beginner or an experienced quilter, this tutorial offers a step-by-step guide to help you create a masterpiece.
The Beautiful Zebra Quilt – Tutorial combines the elegance of black-and-white stripes with the coziness of handmade quilting. Zebra patterns are timeless and versatile, making this quilt an excellent choice for modern home decor, kids’ rooms, or as a unique handmade gift.
This design can be both bold and neutral, fitting seamlessly into various interior styles.
In this detailed guide, we will cover everything you need to know about creating the Beautiful Zebra Quilt – Tutorial, from choosing materials to cutting, assembling, and finishing your quilt. If you’ve been searching for inspiration and guidance, you are in the right place.
There are plenty of reasons why the Beautiful Zebra Quilt – Tutorial has captured the hearts of quilting enthusiasts. One of the primary attractions is the visual impact. The contrasting black-and-white stripes are dynamic, adding movement and depth to any space.
Zebra patterns never go out of style. They work perfectly in modern, minimalist, or even playful decor settings. This quilt becomes a centerpiece wherever it’s placed, whether on a bed, sofa, or as a wall hanging.
Another great reason to follow this Beautiful Zebra Quilt – Tutorial is its adaptability. You can customize the size and adjust the pattern to suit anything from a baby blanket to a king-size quilt.
The pattern itself is straightforward. While it looks sophisticated, it uses basic quilting techniques, making it accessible for beginners who want to try something bold without complicated piecing.
Sustainability is also a highlight of this project. Many quilters use fabric scraps for the stripes, reducing waste while creating something stunning and functional.
Additionally, this quilt makes for an excellent gift. Handmade quilts are always cherished, and the unique zebra design makes it a memorable and thoughtful present for loved ones of all ages.
Before diving into the Beautiful Zebra Quilt – Tutorial, let’s talk about the essential materials and tools you’ll need to bring your zebra quilt to life.
First, fabric selection is key. You’ll need black and white fabrics for the zebra stripes. Solid cotton fabrics are recommended for crisp, clean lines, but you can also experiment with prints for a creative twist.
A rotary cutter is indispensable for cutting precise strips and shapes. Pair it with a self-healing cutting mat to protect your work surface and keep your cuts accurate.
A quilting ruler is another must-have. It ensures your stripes are straight and uniform, which is crucial for the Beautiful Zebra Quilt – Tutorial to look polished and professional.
For the batting, choose a lightweight or medium-weight batting depending on the warmth you desire. Cotton or cotton-blend batting works well for a soft yet breathable finish.
Backing fabric is also important. You can go with a neutral color like gray or white, or use a fun print to add a surprise element to the back of your quilt.
Finally, you’ll need standard sewing tools: pins or clips, sewing machine with a walking foot (highly recommended for quilting), quilting thread, and fabric scissors.
Now we get to the fun part—the process of creating your quilt. Follow this step-by-step guide from the Beautiful Zebra Quilt – Tutorial to ensure great results.
Start by preparing your fabrics. Wash, dry, and iron them to prevent any shrinking or distortion later. This step is especially important for black-and-white fabrics to avoid bleeding.
Cut your fabric into strips. Most zebra quilts use varying widths of black and white strips to mimic natural zebra stripes. Mix thick and thin strips for a more organic look.
Lay out the strips on a design wall or a large table. Arrange them in a pleasing pattern, alternating widths and colors. Stand back frequently to check the overall look.
Sew the strips together using a quarter-inch seam allowance. Take your time to keep the seams straight, which is essential for the clean, bold look of the Beautiful Zebra Quilt – Tutorial.
Once the quilt top is assembled, layer it with batting and backing. Smooth out all wrinkles and baste the layers together with pins or temporary spray adhesive.
Quilt the layers together. Simple straight-line quilting works beautifully for this design, following the direction of the stripes. Alternatively, you can use free-motion quilting for added texture.
The final steps of the Beautiful Zebra Quilt – Tutorial are crucial for achieving a clean, durable, and beautiful finish.
Trim the edges of your quilt sandwich to make sure everything is squared and even. This makes applying the binding much easier.
Prepare your binding strips. You can use black, white, or a bold contrasting color like red or turquoise for an eye-catching frame around your zebra quilt.
Attach the binding to the front of the quilt using a sewing machine. Fold it over to the back and hand-stitch it down for a polished, professional finish.
Check for any loose threads or missed stitches. Take the time to fix these small details; it’s worth the effort for the final result.
Consider adding a quilt label to the back. This can include your name, the date, and any special messages, making your Beautiful Zebra Quilt – Tutorial project even more meaningful.
Finally, give your quilt a gentle wash to soften it and remove any markings from the quilting process. Lay it flat to dry, and enjoy your stunning handmade zebra quilt.
Is the Beautiful Zebra Quilt – Tutorial suitable for beginners?
Yes! While the design looks sophisticated, the construction mainly involves sewing straight lines, making it beginner-friendly.
What fabric works best for the Beautiful Zebra Quilt?
100% cotton fabrics are ideal. They are easy to work with, durable, and hold the crisp lines of the zebra stripes perfectly.
Can I customize the size of the zebra quilt?
Absolutely. Simply adjust the number of strips or the length of each to create anything from a baby quilt to a full-size bedspread.
How do I prevent the black fabric from bleeding into the white?
Pre-wash your fabrics separately using a color catcher sheet. This helps prevent any dye transfer between black and white fabrics.
What quilting pattern should I use?
Straight-line quilting works well to complement the striped design, but feel free to try waves or organic shapes for a more textured look.
Can I add color to the zebra quilt?
Yes! Adding pops of color between the black-and-white stripes can give a modern twist while keeping the zebra-inspired theme.
This Beautiful Zebra Quilt – Tutorial has guided you through every step of creating a striking, modern quilt that showcases the timeless elegance of zebra stripes. From selecting materials to cutting, piecing, quilting, and binding, you now have the knowledge to bring this beautiful project to life.
We hope this tutorial inspires you to explore your creativity and enjoy the rewarding process of quilting. If you’ve completed your own Beautiful Zebra Quilt – Tutorial, we would love to hear about your experience. Please leave your honest opinion, share your thoughts, and suggest what kind of patterns or tutorials you would like to see next. Your feedback helps us continue providing valuable content for our quilting community!


