
Pie Carrier Sewing Pattern

Welcome to this comprehensive Rosewood Radiance Quilt – Tutorial, designed especially for quilters of all levels who are passionate about creating something truly breathtaking.
If you’ve been searching for a stunning quilt project that combines elegance, charm, and timeless beauty, this is the perfect guide for you.
The Rosewood Radiance Quilt – Tutorial walks you through every stage of making this gorgeous quilt. Whether you are a beginner ready for a new challenge or an experienced quilter looking for your next masterpiece, this tutorial will guide you step by step with clarity and ease.

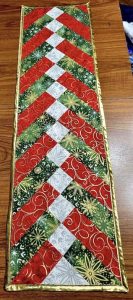
This quilt pattern showcases radiant star designs blended with warm rosewood-inspired hues, offering a balance between traditional and modern quilting.
With its intricate yet achievable layout, the Rosewood Radiance Quilt – Tutorial will not only improve your quilting skills but also result in a piece you’ll treasure for years to come.
Before diving into the sewing process, having the right materials and tools is essential. Following the Rosewood Radiance Quilt – Tutorial properly starts with preparation.
First, select high-quality quilting cotton fabrics. The beauty of the Rosewood Radiance design shines with rich tones like deep reds, soft pinks, warm neutrals, and contrasting darks for balance.
Make sure to gather enough fabric for the quilt top, binding, and backing. Depending on the size you choose (lap, twin, or queen), fabric yardage will vary. Check your cutting plan carefully before shopping.
A rotary cutter, self-healing cutting mat, and quilting ruler are absolute must-haves. These tools ensure precise cutting, which is crucial for aligning the radiating star blocks correctly.
You’ll also need a sewing machine that can handle quilting tasks comfortably. If possible, use a walking foot or quarter-inch foot to maintain accurate seam allowances throughout the project.
Basic quilting supplies like pins, fabric clips, scissors, and a seam ripper are also necessary. Having these on hand makes the sewing process smoother and more enjoyable.
Finally, don’t forget batting and quilting thread. Opt for a high-quality cotton or polyester batting to give the quilt softness and durability, paired with threads that blend or contrast beautifully with your fabric choices.
With your materials ready, the next step in the Rosewood Radiance Quilt – Tutorial is cutting and preparing all the pieces. Accuracy is the foundation of a well-constructed quilt.
Start by starching your fabrics lightly. This helps reduce stretching and warping during cutting and piecing, resulting in sharper corners and straighter lines.
Refer to your pattern’s cutting guide and begin cutting strips, squares, and triangles needed for the star blocks and background pieces. Take your time to ensure each piece is measured and cut correctly.
Organize your cut pieces by color and block type. Small bins, trays, or zip-lock bags work well for keeping everything neat and easy to access during assembly.
Label each group of pieces with sticky notes or fabric markers. This step reduces confusion when it’s time to sew, especially since the Rosewood Radiance Quilt – Tutorial involves several block variations.
Double-check your counts before moving forward. Running short on any piece can disrupt your workflow and affect the symmetry of the final design.
Lastly, set up a clean sewing area with good lighting and enough space for your machine, tools, and fabric piles. Being organized from the beginning helps keep the quilting process enjoyable and efficient.
Now comes the most exciting part of the Rosewood Radiance Quilt – Tutorial—assembling the quilt blocks. These radiant star blocks are what give the quilt its name and signature beauty.
Begin with the center star block. Sew half-square triangles (HSTs) using the two-at-a-time method for efficiency. Pair light and dark fabrics to create contrast and make the star design pop.
Once your HSTs are trimmed to size, assemble them with center squares and side rectangles according to the pattern layout. Keep an eye on your seam allowance, maintaining a consistent ¼ inch throughout.
Press seams carefully after each step. Press toward the darker fabric to prevent shadowing, or use open seams if the block feels bulky. Proper pressing keeps your blocks crisp and flat.
Repeat the process for the side star blocks. The Rosewood Radiance Quilt – Tutorial typically uses variations in color placement to create movement and depth in the quilt.
Check the alignment of points frequently. If your seams are slightly off, don’t hesitate to use a seam ripper and adjust. The time spent perfecting these details pays off when the blocks come together flawlessly.
After completing all blocks, lay them out on a design wall or clean floor to finalize the arrangement. This step allows you to balance colors and adjust placement before sewing everything together.
The final phase of the Rosewood Radiance Quilt – Tutorial is assembling the quilt top, adding batting and backing, quilting the layers, and finishing with binding.
Sew the quilt blocks together row by row, carefully matching seams where the blocks meet. Take your time pinning intersections to ensure clean lines and accurate corners.
Once the quilt top is assembled, prepare your quilt sandwich: backing fabric (right side down), batting, and the quilt top (right side up). Smooth out each layer to prevent wrinkles.
Baste the layers together using safety pins, basting spray, or large hand stitches. A well-basted quilt reduces shifting during quilting and results in a more professional finish.
Choose your quilting design. You can follow the lines of the star blocks with straight-line quilting, create echo quilting around the stars, or try free-motion quilting for a flowing look.
After quilting, trim the excess batting and backing. Prepare your binding strips—either matching one of the quilt fabrics or using a contrasting color for a bold edge.
Attach the binding by sewing it to the front of the quilt first, then folding it over to the back and stitching it down by hand or machine. This final touch completes your masterpiece.
1. Is the Rosewood Radiance Quilt – Tutorial beginner-friendly?
Yes, with patience. While it involves precise piecing, the tutorial breaks it down into manageable steps suitable for confident beginners.
2. What size quilt can I make with this pattern?
The Rosewood Radiance Quilt – Tutorial can be adapted to various sizes including lap, twin, or queen. Simply adjust the number of blocks.
3. Do I need special tools for this quilt?
Basic quilting tools like a rotary cutter, ruler, and sewing machine are sufficient. A quarter-inch foot and walking foot are helpful but not mandatory.
4. How do I achieve perfect points in the star blocks?
Consistent seam allowances and careful pressing are key. Take your time aligning pieces, and don’t hesitate to redo seams if necessary.
5. Can I use scrap fabrics for this quilt?
Absolutely! This quilt is perfect for using coordinated scraps, especially for the star sections. Just ensure consistent fabric weight.
6. What quilting design works best for this quilt?
Straight-line quilting highlights the geometric lines, while free-motion quilting can add softness. Both options work beautifully with the Rosewood Radiance Quilt – Tutorial.
In this comprehensive guide, the Rosewood Radiance Quilt – Tutorial has walked you through each step—from selecting materials and cutting fabrics to assembling, quilting, and binding your project. With its radiant star design and rich color palette, this quilt is a rewarding project that blends creativity with skill.
If you’ve followed along and created your own Rosewood Radiance Quilt, we would love to hear from you. Please share your honest opinion and suggestions in the comments. Your feedback inspires us to keep providing valuable tutorials for quilting enthusiasts like you.


