
Crochet Multi-Purpose Blouse, Shawl, Runner Model

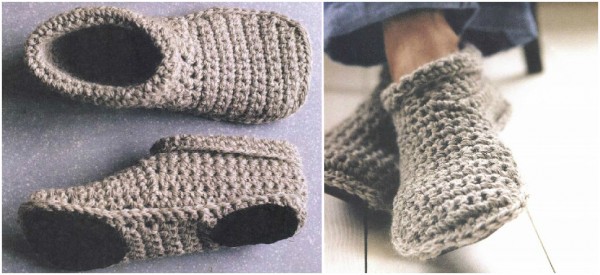
If you are looking for a fun, practical, and cozy project, the Slipper Boots Free Crochet Pattern is the perfect choice for you. These slipper boots are not only comfortable but also stylish and customizable to fit any size or color preference.
Crocheting your own slipper boots allows you to combine creativity with functionality, making a thoughtful gift or a special treat for yourself.
The Slipper Boots Free Crochet Pattern is designed to be beginner-friendly while offering enough versatility for experienced crocheters to add their own flair.
These slipper boots are perfect for keeping your feet warm during chilly mornings or relaxing evenings at home. Plus, they are eco-friendly since you can use leftover yarn or sustainable materials.
In this comprehensive guide, you will learn everything you need to know about the Slipper Boots Free Crochet Pattern, from the materials required to the step-by-step instructions and helpful tips for a perfect finish.
Whether you are crocheting for yourself, your family, or as handmade gifts, this tutorial will guide you through every stitch.
The Slipper Boots Free Crochet Pattern is a downloadable and printable guide that helps crafters create warm, cozy slipper boots using basic crochet techniques. This pattern is designed to be adaptable to different foot sizes and styles.
This pattern typically includes detailed written instructions, stitch diagrams, and helpful tips. Whether you prefer ankle-height or mid-calf slipper boots, this pattern can be adjusted easily to match your desired length and fit.
One of the best things about the Slipper Boots Free Crochet Pattern is its versatility. You can choose different yarn weights, colors, and textures to create unique pairs of slipper boots that suit your style or that of your loved ones.
The finished slipper boots are not just beautiful but highly functional. They are ideal for indoor wear, providing comfort and warmth during cold seasons. Adding a non-slip sole can even make them safer for walking on slippery floors.
Additionally, this pattern is perfect for gift-making. Handmade slipper boots are always appreciated for their thoughtful touch and practicality. They are perfect for birthdays, holidays, or even self-care gifts.
Working on the Slipper Boots Free Crochet Pattern also offers a relaxing, meditative experience. It’s a rewarding project that combines creativity, craftsmanship, and comfort.
Before you start the Slipper Boots Free Crochet Pattern, it’s important to gather the right materials. Having everything prepared will make your crocheting process smooth and enjoyable.
You will need medium-weight yarn (worsted weight) or chunky yarn, depending on how thick and warm you want your slipper boots to be. Acrylic, wool, or a wool blend is commonly used for softness and durability.
A crochet hook that matches your yarn weight is essential. Most patterns recommend sizes between 5mm to 7mm, but always check your pattern for the correct size to achieve the right gauge.
You’ll also need scissors and a yarn needle for weaving in ends and sewing pieces together if needed. A stitch marker can be very helpful to keep track of rounds or important points in the pattern.
For extra comfort and practicality, consider adding a foam insole or a felt sole inside the slippers. This provides cushioning and extends the life of your slipper boots.
If you want to make them slip-resistant, you can use fabric paint, hot glue, or pre-made rubber soles. This is especially useful if you have wooden or tile floors at home.
Optional decorations include buttons, pom-poms, or crocheted flowers. These can be added to personalize your slipper boots and give them a unique and playful look.
Creating your own pair using the Slipper Boots Free Crochet Pattern is straightforward and enjoyable. Let’s go through the basic steps to help you get started.
Begin by making the sole. Most patterns start with a foundation chain that matches the length of the foot. You’ll work around the chain using increases to form an oval shape that fits the bottom of the foot.
Once the sole is complete, you move on to the sides. This involves crocheting in rounds or rows along the edge of the sole to build the walls of the slipper. This part forms the sides and toe area.
For the heel, you will typically create a few decrease rows to shape the back of the foot snugly. Some patterns include a seam at the back, while others are worked in the round for a seamless look.
Next, crochet the ankle and boot section. Depending on your preference, you can stop at the ankle for short slipper boots or continue upward for a mid-calf or knee-high style.
At this point, you can add cuffs, ribbing, or decorative stitches around the ankle opening. This adds a finished look and helps the boots stay securely on your feet.
Finally, finish by adding any desired decorations or functional additions like buttons, soles, or non-slip materials. Weave in all loose ends carefully for a polished and professional result.
Using the Slipper Boots Free Crochet Pattern can be simple, but there are some helpful tips that can elevate the quality and fit of your finished project.
Check your gauge before starting. Making a small swatch helps ensure your stitches match the pattern’s sizing recommendations. This avoids ending up with slipper boots that are too big or too small.
Choose yarn that is both soft and durable. Slippers undergo a lot of wear and tear, so a sturdy yarn like a wool blend or durable acrylic will help your boots last longer.
Reinforce the sole. Adding a double layer to the sole or stitching on a felt piece increases comfort and durability. This is especially useful if you plan to wear the slippers frequently.
Pay attention to tension. Maintaining consistent stitch tension is crucial to ensure that both slippers are the same size and shape. Uneven tension can lead to mismatched boots.
If you want a snug fit around the ankle, consider adding ribbing or elastic edging. This helps keep the slippers from slipping off while walking around.
Experiment with colors and textures. Use variegated yarns for a fun multicolor effect or stick with neutral tones for a classic look. Adding stripes or color blocks can also make your slipper boots stand out.
1. Is the Slipper Boots Free Crochet Pattern suitable for beginners?
Yes! The Slipper Boots Free Crochet Pattern is designed to be beginner-friendly with clear instructions. Basic knowledge of single crochet, half-double crochet, and slip stitches is helpful.
2. How long does it take to crochet slipper boots?
Typically, it takes between 4 to 6 hours to complete a pair, depending on your skill level and the complexity of the design. Faster crocheters may finish even sooner.
3. Can I adjust the size of the slipper boots?
Absolutely. The pattern often includes size adjustments for small, medium, and large. You can also modify the starting chain or add rows to fit your foot perfectly.
4. What is the best yarn for slipper boots?
Wool blends or acrylic yarn are ideal for slipper boots due to their durability and warmth. Avoid very soft or fluffy yarns that may wear out quickly.
5. How do I make slipper boots non-slip?
You can apply fabric paint, hot glue dots, or sew on rubber soles to the bottom of the slippers to make them slip-resistant, especially on tile or hardwood floors.
6. Can I machine wash crochet slipper boots?
If made with washable yarn like acrylic, yes. However, handwashing is recommended to maintain shape and longevity, especially if decorations like buttons are attached.
The Slipper Boots Free Crochet Pattern is a delightful project that combines creativity, comfort, and practicality. You’ve learned how to choose materials, follow the steps, and apply helpful tips to create your own cozy pair of slipper boots.
This pattern is perfect for anyone looking to make a thoughtful gift or a warm treat for themselves. With endless options for customization in color, size, and style, your handmade slippers will be truly one of a kind.
I hope this tutorial has inspired you to pick up your crochet hook and start crafting. If you’ve tried this pattern, please leave your honest feedback, share your thoughts, and let us know what other crochet patterns you’d like to see in the future!


