
Crochet Multi-Purpose Blouse, Shawl, Runner Model

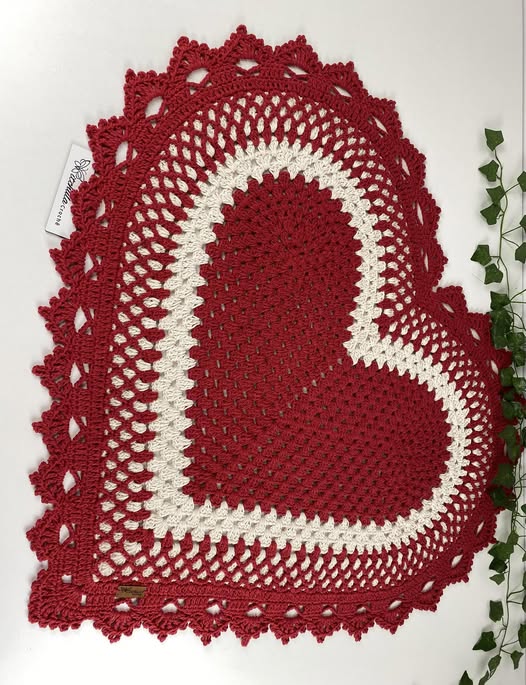
If you are looking to create something special and heartwarming for February 14th, the VALENTINE’S DAY RUG step by step is the perfect project for you. This adorable handmade rug brings warmth, love, and charm to any space in your home.
Whether it’s for your living room, bedroom, or entryway, this rug is a lovely way to celebrate love and add a cozy touch to your decor.
The VALENTINE’S DAY RUG step by step is designed to be beginner-friendly yet visually stunning. Using basic crochet techniques, you can craft a rug filled with hearts, romantic colors, and a soft texture that embodies the spirit of Valentine’s Day. Plus, it’s a thoughtful gift for someone special or a delightful addition to your own space.
Creating the VALENTINE’S DAY RUG step by step is more than just making a decorative piece. It’s a labor of love that allows you to express creativity while making something useful and beautiful.
In this guide, you’ll find detailed instructions, materials needed, and helpful tips to ensure your rug turns out perfectly.
The VALENTINE’S DAY RUG step by step is a crochet project designed with love in mind. It often features motifs like hearts, flowers, or scalloped edges, paired with romantic colors such as red, pink, white, and soft pastels.
This project is perfect for crafters of all skill levels. The stitches involved are simple, yet when combined, they create a stunning and heartfelt piece. Whether you are new to crochet or an experienced maker, this rug offers an enjoyable crafting experience.
The rug’s shape can be circular, oval, or even heart-shaped. This flexibility allows you to tailor the VALENTINE’S DAY RUG step by step to your personal style and the space where you plan to place it.
A great feature of this rug is its versatility. It can serve as a floor rug, a table centerpiece, or even a decorative wall hanging. The design options are endless, making it a truly customizable project.
Using eco-friendly materials such as cotton yarn or recycled t-shirt yarn not only adds durability but also aligns with sustainable crafting practices. The texture will be soft underfoot while sturdy enough for everyday use.
The process of making the VALENTINE’S DAY RUG step by step also offers a wonderful opportunity to relax and enjoy mindful crafting. As you crochet each stitch, you’re quite literally stitching love into every part of your creation.
To start your VALENTINE’S DAY RUG step by step, gathering the right materials is essential. Having everything prepared ahead of time ensures a smooth crafting experience.
First, choose the yarn. Soft, chunky cotton yarn or recycled fabric yarn is ideal for a rug. These materials are durable, washable, and provide the plush texture you want for a cozy rug.
Select crochet hooks that match the thickness of your yarn. Typically, a size between 8mm (L) and 12mm (O) is perfect for rug projects. A larger hook will help create looser stitches that make the rug more flexible and quicker to complete.
Other essential tools include a pair of sharp scissors for cutting yarn and a large yarn needle for weaving in ends once your rug is finished. These basic tools will help keep your work neat and durable.
You may also want a stitch marker to help keep track of your rounds, especially if you are working on a circular or oval-shaped rug. It’s an inexpensive tool that prevents you from losing your place.
Consider adding a non-slip backing or rug gripper if you plan to place your VALENTINE’S DAY RUG step by step on smooth floors. This small addition ensures safety and keeps the rug in place.
Optional embellishments like pom-poms, heart-shaped appliques, or fringe can add extra charm to your rug. Personal touches like these turn your project from beautiful to unforgettable.
Creating the VALENTINE’S DAY RUG step by step involves simple but satisfying crochet techniques. You’ll be working in rounds or rows depending on your chosen shape.
Start by making a foundation chain. If your rug is heart-shaped, you may begin with two small circles that are connected and worked downward into the point of the heart. For an oval or round rug, a simple chain followed by rounds of increases is the starting point.
After your foundation is set, begin crocheting around it using basic stitches like single crochet, half double crochet, or double crochet. Add increases evenly around the curves or edges to ensure the rug lies flat.
As you continue, incorporate color changes to create heart patterns or stripes. This is where your VALENTINE’S DAY RUG step by step really starts to come to life with romantic designs.
To form the heart shapes, you can crochet small heart appliques separately and sew them onto the rug. Alternatively, you can use color changes within the stitches to form hearts directly in the pattern.
Pay close attention to your stitch tension. Keeping it consistent helps the rug maintain its shape. If you notice curling or rippling, you may need to adjust the number of increases or slightly loosen your stitches.
Finish your rug with a border. A scalloped edge in a contrasting color like white or pink adds a lovely touch to your VALENTINE’S DAY RUG step by step, giving it a polished, festive appearance.
Crafting the perfect VALENTINE’S DAY RUG step by step becomes easier when you apply a few helpful tips. These small details make a big difference in the final look and durability of your rug.
First, always test your yarn and hook combination before starting the full project. Make a small swatch to ensure the fabric is the right thickness and feel for a rug.
Check your stitch count frequently. Missing an increase or accidentally adding extra stitches can throw off the shape, especially in patterns with curves like hearts or ovals.
Use a color plan. Decide ahead of time where you want different colors to appear—whether for hearts, stripes, or borders. This prevents mid-project confusion and ensures a cohesive design.
If your rug starts to curl at the edges, try blocking it. Lightly spray the rug with water and pin it flat to dry. This process helps even out tension issues and smooths the edges.
Consider double-stranding your yarn for extra durability. This method involves holding two strands of yarn together as you crochet, creating a thicker, more robust fabric perfect for high-traffic areas.
Finally, enjoy the process! The VALENTINE’S DAY RUG step by step is a celebration of love and creativity. Taking your time and enjoying each stitch makes the end result even more meaningful.
1. Is the VALENTINE’S DAY RUG step by step beginner-friendly?
Yes, this pattern is perfect for beginners. It mainly uses simple stitches like single crochet, half double crochet, and double crochet, with clear step-by-step instructions.
2. How long does it take to make the VALENTINE’S DAY RUG?
Depending on the size and your crochet speed, it typically takes between 6 to 12 hours to complete the rug.
3. What type of yarn is best for the VALENTINE’S DAY RUG step by step?
Chunky cotton yarn, t-shirt yarn, or other durable fibers are ideal. They provide softness underfoot and are easy to clean.
4. Can I customize the colors of the rug?
Absolutely! While red, pink, and white are traditional Valentine’s Day colors, you can choose any combination that matches your home decor.
5. How do I keep my rug from slipping on the floor?
Adding a rug gripper or non-slip backing will keep the VALENTINE’S DAY RUG step by step securely in place on smooth surfaces.
6. Is the rug machine washable?
If made with cotton or t-shirt yarn, it is usually machine washable on a gentle cycle. However, handwashing can help preserve its shape and colors longer.
The VALENTINE’S DAY RUG step by step is a wonderful crochet project that combines creativity, love, and functionality. Whether you make it for yourself or as a thoughtful gift, this rug adds a touch of handmade warmth to any space.
Throughout this article, we covered everything from understanding the project’s design, gathering materials, following the crochet instructions, and helpful tips for the best results. The FAQ section also addressed the most common questions to help guide you.
I hope you enjoyed learning how to create your own VALENTINE’S DAY RUG step by step. If you try this project, please leave your honest opinion and suggestions in the comments. Your feedback helps inspire others and improves future patterns. Happy crocheting and happy Valentine’s Day!


