
Crochet Multi-Purpose Blouse, Shawl, Runner Model

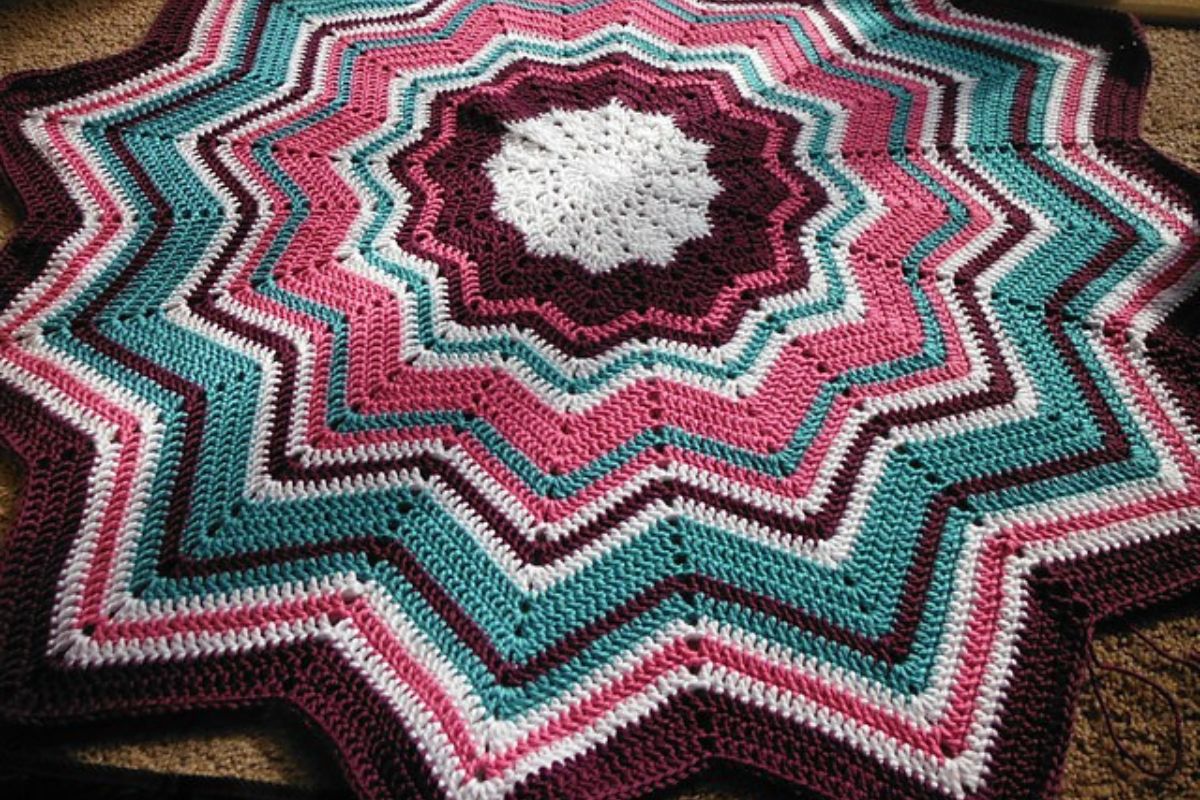
The Rainbow Ripple Baby Blanket – FREE PATTERN is one of the most beloved and cheerful crochet projects for beginners and experienced crafters alike. Its vibrant, colorful design and soothing wave-like texture make it a perfect handmade gift for new babies, nurseries, or simply for adding joy to any child’s room.
Whether you’re making this for a baby shower or a family keepsake, this pattern is both heartwarming and fun to create.
What sets the Rainbow Ripple Baby Blanket – FREE PATTERN apart is its versatility and ease of customization. You can choose your favorite color palette—be it classic rainbow hues, pastels, or modern neutrals—and adapt the size to suit your needs.
The repeating ripple pattern not only looks beautiful but is also relaxing to work on, making it ideal for crocheting during cozy evenings or quiet weekends.
In this article, we’ll explore how to get started with the Rainbow Ripple Baby Blanket – FREE PATTERN, including yarn selection, stitch instructions, tips for a professional finish, and ideas for customization.
You’ll also find a helpful FAQ section to answer common questions and a conclusion to encourage your feedback and creative sharing. Let’s dive into this delightful project and create something truly special.
Before picking up your hook, it’s important to understand the structure and materials needed for the Rainbow Ripple Baby Blanket – FREE PATTERN. This ripple blanket is typically made using a series of double crochet stitches that create peaks and valleys, giving it that signature zigzag look. Choosing the right yarn and hook size will make your project easier and more enjoyable.
For beginners, worsted-weight yarn is a good starting point. It’s easy to work with and provides a nice balance of warmth and softness. You’ll need multiple colors if you want to achieve the rainbow effect, but you can also go for ombre tones or alternate between two or three shades for a more subtle look. Acrylic yarns are recommended for baby blankets because they are machine washable and gentle on sensitive skin.
A size H/8 (5.0 mm) crochet hook works well with worsted yarn and provides a balanced tension for the ripple pattern. If your stitches tend to be tight, you might size up slightly. Gauge isn’t critical for this pattern, but consistency is key—your ripples should look uniform and evenly spaced.
To create the ripple effect, the pattern uses increases and decreases spaced at regular intervals. These techniques form the characteristic wave shape, and once you understand the rhythm of the pattern, it becomes almost meditative. Always count your stitches at the end of each row to make sure your blanket stays even.
A good starting chain for a baby-sized blanket is around 107 stitches, but the ripple pattern requires a multiple of 14 + 3, so you can adjust accordingly depending on your desired size. Write down your stitch count for reference as the project grows.
Before moving on, gather your tools: a yarn needle for weaving in ends, scissors, and stitch markers if you like to track the peaks and valleys. Having everything ready ensures a smoother crochet experience and minimizes interruptions.
The beauty of the Rainbow Ripple Baby Blanket – FREE PATTERN lies in its texture. The ripple effect is achieved through simple yet effective crochet techniques, making it suitable for crafters of all skill levels. Let’s break down the core stitches and tips that bring this pattern to life.
The blanket is primarily made up of double crochet (dc) stitches, which provide height and a soft drape. By strategically adding or subtracting stitches in specific spots, you’ll create gentle waves. Increases are made by working three double crochets into the same stitch, while decreases involve skipping stitches or working two stitches together.
Stitch markers are useful tools to help track where increases and decreases occur. Place them at the start of your peaks and valleys so you can quickly identify the stitch count rhythm. This helps maintain the ripple shape and prevents unintentional stitch loss or gain.
Keep your tension relaxed and consistent. If your tension changes between rows, the edges of your blanket may start to curl or warp. Practicing with scrap yarn before beginning your final project can help you find a comfortable rhythm and ensure even stitches.
Change colors at the end of rows for a clean transition. When switching colors, always complete the final yarn-over of the last stitch with the new color. This method prevents color bleeding and gives your stripes a crisp, clean look.
To avoid weaving in hundreds of ends, consider carrying the yarn up the side or crocheting over the ends as you go. This not only saves time but also reduces bulk, keeping the blanket soft and smooth.
Finally, take your time and enjoy the process. The ripple stitch has a relaxing flow once you get the hang of it. Whether you’re listening to music, watching TV, or enjoying a peaceful moment, this project is perfect for crafting mindfulness.
One of the most exciting aspects of the Rainbow Ripple Baby Blanket – FREE PATTERN is the opportunity for creativity through color. Whether you follow a traditional rainbow order or experiment with your own palette, each version becomes a unique masterpiece.
For a classic rainbow look, use red, orange, yellow, green, blue, indigo, and violet. You can alternate these in a repeated sequence or create longer color blocks for a bolder statement. Choose shades that complement each other well and create a pleasing visual flow.
If you prefer a softer look, pastel colors work beautifully in baby blankets. Think blush pink, mint green, sky blue, and lavender. These shades are soothing and popular for newborns, adding a dreamy quality to the blanket.
Neutral tones such as beige, gray, ivory, and soft browns are also stylish and timeless. They blend well with any nursery decor and suit both boys and girls. Neutral palettes are especially loved for baby shower gifts when the baby’s gender is unknown.
You can also create an ombre effect by gradually changing from light to dark shades of the same color. This gives your blanket a sophisticated gradient look and works well in modern or minimalist nurseries.
Adding a border is another way to personalize your blanket. A simple single crochet or picot border can frame the ripples beautifully. You can match the border to one of your main colors or choose a contrasting shade to make the design pop.
Finally, consider adding a small tag or label with the baby’s name, birthdate, or a sweet message. These tiny touches transform your crochet into a keepsake that families will treasure for years to come.
The Rainbow Ripple Baby Blanket – FREE PATTERN is not just beautiful—it’s also practical. Ensuring proper care for your finished piece will help maintain its quality, color, and softness through use and washing. Here’s how to care for your blanket so it lasts a lifetime.
First, always check the yarn label for washing instructions. Most baby-safe acrylic yarns are machine washable, which is a huge plus for busy parents. Use cold or lukewarm water and a gentle cycle to keep the fibers soft and colors vibrant.
If you’ve used wool or a wool blend, you may need to hand wash the blanket to avoid shrinking. Fill a basin with cool water and mild detergent, gently submerge the blanket, and press (don’t wring) the water out before laying it flat to dry.
Drying the blanket properly is just as important. Lay it flat on a clean towel and reshape the edges while it’s still damp. Avoid hanging it to dry, as this can stretch the blanket out of shape. Never use high heat to dry crochet projects.
For long-term storage, fold the blanket neatly and place it in a breathable fabric bag or storage container. Avoid plastic bags, which can trap moisture and cause mildew or fiber breakdown over time.
If the blanket is used regularly, inspect it occasionally for loose ends or worn stitches. Gently rework any problem areas with a yarn needle to maintain its structural integrity. This light maintenance keeps the blanket looking fresh and safe for baby use.
A well-made Rainbow Ripple Baby Blanket – FREE PATTERN can become a cherished heirloom, passed down from sibling to sibling or even through generations. Taking time to care for it ensures its beauty and warmth are preserved.
Is the Rainbow Ripple Baby Blanket suitable for beginners?
Yes! This pattern is very beginner-friendly. The ripple stitch uses basic increases and decreases, and once you learn the repeat, it’s easy to follow.
How many colors do I need for the rainbow effect?
Traditionally, you’ll use 7 colors for the rainbow, but you can use as many or as few as you like. Some versions use just 3 alternating shades or a full gradient set.
What size should I make the starting chain?
A typical baby blanket chain is around 107 stitches, but the pattern requires a multiple of 14 + 3. You can adjust the size depending on your preference.
Can I use a different type of yarn?
Absolutely. Just choose a yarn that’s soft and washable. Acrylic and cotton blends are great for baby items. Just adjust your hook size to match the yarn.
What’s the best way to change colors?
Change colors at the end of the row by finishing the last yarn-over with the new color. This keeps transitions neat and reduces ends to weave in.
Do I need a border?
A border is optional, but it can add a polished finish. A single crochet edge in a neutral color or one of the main colors works beautifully.
The Rainbow Ripple Baby Blanket – FREE PATTERN is more than just a crochet project—it’s a heartfelt creation full of joy, color, and comfort. In this article, we explored everything from yarn choices and stitch techniques to customization ideas and care tips, helping you feel confident in making your own ripple masterpiece.
Whether you’re crafting for a new arrival, a thoughtful gift, or simply for the joy of crochet, this pattern delivers on beauty and simplicity. We hope this guide has inspired you to begin or finish your own blanket with pride and creativity.
We’d love to hear from you! Please leave a sincere opinion or share your experience in the comments. What colors did you choose? Did you add a border or tag? Your suggestions and feedback are always welcome and help our community grow together. Happy crocheting!


