
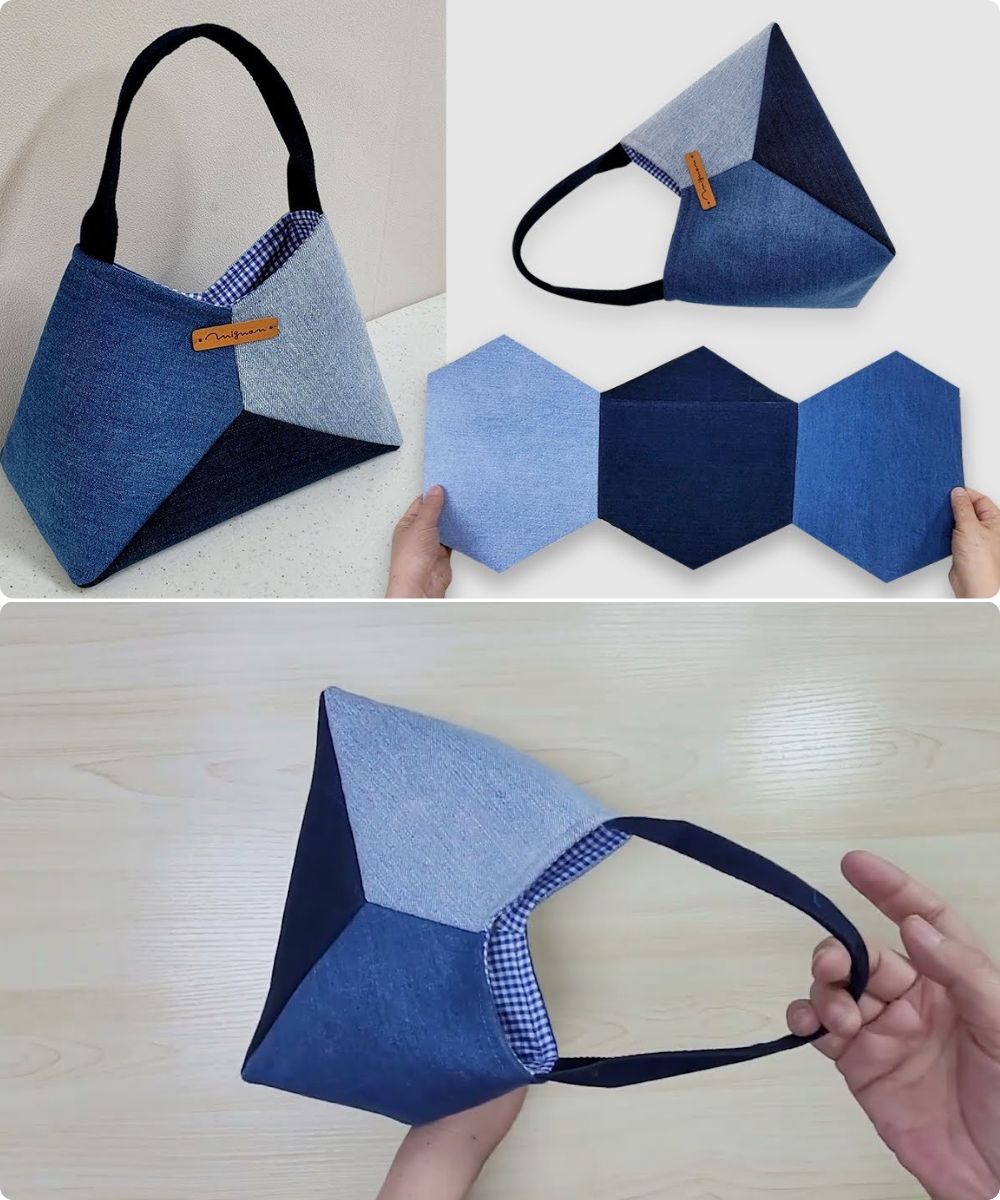
Pie Carrier Sewing Pattern

If you’ve ever dreamed of creating your own bag that’s both stylish and practical, then this guide on Step-by-Step Tote Crochet Bag Tutorials is the perfect place to start. A crochet tote bag is a wonderful beginner-friendly project that allows for creativity while offering a functional final product.
Whether you need a bag for groceries, beach trips, or everyday errands, crochet tote bags can be customized in size, color, and design to suit your taste.
Learning to make a tote bag through crochet introduces you to useful techniques such as shaping, creating flat bases, adding sturdy handles, and choosing the right yarn for durability.
These step-by-step tote crochet bag tutorials are crafted to walk you through every part of the process, ensuring you feel confident from the first stitch to the final assembly. Even if you’ve never crocheted a bag before, this article provides clear, digestible instructions to help you succeed.
In this detailed guide, we’ll explore the tools you’ll need, the most common stitches used in tote bags, various patterns and shapes you can try, and how to make your bag strong enough for everyday use.
With these Step-by-Step Tote Crochet Bag Tutorials, you won’t just make a bag—you’ll create something you can proudly carry and even gift to friends and family. Let’s begin your crochet journey with this satisfying and practical project!
The foundation of any great crochet tote bag starts with choosing the right yarn. You’ll want a strong, durable fiber—cotton yarn is the most popular choice. It holds its shape, is machine washable, and is soft enough to work with easily.
Worsted weight yarn (category #4) is ideal for tote bags. It provides the right amount of thickness without being too heavy or bulky. Avoid very stretchy yarns like acrylic for tote bags as they may lose shape under weight.
Your crochet hook should match your yarn. For worsted weight yarn, a 5 mm (H-8) or 5.5 mm (I-9) hook is commonly recommended. Using a slightly smaller hook than usual can also make your stitches tighter and sturdier.
Other tools you’ll need include scissors, a yarn needle for weaving in ends, and stitch markers to track your rounds or sides. Optional tools like a tape measure and blocking mat can help maintain symmetry in your project.
For lining your bag, consider lightweight fabric and a sewing needle and thread, especially if you plan to carry small items. Lining can add both function and polish to your finished bag.
Finally, print or save your Step-by-Step Tote Crochet Bag Tutorial so you can reference it throughout the process without losing your place.
Most crochet tote bags begin with a solid base—either rectangular, oval, or circular. This provides stability for the items you’ll carry. Starting with a chain of about 25–30 stitches is a good size for beginners.
To form a rectangular base, crochet rows of single crochet or half double crochet until your base reaches the desired length. Turn your work at the end of each row and continue until the rectangle is complete.
For an oval base, start with a chain, then work around both sides of the chain in the round, increasing at each end. This helps shape the base without sharp corners and is a common style for market bags.
Once the base is completed, you’ll begin building the body of the tote by crocheting around the outer edge of the base. No more turning—just continue in a spiral or joined rounds.
Use stitch markers to keep track of the first stitch in each round. This helps maintain even sides and prevents the bag from twisting as it grows.
A well-structured base is essential for a functional bag. Take your time to get it right—crochet tightly, count your stitches, and check for symmetry.
With the base ready, now it’s time to build up the sides of your crochet tote bag. This is where the real character of your bag takes shape. You can use a single stitch throughout or get creative with textured patterns like the mesh stitch, puff stitch, or granite stitch.
Work in continuous rounds or joined rounds, depending on the look you want. Continuous rounds avoid seams, while joined rounds give cleaner edges and easier row counting.
For a solid tote, single crochet or half double crochet works great. For a lighter, more breathable bag (great for beach or produce totes), try a mesh pattern using chain spaces.
Once the body is the desired height—usually between 10 to 14 inches—it’s time to shape and add the handles. Handles can be simple chains reinforced with slip stitches or more elaborate with thick, sturdy straps.
To make the handles, mark your desired placement with stitch markers. Skip stitches in the top edge where your handles will go, and work chains across the skipped sections. Then on the next round, reinforce the chain with stitches.
You can also create separate straps and sew them on afterward. This adds strength, especially for larger totes or those that will carry heavy items.
Finishing your tote bag involves more than just fastening off the yarn. The final steps are just as important for achieving a polished, long-lasting result.
Weave in all yarn ends using a yarn needle. Make sure they’re secure—especially at the base and handles—so they don’t come loose with use.
Blocking your bag is optional but recommended. Dampen your tote and shape it on a flat surface to smooth out uneven stitches and give it a professional finish.
Add a fabric lining if you plan to carry small or delicate items. A simple rectangle sewn into the inside of the bag can prevent stretching and items falling through mesh.
You can personalize your crochet tote bag by adding buttons, zippers, tassels, or even embroidery. This makes each bag unique and fun to create.
If gifting your tote, consider adding a handmade label or tag. This adds a personal touch and showcases your craftsmanship.
Now that you’ve mastered this tutorial, challenge yourself with variations—try using color changes, textured stitches, or even creating matching pouches or accessories.
What is the best yarn for a crochet tote bag?
Cotton yarn is the best choice for tote bags because it is strong, washable, and holds its shape well. Look for worsted weight cotton for durability.
How long does it take to crochet a tote bag?
It depends on the size and stitch pattern, but most beginners can complete a basic tote in 4–6 hours over a few sessions.
Can I add a lining to my crochet tote bag?
Yes! Adding a fabric lining improves strength and keeps small items from falling out. It’s a great finishing touch for functional totes.
What stitches are best for tote bags?
Simple stitches like single crochet, half double crochet, and mesh stitch are commonly used. They offer strength and are easy to work with.
How do I wash a crochet tote bag?
Hand wash in cold water and lay flat to dry. If you used cotton yarn, some bags may also be machine washable—check the yarn label for care instructions.
Can I make my own pattern after learning this tutorial?
Absolutely! Once you’re familiar with the structure, you can customize size, stitch combinations, and even create your own design from scratch.
Now that you’ve followed this Step-by-Step Tote Crochet Bag Tutorials guide, you’re ready to create a beautiful and functional tote bag with confidence. From choosing the right yarn and stitches to building the base, body, and handles, you now understand each part of the process.
Crochet tote bags are not only practical but also enjoyable to make. They’re perfect for gifting, selling, or adding to your personal collection. Remember that every stitch you make improves your skills and brings you closer to becoming a more experienced crocheter.
We’d love to hear from you! Share your thoughts, questions, or suggestions in the comments. What kind of bag will you make next? Let your creativity lead the way—happy crocheting!


