
Crochet Multi-Purpose Blouse, Shawl, Runner Model

If you’ve been searching for the perfect handmade accessory to combine style and functionality, this guide on How to Make Headband, Crochet Ponytail Hat – All Sizes is just for you.
Whether you’re a beginner or experienced crocheter, creating these pieces can be a fun and satisfying project. These crochet accessories are ideal for keeping warm, looking trendy, and making personalized gifts for family and friends.
The crochet ponytail hat is especially popular because of its practical design. It allows your ponytail or bun to stick out while still keeping your head cozy and stylish.
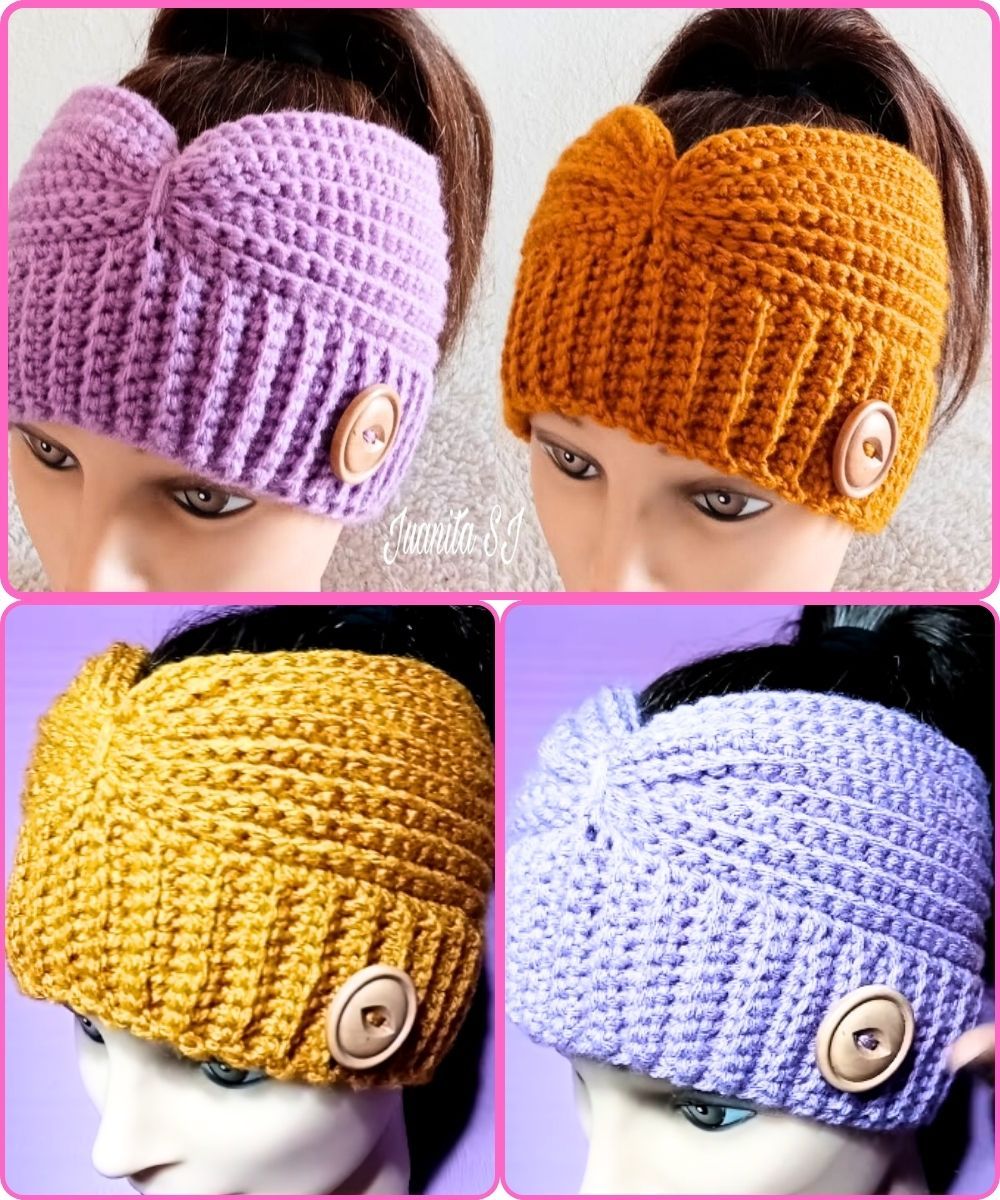
On the other hand, a crochet headband is a versatile accessory that works for all ages and seasons. From toddlers to adults, these patterns can be customized in size, color, and texture.
In this tutorial, we will walk you through how to make headbands and crochet ponytail hats in all sizes, from baby to adult.
You’ll learn the materials you need, simple techniques, and pattern tips to ensure your projects come out perfect. These crochet ideas are not only beautiful but also practical additions to your handmade collection.
When starting your headband or crochet ponytail hat, selecting the right yarn is crucial.
Pick a crochet hook size that complements your yarn choice. Always check the yarn label for the recommended hook size.
For baby sizes, use lightweight yarn and smaller hooks to ensure the headband or hat fits snugly and gently.
For adults, bulkier yarns work well and make the project faster to complete.
Use a tape measure to match your desired head circumference for a perfect fit every time.
A crochet headband is a quick and beginner-friendly project. You can complete one in under an hour!
Start with a chain that matches the head circumference minus 1–2 inches (to account for stretch).
Use basic stitches like half-double crochet (hdc) or double crochet (dc) to create the band’s body.
Crochet in rows or in the round, depending on the style you prefer.
Try variations like the twisted headband or bow-front design to add extra flair.
Secure the ends together using slip stitch or whipstitch for a clean finish.
Add embellishments like buttons, flowers, or bows for a personalized touch.
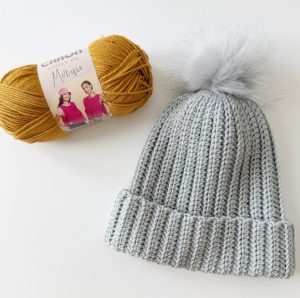
The crochet ponytail hat—also called a messy bun hat—is crocheted like a beanie but leaves a hole at the top.
Start with a magic ring or chain loop at the crown, leaving a 2–3 inch opening.
Work in rounds using stitches like single crochet (sc), hdc, or dc, increasing as needed for the head size.
Continue until the hat reaches the desired length (typically just above the ears or to the nape).
Finish with a few tighter rounds for a snug brim or add ribbed edging for stretch.
You can add an elastic hair tie into the crown if you want extra support for the ponytail opening.
Customize it with stripes, textures, or even faux fur yarn for seasonal appeal.
Getting the right size for your headband or ponytail hat is essential for comfort and style.
Use this general guide for head sizes:
Measure head circumference and depth to get the right number of stitches and rows/rounds.
Always make a gauge swatch before starting your project to avoid sizing surprises.
Add or subtract stitches in multiples depending on your pattern repeat.
Use stretchy stitches like ribbing or slip stitch in the back loop to help your project adapt to different sizes.
Try your project on (or measure against the recipient) as you go to ensure a great fit.
Is this a beginner-friendly project?
Yes! Both headbands and ponytail hats are simple projects perfect for beginners learning to crochet.
What type of yarn is best for these projects?
Soft acrylic, cotton, or blended yarns are ideal. For warmth, use worsted or bulky yarn. For lightweight styles, choose DK or cotton.
Can I adjust the pattern to any head size?
Absolutely. Use a tape measure and adjust your foundation chain or starting rounds to match the recipient’s head size.
How do I make the ponytail hole secure?
You can crochet tightly around a hair tie or use a strong elastic loop to make a stretchy, durable ponytail hole.
Do I need to use a specific stitch pattern?
No, you can use your favorite stitch—hdc, dc, or even textured stitches like puff or bobble work great. Keep in mind that some stretch more than others.
How long does each project take to complete?
A headband may take 30–60 minutes, while a ponytail hat may take 1–2 hours depending on your speed and pattern.
Can I add decorations to the finished pieces?
Yes! Buttons, flowers, bows, and appliqués make great additions and help personalize your item.
Do these make good handmade gifts?
Definitely! They’re thoughtful, quick to make, and can be customized in favorite colors and sizes for each person.
Now that you’ve learned How to Make Headband, Crochet Ponytail Hat – All Sizes, you’re ready to create a variety of fun, useful, and stylish crochet accessories. These projects are excellent for beginners and seasoned crocheters alike. You can make them as gifts, for sale, or for your own wardrobe—all while practicing your crochet skills and enjoying the relaxing rhythm of handmade creation.
We’d love to know what you thought of this guide! Have you made a headband or ponytail hat before? What’s your favorite yarn or pattern style? Leave your honest opinion or any suggestions in the comments—we’d love to hear from you!


