
Crochet Multi-Purpose Blouse, Shawl, Runner Model

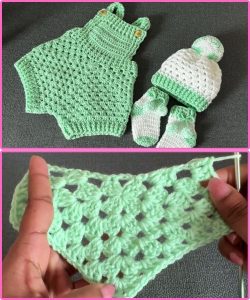
There’s nothing quite like slipping your feet into a pair of soft, cozy slippers after a long day—and it’s even better when those slippers are handmade. With this CROCHET LOVELY SLIPPERS – FREE PATTERN, you’ll not only create something practical, but also stylish, warm, and full of personal charm.
Whether you’re crafting a pair for yourself, as a heartfelt gift, or as part of your handmade business, this pattern is a wonderful project to add to your crochet collection.
The beauty of this CROCHET LOVELY SLIPPERS – FREE PATTERN is in its simplicity and flexibility. You can choose from a range of yarn colors, adjust sizing for different feet, and even add embellishments like buttons or bows to give each pair a unique flair.
These slippers are worked in a way that even beginners can follow along, while still offering experienced crocheters a chance to play with texture and design.
In this tutorial, we’ll guide you through everything—from choosing the right yarn to shaping the toe and finishing the heel.
With step-by-step explanations and tips along the way, you’ll feel confident and excited to complete your project. So grab your hook, settle into your favorite chair, and let’s start creating your own pair of crochet lovely slippers.
Selecting the right materials is key to ensuring your crochet lovely slippers are both beautiful and durable.
A simple swatch test will help you determine if your stitches are tight enough to form a sturdy slipper. Loose stitches may stretch too much over time.
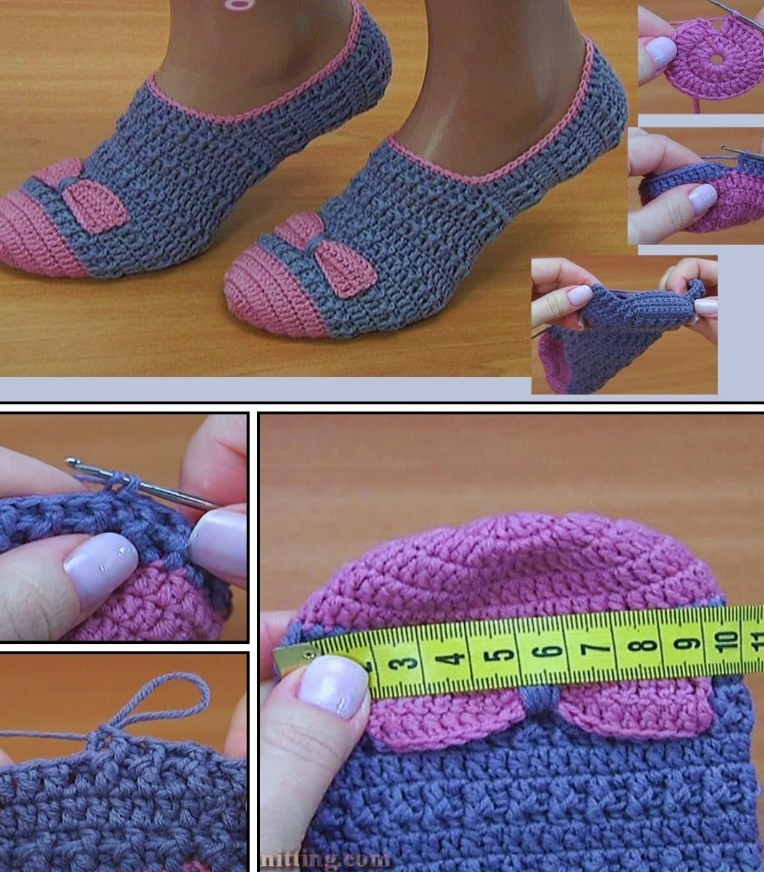
The construction of these crochet lovely slippers begins at the toe and builds backward toward the heel.
Start by creating a magic ring or chain 4 and slip stitch to form a ring.
Work increasing rounds using half double crochet (hdc) or single crochet (sc) to create a flat circular base for the toe.
As the toe area expands, begin shaping it into an oval, not a perfect circle. This allows it to fit the natural shape of the foot.
Once the toe base reaches the correct width for your size, stop increasing and work even rows to extend the slipper toward the arch.
Use stitch markers to help you track the beginning of each round.
Keep trying the slipper on as you go to ensure a snug but comfortable fit over the front of the foot.
After completing the arch area, it’s time to focus on the heel and finishing the shape of the crochet lovely slippers.
Begin working in rows instead of rounds to create the back heel portion.
Use short rows to gently decrease and shape the curve of the heel. This helps the slipper hug the foot without slipping off.
Once the heel is shaped, fold the back edges together and seam with a slip stitch or whip stitch.
To reinforce the heel, consider adding an extra row around the edge using a reverse single crochet (crab stitch).
Now you can work a finishing round around the slipper opening, which adds strength and neatness to the edge.
At this point, your slipper is essentially complete and ready for embellishments or lining, if desired.
Make your crochet lovely slippers stand out with simple, creative additions and finishing touches.
Add a decorative button or bow to the top of the toe for personality.
Use a different colored yarn for the edging to create contrast.
For a more luxurious finish, crochet a small lining or sew in a fabric insert using fleece or flannel.
If you’re giving the slippers as a gift, you can crochet a matching pouch or tie them with a ribbon and a handmade tag.
Want extra grip? Apply fabric glue with sand or rubber dots to the sole for a non-slip effect.
Remember to block your finished slippers if needed, especially if they curl slightly at the edges after finishing.
What is the best yarn for making crochet slippers?
Worsted weight or aran yarn is ideal. Look for acrylic or wool blends that offer warmth, stretch, and easy washing.
Can I make these slippers in different sizes?
Yes! Adjust your starting rounds and total length to fit children’s, women’s, or men’s sizes. Try them on during the process to ensure a good fit.
How long does it take to crochet a pair?
Depending on your experience, it may take 2–4 hours per slipper. It’s a relatively quick project that can be done in an evening.
Are crochet slippers machine washable?
If you use machine-washable yarn, yes. Always check the label. For longevity, it’s best to hand wash and air dry.
Can beginners make this pattern?
Absolutely. The pattern uses basic stitches and simple shaping techniques. It’s a great beginner project that produces satisfying results.
What if my slippers stretch out over time?
Consider using a tighter tension or switching to a smaller hook. You can also add elastic around the edge if needed for better fit.
The CROCHET LOVELY SLIPPERS – FREE PATTERN offers the perfect mix of comfort, creativity, and style. Whether you’re curling up on the couch or heading to bed, these slippers are a cozy delight that you’ll be proud to wear or gift. With easy-to-follow steps and plenty of room for personalization, this pattern is sure to become one of your favorites.
Now that you’ve seen how simple and enjoyable it is to make these beautiful slippers, we’d love to hear from you! Leave your honest opinion below and feel free to share suggestions, ideas, or photos of your finished slippers. Your feedback helps us grow and inspires others to start crocheting too!


