
Crochet Multi-Purpose Blouse, Shawl, Runner Model

If you’ve ever wanted to create a unique, patriotic, and practical crochet project, this guide on How to Crochet US American Flag Pouch – Crochet Plastic Canvas Tutorial is perfect for you. Combining yarn, structure, and national pride, this pouch is both decorative and functional.
It’s a wonderful way to celebrate American spirit through the art of crochet, especially for holidays like the Fourth of July, Memorial Day, or Veterans Day.
The beauty of this project lies in its versatility and sturdiness. Using plastic canvas as a base gives the pouch durability, making it ideal for holding small items such as coins, cosmetics, or even sewing supplies.
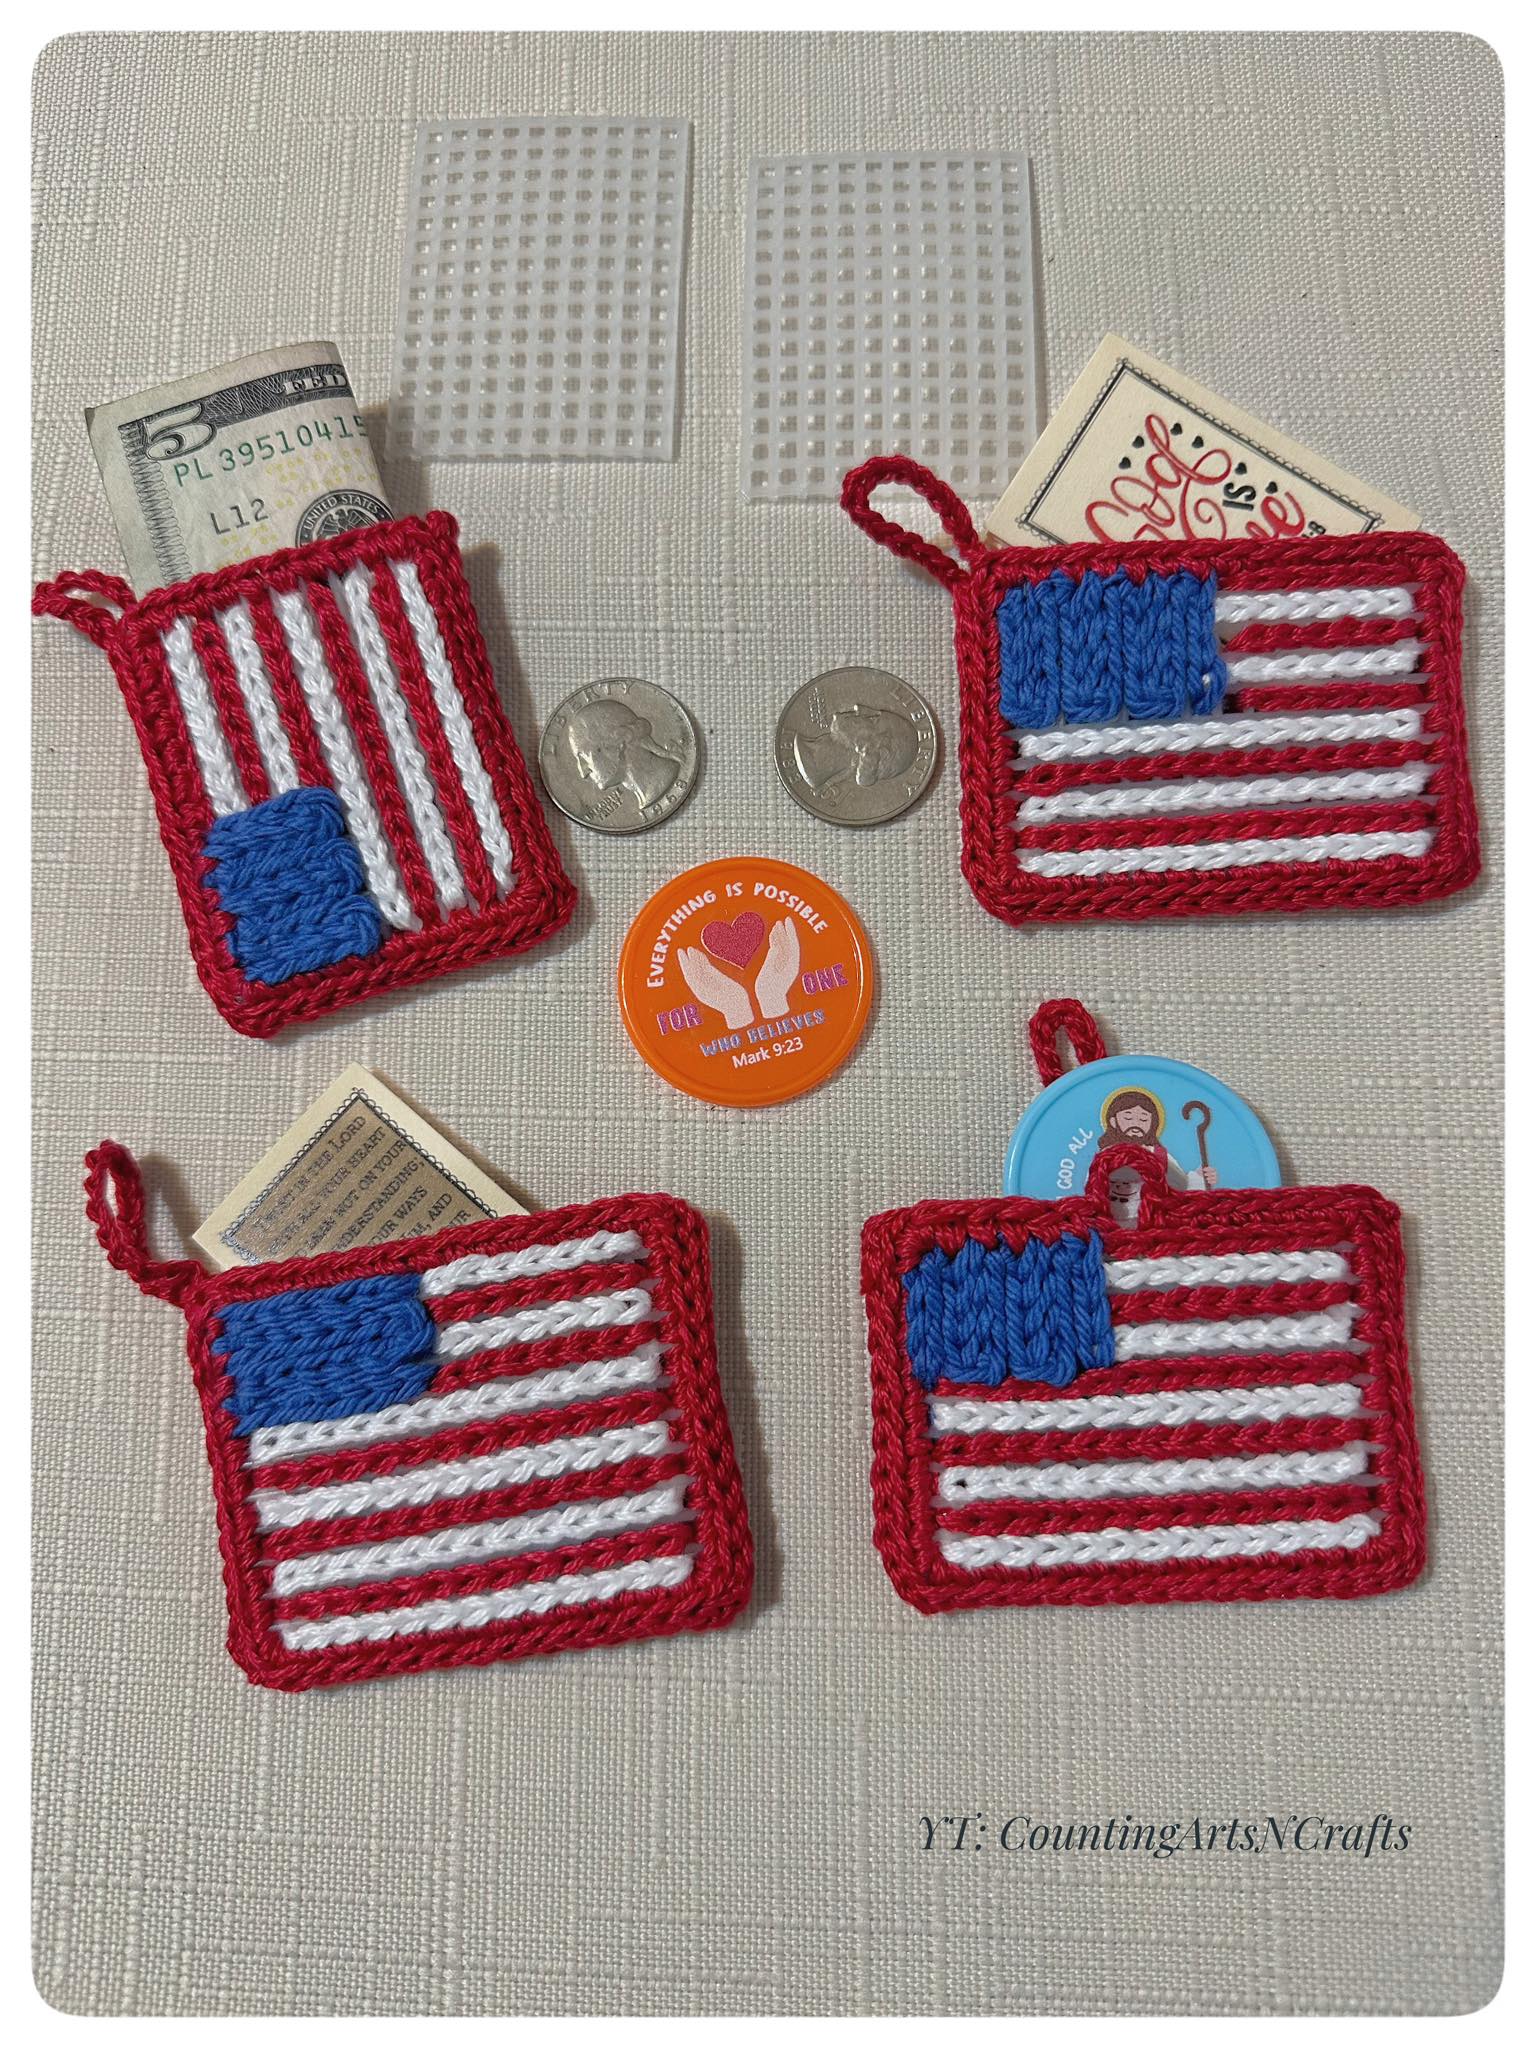
The crochet overlay allows you to personalize and decorate it in any patriotic color scheme, with the classic red, white, and blue of the US American flag.
Even if you’re new to combining crochet with plastic canvas, don’t worry! This tutorial will walk you through the entire process, from selecting materials to assembling your pouch with clean edges and bold stars and stripes. Let’s dive into how to crochet a US American Flag pouch step by step.
To begin your How to Crochet US American Flag Pouch – Crochet Plastic Canvas Tutorial, gather all your supplies. You’ll need worsted weight yarn in red, white, and blue, as well as a sheet of 7-count plastic canvas, which is easy to cut and stiff enough to give your pouch shape.
In addition, grab a tapestry needle for weaving in ends and sewing pieces together, a pair of scissors, and a size G/4mm or H/5mm crochet hook, depending on your tension. Make sure your hook fits comfortably through the holes of your plastic canvas without stretching the yarn too tightly.
You’ll also want to cut the plastic canvas into your pouch shape before crocheting. A common pouch size is two rectangles measuring about 5” x 7”, plus a small strip for the bottom or sides if you want depth.
If you’d like to add a zipper or button closure, pick one in a matching or contrasting color. These are optional but help make the pouch even more functional and polished.
You can also prepare a star applique or white buttons to represent the stars on the flag’s blue section. Embroidery or surface crochet is another creative option for this detail.
Lastly, have a ruler or measuring tape handy to keep your cuts and stitches even throughout the project. Consistency is key for a professional finish.
Once you’ve cut your canvas to size, it’s time to begin the crochet part of your How to Crochet US American Flag Pouch – Crochet Plastic Canvas Tutorial. Start by single crocheting around the edge of each rectangle. This border provides a clean edge and prepares the canvas for joining later.
To do this, insert your hook into a hole on the canvas, pull up a loop, and make a single crochet. Continue evenly spacing your stitches around the perimeter. Try placing two stitches in each corner hole for a rounded edge.
After bordering both canvas panels, you’ll work on covering the canvas surfaces to create the American flag design. Begin with red yarn, crocheting stripes across the width of the canvas. Alternate red and white rows to form the classic flag look. Each row can be a single crochet or half double crochet, depending on your desired texture.
In the top left corner, switch to blue yarn and crochet a square section for the flag’s stars. You can use simple stitch techniques or even embroider the stars later with white yarn or thread.
Make sure your stripes are straight and aligned. Plastic canvas helps maintain structure, so the rows should stay neat as you work.
Repeat the flag design on both panels if you’d like a front-and-back pouch, or make the back a solid color for simplicity. This step is entirely customizable based on your style.
After you’ve crocheted the flag design on your canvas panels, it’s time to assemble the pouch. This is a crucial step in your Crochet Plastic Canvas Tutorial, where precision and patience will pay off in the final look.
Lay your panels flat and align them with the edges matching perfectly. Use red or blue yarn (or any color that blends well) to whip stitch or single crochet the sides together. Be sure to insert your needle or hook through the edge stitches you created earlier.
If you’ve included a third strip for the pouch bottom or sides, sew it in carefully, joining one edge to the front panel and the other to the back. This creates a boxy shape and gives more room inside the pouch.
Take your time sewing the seams. Consistent stitches along the edges give a polished appearance and ensure that your pouch is sturdy and won’t come apart with use.
Once assembled, reinforce the corners by adding a few extra stitches. You can also crochet a small loop on one side to attach a keychain or wrist strap for portability.
If you opted to add a zipper or button closure, now’s the time to sew that in. Make sure it opens and closes smoothly and is securely attached to the canvas border.
Check the inside of your pouch for loose ends and secure them with the tapestry needle. Your pouch should now be fully assembled and ready to use or gift!
Now that you’ve learned How to Crochet US American Flag Pouch – Crochet Plastic Canvas Tutorial, you can try several creative variations. This project is highly adaptable and allows you to express yourself with color, shape, and embellishments.
For a modern twist, consider using glitter yarn or metallic threads to add shine to the stars and stripes. This works beautifully for festive events and parades.
Instead of a rectangular pouch, you can create a clutch, pencil case, or even a coin purse by adjusting the canvas size and shape. The same crochet technique applies regardless of the pouch form.
You can also scale the pattern up to create a tablet sleeve or down to make a keychain pouch. Plastic canvas makes it easy to modify dimensions while maintaining structure.
Think about adding fabric lining for a smooth interior. This gives a high-end finish and helps protect delicate items like sunglasses or phone screens.
If you’re making this as a gift, consider adding initials or a name on the back side using embroidery floss or surface slip stitches for a personal touch.
Lastly, this pattern can inspire other flag designs. By changing the colors and elements, you can create flag pouches for other countries or causes, making this tutorial useful for many occasions.
1. Can beginners make this pouch project?
Yes! This tutorial is beginner-friendly. If you know how to single crochet and sew basic seams, you’ll be able to follow along easily.
2. What kind of yarn works best for this project?
Worsted weight acrylic yarn is ideal. It’s durable, holds shape well on plastic canvas, and comes in a wide variety of patriotic colors.
3. Is plastic canvas washable?
Plastic canvas itself is washable, but paired with yarn, you should hand-wash gently with mild soap and lay flat to dry to maintain shape.
4. Can I use regular crochet techniques without canvas?
You can, but the plastic canvas adds structure and durability. Without it, your pouch may be too soft to hold its form.
5. How do I make the stars on the blue section?
You can use small white star-shaped buttons, embroidery, or surface crochet to represent the stars. Keep them proportional to the blue area.
6. How long does it take to complete this project?
Depending on your speed, it may take between 2–4 hours. It’s a great weekend or afternoon project, especially before a patriotic holiday.
In this How to Crochet US American Flag Pouch – Crochet Plastic Canvas Tutorial, we’ve explored a fun and patriotic way to combine two crafts into one useful item. From selecting materials to stitching the stars and stripes, each step builds toward a handmade item full of pride and personality.
This project not only celebrates American spirit, but also helps you learn to work with plastic canvas and crochet in a creative, functional way. Whether for yourself, a friend, or as part of a patriotic event, this pouch is sure to be a hit.
We hope you enjoyed this tutorial! If you’ve made your own US American Flag pouch, we’d love to hear how it turned out. Leave a comment below with your thoughts, photos, and any suggestions for future tutorials. Your feedback helps inspire new ideas for our creative community!


