
Pie Carrier Sewing Pattern

If you’re looking for a practical and satisfying sewing project, this Oven Glove Pattern – Step by Step tutorial is the perfect place to start.
Whether you’re a beginner or an experienced sewer, creating your own oven mitt is not only a fun experience but also an excellent way to add handmade charm to your kitchen.
Homemade oven gloves make great gifts, are more durable than many store-bought versions, and give you full control over colors, thickness, and comfort.
Plus, using your own fabric scraps or upcycled materials makes this project eco-friendly and budget-conscious.
In this guide, you’ll learn how to follow an oven glove pattern step by step, from choosing materials to the final stitch. We’ll walk you through everything with detailed explanations, making it easy to create a stylish and functional glove that reflects your personal taste.
To start your oven glove pattern – step by step journey, the first step is selecting the right materials. Your choice of fabric and insulation will determine how effective and durable your oven mitt will be.
The outer fabric should be thick and heat-resistant. Cotton canvas or quilted cotton works beautifully, and they’re easy to sew. Avoid synthetic fabrics like polyester as they can melt under high heat.
For the inner lining, soft cotton or flannel is a cozy and safe choice. Since this layer touches your skin, comfort is essential.
The most important layer is the insulation. Use heat-resistant batting such as Insul-Bright or multiple layers of cotton batting to protect your hands from heat when handling hot pans or dishes.
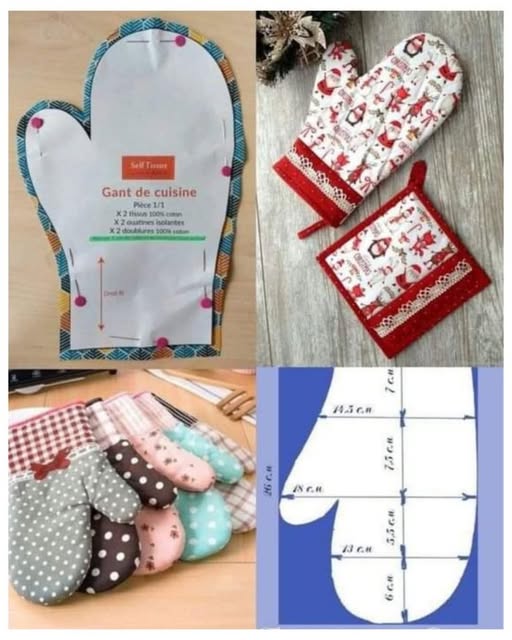
You’ll also need a bias tape for finishing the edges, matching thread, and a printed or drawn oven glove pattern. You can draft your own using your hand as a guide or use a free printable version available from sewing books or magazines.
Don’t forget basic sewing tools like scissors, pins or clips, a sewing machine, and an iron. Having everything ready helps you complete the project in one focused session.
Once you’ve gathered your supplies, it’s time to cut the pieces for your oven glove pattern – step by step project. Accuracy here is key to getting a neat and professional-looking result.
Lay your pattern on the outer fabric, insulation, and lining. Cut two mirrored sets from each layer to make one complete glove (front and back). Pin the layers together: outer fabric on the outside, insulation in the middle, and lining on the inside.
If you’re using quilted fabric or batting, you may want to quilt the layers together before assembling the glove. This helps keep the insulation in place and adds a lovely texture. Use a walking foot on your sewing machine and stitch straight lines or diamond shapes.
Mark a notch or label for the thumb placement to ensure everything aligns correctly during assembly. A well-aligned thumb is key to a comfortable glove.
Next, trim excess threads and press the layers with an iron to flatten them. This will make sewing the pieces together much easier and neater.
At this point, you can decide if you want to add a loop for hanging. Cut a 4-inch piece of fabric or ribbon, fold it into a loop, and pin it in place on one of the outer layers.
Now it’s time to sew! This is where your oven glove pattern – step by step really comes to life. Follow these instructions carefully, and you’ll soon have a complete and practical oven mitt.
With right sides together, place one front and one back piece of the glove. Pin them securely, making sure all layers align, especially around the thumb curve.
Using a ½ inch seam allowance, sew around the edge of the glove, leaving the wrist end open. Take your time around curves, and use small stitches for better control.
Once the glove is sewn, clip notches around the curves, especially near the thumb. This allows the fabric to bend more naturally when turned right side out, preventing bulk.
Now turn the glove inside out. This might take a bit of effort because of the thickness, but using a blunt tool (like the end of a wooden spoon) can help push out the fingers and thumb.
Try the glove on to check the fit. If it feels too tight, you can trim the inside seams slightly or adjust the curve next time you use the pattern.
Finish the bottom edge by folding in a ¼ inch hem, then enclosing it with bias tape. This creates a clean and durable finish, and the bias tape adds a nice pop of color or contrast.
Now that you’ve finished the main construction, it’s time to personalize your oven glove pattern – step by step project. A few small additions can make your glove stand out or become a beloved kitchen essential.
Embroider a name or monogram on the outer fabric before sewing, especially if you’re giving the glove as a gift. A hand-stitched letter adds charm and personality.
Use contrasting fabric for the thumb to create a bold, playful look. Mixing patterns and colors is a fun way to use scraps and make each glove unique.
If you’re making more than one, consider batch sewing. Cut and prepare several sets at once to save time. These make wonderful housewarming gifts or craft fair items.
Always test your glove with a hot pan before regular use to ensure safety. Double-check that your insulation layer is thick enough and well stitched to prevent burns.
Consider making a matching potholder or trivet to go with your glove. Coordinated sets look beautiful and are super practical.
Finally, don’t be afraid to experiment. Once you master the basic oven glove pattern, you can modify the size, shape, or add silicone grip patches for extra safety.
Can I make an oven glove without a sewing machine?
Yes, but it will take longer. Hand sewing is possible, especially with strong thread and patience. Use backstitches to ensure strength and durability.
What type of batting is best for heat resistance?
Insul-Bright is a popular choice because it contains a reflective layer that helps protect against heat. You can also use multiple layers of 100% cotton batting.
Is it safe to use regular fabric for oven gloves?
Only if it’s 100% cotton and you use enough insulation. Avoid synthetic fabrics like polyester or fleece—they can melt or catch fire.
How long does it take to make an oven glove?
For beginners, it may take 1–2 hours. With practice, you can complete one in under an hour, especially if you prepare your materials in advance.
Can I wash my homemade oven glove?
Yes, but it’s best to hand wash or use a gentle cycle in cold water. Avoid dryers if your glove contains heat-reflective batting.
Can I adjust the size of the pattern?
Absolutely! Trace your own hand or enlarge a printed pattern to fit larger or smaller hands. Just remember to keep seam allowances in mind.
Creating your own Oven Glove Pattern – Step by Step is not only useful but also a fulfilling experience for any crafter or sewist. From selecting fabrics to the final seam, each part of the process offers an opportunity to learn, create, and add a personal touch to your kitchen essentials.
You’ve now learned how to choose materials, cut and assemble the layers, sew the glove safely, and even customize it to your style. With this knowledge, you’re ready to create your own collection—or gift them to friends and family!
We’d love to hear from you! Leave a comment below with your experience making your oven glove, or share any suggestions or creative twists you added. Your feedback helps inspire others in the community. Happy sewing!


