
Pie Carrier Sewing Pattern

If you’ve ever wanted to make a stylish and practical accessory, learning how to sew a quilted makeup bag – step-by-step is the perfect project to try.
Whether you’re a beginner at sewing or an experienced quilter, this easy-to-follow guide will help you create a beautiful, functional, and personalized makeup bag with charm and durability.
A quilted makeup bag makes a lovely handmade gift and is ideal for keeping your cosmetics, toiletries, or even sewing notions organized.
It’s a small project that allows you to use leftover fabric scraps, practice quilting techniques, and try out zipper installation in a stress-free way.
In this tutorial, we’ll guide you through every step of the process: from choosing fabrics and adding batting, to quilting and assembling the zipper pouch.
With our detailed instructions, you’ll be able to complete your own quilted makeup bag from start to finish with confidence and creativity.
Before starting your quilted makeup bag, the first step is gathering your materials. Good preparation will make the whole sewing process smoother and more enjoyable.
Choose two coordinating cotton fabrics—one for the outside and one for the lining. Quilting cotton is perfect for this project because it’s easy to handle and comes in endless prints and colors. This is a great opportunity to use up small fabric scraps from past projects.
You’ll also need quilt batting or fusible fleece. Batting adds structure and that signature quilted feel to the bag. It also offers some protection for your items inside. Fusible fleece can be ironed directly onto the outer fabric, saving a little sewing time.
A nylon or metal zipper is essential. Make sure it’s longer than the top width of your bag—this allows room to trim and install the zipper with ease. A 9″ or 10″ zipper usually works great for a medium-size pouch.
Other essentials include a rotary cutter, ruler, pins, sewing machine, thread, and optionally, a walking foot to help with quilting.
If you’d like your bag to have extra detail, consider adding a small fabric pull tab, a wristlet strap, or even a personalized label for the finishing touch.
Now that your materials are ready, it’s time to move on to the quilting part of how to sew a quilted makeup bag – step-by-step. This is where your bag starts to take shape—and you add that cozy, padded texture that makes it unique.
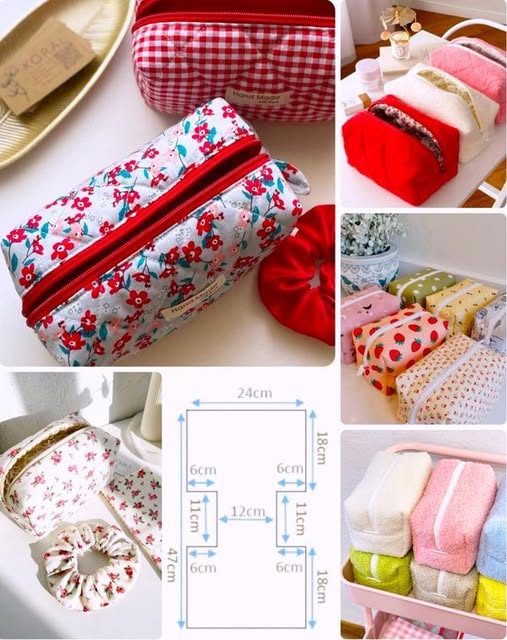
Start by cutting your outer fabric and batting to the same size. A good beginner-friendly size is 10″ x 7″ for the outer and lining pieces. You’ll need two pieces of outer fabric, two of lining, and two of batting.
Layer your outer fabric on top of the batting, with the right side facing up. Use safety pins or quilting spray to hold the layers together. Now you’re ready to quilt.
You can quilt in straight lines, diagonal lines, or a grid pattern. Use a fabric marking tool to draw your design, or go freehand for a relaxed look. Straight-line quilting every inch or so gives a clean and modern finish.
Use a longer stitch length (around 3.0 mm) and sew carefully through both layers. If you have a walking foot, it will help feed the fabric evenly without puckering.
Once quilted, trim the edges to square them up. Repeat this process with the second outer panel and batting. Your quilted pieces are now ready to become the front and back of your makeup bag.
This quilting step not only adds a beautiful visual element but also strengthens the fabric, making your bag more durable for everyday use.
One of the most satisfying parts of learning how to sew a quilted makeup bag – step-by-step is installing the zipper and seeing the project come together. Don’t worry—zipper installation is easier than it looks!
Start by placing one quilted outer panel face up, then lay the zipper face down along the top edge. Align a lining piece on top of the zipper, right side down, so the zipper is sandwiched between the quilted panel and the lining.
Pin in place and sew along the edge using a zipper foot. Sew slowly and remove pins as you go. Once sewn, flip both fabrics right side out and press them away from the zipper. Topstitch along the edge for a clean and finished look.
Repeat the process for the other side: place the second quilted panel face up, align the other side of the zipper face down, then add the second lining piece on top, also face down. Pin and sew, then press and topstitch again.
Open the zipper halfway—this is important so you can turn the bag right side out later. Now align the outer quilted pieces right sides together, and the lining pieces right sides together, forming one big rectangle.
Sew around the edge, leaving a 2-inch gap in the lining for turning. Trim the corners and turn the bag right side out through the opening.
Push out the corners carefully and sew the gap in the lining closed, either with a machine stitch or a neat hand stitch. Push the lining inside the bag—and your quilted makeup bag is almost done!
The best part of how to sew a quilted makeup bag – step-by-step is making it your own. With your basic pouch completed, now’s the time to add personal touches and consider different uses.
Add a wrist strap to one side of the zipper for easy carrying. Use matching fabric or ribbon. Sew it into the side seam before sewing the pouch closed.
Decorate the exterior with embroidery, fabric appliqués, or even a small patch or label. You could add initials or a motif that reflects your style.
Want more structure? Add interfacing or foam between the layers for a sturdier pouch. This is especially useful if you’re storing brushes or small bottles inside.
These quilted pouches are also ideal for storing school supplies, travel essentials, or craft tools—not just makeup. You can adjust the dimensions to suit your needs.
Make a matching set in different sizes—one for your purse, one for your suitcase, and one for your vanity. Quilted bags are lightweight, protective, and endlessly versatile.
Most importantly, don’t be afraid to get creative. Once you’ve mastered the basic technique, you’ll be able to sew these quilted makeup bags quickly and confidently, and have fun doing it!
Can I sew a quilted makeup bag by hand?
Yes, but it will take more time. Use strong thread and small backstitches for durability, especially around the zipper and side seams.
What size should I make my quilted makeup bag?
A good standard size is 10″ x 7″, but you can customize it easily. Make it smaller for travel or larger for toiletries and brushes.
What kind of batting is best for quilting bags?
Cotton or polyester quilt batting works well. Fusible fleece is great for easy application and adds a bit more stiffness to the bag.
Do I need a special zipper for this project?
No, a regular nylon zipper is fine. Just make sure it’s slightly longer than the top of your bag so you can trim it if needed.
Can I wash my quilted makeup bag?
Yes, especially if all your materials are cotton. Wash in cold water on a gentle cycle and air dry to keep it in good shape.
What quilting pattern should I use?
Straight lines or crosshatch designs are easiest for beginners. But feel free to experiment with curves or even free-motion quilting if you’re comfortable.
Now that you’ve learned how to sew a quilted makeup bag – step-by-step, you have the skills to create a project that’s both practical and beautiful. This tutorial walked you through choosing materials, quilting fabric, installing a zipper, and adding final touches—all essential steps to building your sewing confidence.
Whether you keep your bag for yourself or gift it to someone special, it’s sure to be appreciated for its handmade charm and quality. Plus, once you’ve made one, you’ll probably want to make many more!
Did you enjoy this tutorial? We’d love to hear about your sewing experience. Leave a comment below with your thoughts, suggestions, or questions. Your feedback helps make our community stronger and more creative. Happy sewing!


