
If you love combining functionality with creativity, the Embroidery Hoop Clock – Step by Step tutorial is perfect for your next DIY project.
This charming handmade clock adds a touch of whimsy and personality to any room while showcasing your embroidery or fabric art in a practical way.
Using a simple embroidery hoop as the base, this clock-making method is fun, affordable, and totally customizable.
Whether you’re into minimalist designs or floral embroidery, you’ll be amazed at how easy it is to transform basic materials into a unique and stylish timepiece.
In this article, we’ll walk you through all the steps—from choosing your hoop and materials to assembling and mounting the finished clock. By the end, you’ll be ready to display your handcrafted creation with pride or even gift it to someone special.
1. Materials You’ll Need for Your Embroidery Hoop Clock
Before starting your Embroidery Hoop Clock – Step by Step, it’s important to gather all the materials and tools you’ll need. This helps ensure a smooth process from beginning to end.
You’ll need one embroidery hoop—wooden hoops are ideal because they’re sturdy and easy to work with. An 8” to 10” hoop is a perfect size for most clock projects.
Choose a piece of fabric or embroidered art to display in the hoop. You can embroider a clock face design, use a patterned cotton fabric, or even repurpose a vintage napkin or tea towel.
You’ll also need a battery-operated clock movement kit with hands and a central mechanism. Make sure the shaft is long enough to go through the fabric and backing.
Stiff cardboard or foam board works well as backing for the clock. This helps support the fabric and keep everything in place.
You’ll need scissors, a craft knife, a pencil or fabric marker, and a ruler. For securing everything, grab some hot glue or strong craft glue.
And of course, one AA battery to power your clock. Once you’ve collected everything, you’re ready to start making your Embroidery Hoop Clock – Step by Step.
2. Preparing the Fabric and Hoop
The second stage of this Embroidery Hoop Clock – Step by Step tutorial involves setting up your hoop and fabric, which forms the face of your clock.
Start by ironing your fabric to remove any creases. If you’re using embroidered fabric, ensure the design is centered.
Place your fabric into the embroidery hoop, tightening the screw at the top until the fabric is taut like a drum. This is essential for a smooth, professional finish.
Next, find the exact center of the hoop. Measure the width and height of the visible fabric and mark the center point lightly with a fabric-safe marker.
Use a craft knife or sharp scissors to make a small hole where the clock mechanism will be inserted. This hole should be just large enough to allow the clock shaft to pass through.
Cut a circular piece of cardboard or foam board to fit snugly behind the fabric inside the hoop. This will support the clock and give it structure.
With the fabric in place and the hole cut, you’re now ready to install the clock mechanism, the centerpiece of your handmade clock.
3. Installing the Clock Mechanism
This part of the Embroidery Hoop Clock – Step by Step guide focuses on inserting the clock movement and securing it properly.
Take your clock movement kit and insert the central shaft through the hole you made in the fabric. Make sure the back of the mechanism is pressed against the cardboard or foam backing.
From the front, screw the washer and nut that come with the clock kit to hold the movement in place. It should feel snug and stable—not loose or wobbly.
Now, attach the hour hand to the shaft by gently pressing it down until it’s secure. Repeat with the minute hand, and then the second hand if your kit includes one.
Ensure all hands are pointing to 12 so the clock is set properly. Test their movement by rotating the shaft gently.
Once satisfied with the alignment, insert the battery into the clock mechanism. You should see the second hand start to tick, signaling that your clock is functioning.
Finally, glue the foam board backing to the inside of the embroidery hoop, sealing everything in place. Let it dry thoroughly before moving or hanging your clock.
4. Decorating, Hanging, and Gifting Your Clock
Now that your clock is assembled, the final part of the Embroidery Hoop Clock – Step by Step process is adding decorative touches and getting it ready for display or gifting.
To cover any excess fabric at the back, you can glue a felt circle over the backing. This gives your clock a clean, finished look and protects the wall.
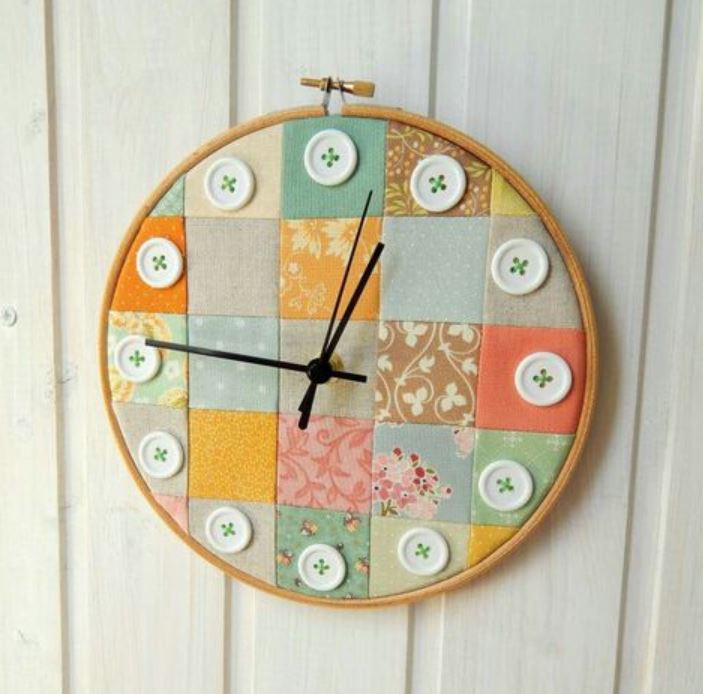
Embellish the clock face if desired. Use buttons, appliqué, or tiny stitched numbers to mark the hours. Keep it minimal or go bold—it’s up to your creative taste.
If you want a rustic look, add lace or ribbon around the outer edge of the hoop. You can even paint or stain the wooden hoop for a more polished finish.
To hang your clock, simply use the metal screw at the top of the hoop. It makes a natural hook. You can also attach a sawtooth hanger to the back for more stability.
This DIY project makes a fantastic handmade gift for weddings, housewarmings, birthdays, or holidays. Customize the fabric to suit the recipient’s taste or home décor.
The Embroidery Hoop Clock – Step by Step project is more than just a clock—it’s a piece of wall art with a personal touch that brings both beauty and function to any room.
FAQ – Frequently Asked Questions
Can I make the clock without embroidery?
Yes! You can use any fabric—plain, printed, or patterned. Embroidery is just one decorative option.
What size hoop is best for making a clock?
8 to 10 inches is ideal, but you can go larger or smaller depending on your space and personal preference.
Where can I find clock mechanisms?
You can buy them at most craft stores or online. Look for battery-powered kits that include all necessary parts.
Do I need special tools to make this?
No special tools are needed. Basic scissors, glue, and a craft knife are usually enough.
Can I use fabric glue instead of a hot glue gun?
Yes, strong craft or fabric glue works fine—just make sure it dries securely and doesn’t soak through the fabric.
Is this project beginner-friendly?
Absolutely. The Embroidery Hoop Clock – Step by Step guide is designed to be easy to follow, even for those new to DIY crafts.
Conclusion
Creating your own Embroidery Hoop Clock – Step by Step is a rewarding and delightful experience. You’ve learned how to choose the right materials, prepare your fabric and hoop, install the clock mechanism, and add finishing touches that make your creation unique.
Whether you’re giving it as a gift or hanging it in your favorite room, this handmade clock brings a warm, artistic flair to any space. And the best part? You did it all yourself.
If you enjoyed this tutorial, we’d love to hear from you! Leave a comment below with your honest thoughts, photos of your project, or suggestions for future craft ideas. Your feedback inspires us to keep creating and sharing beautiful DIY guides just like this one.


