
Pie Carrier Sewing Pattern

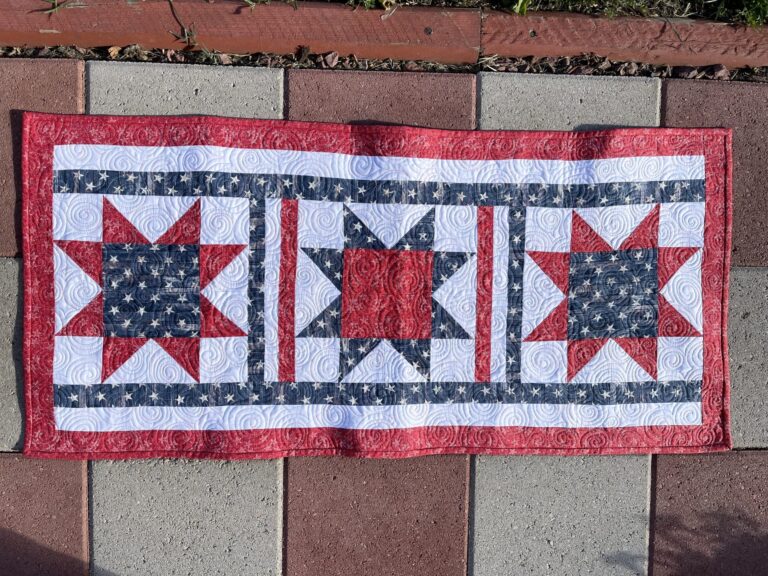
If you’re looking to add a festive and heartfelt touch to your holiday décor, this Patriotic Table Runner Tutorial is the perfect project. Whether you’re celebrating Independence Day, Memorial Day, Veterans
Day, or simply want to showcase your national pride, a handmade table runner brings warmth, creativity, and color to any dining or picnic table.
This DIY tutorial is easy to follow and suitable for beginners and seasoned crafters alike. With some fabric, basic sewing tools, and a love for all things red, white, and blue, you’ll create a unique piece that can be cherished year after year.
In this Patriotic Table Runner Tutorial, we’ll guide you through each step—from choosing fabrics to assembling the pieces and adding those final touches that make your runner truly stand out.
Let’s dive into this creative journey together and sew something meaningful for your home.
Before starting your Patriotic Table Runner Tutorial, gather all necessary supplies to ensure a smooth crafting process. The good news is you don’t need any fancy equipment—just some standard sewing tools and beautiful fabric.
You will need:
When selecting fabrics, try mixing solids with printed designs—like stars, stripes, or checks—to add texture and movement to the runner. Pre-washing your fabric is always a good idea to avoid shrinkage later.
A traditional patriotic runner often uses blocks or strips in repeating patterns, such as pinwheels, log cabins, or simple rectangles. However, feel free to express your style—this is your handmade masterpiece.
Depending on your table size, you can adjust the length and width. A common finished size is about 12” x 48”, but the design can easily be scaled.
Now that you’ve chosen your fabric, it’s time to begin cutting and piecing the top of your Patriotic Table Runner. This is where your creativity and precision really shine.
Start by planning your layout. If you’re doing simple strips, cut your fabric into strips of equal width (e.g., 3” x 12”). If you’re using quilt blocks like half-square triangles or flying geese, prep your templates and cut accordingly.
Arrange your pieces on a flat surface or design wall to visualize how your colors interact. Balance your reds, whites, and blues evenly for a cohesive look. You can place blue in the center with alternating red and white stripes outward or follow a checkerboard pattern.
Once you’re happy with the layout, begin piecing. Sew two pieces right sides together using a ¼” seam allowance, press open, and continue sewing each section row by row.
After the rows are complete, stitch them together to form the complete top panel of your runner. Don’t forget to press your seams flat with an iron—this keeps the runner crisp and helps it lay smoothly on your table.
This piecing stage is great for experimenting. You can even add an appliqué star or small embroidered message like “USA” or “Home of the Brave” for a personal touch.
With your top complete, it’s time to quilt the layers of your Patriotic Table Runner. This step will add texture and durability to your piece, and really make your design pop.
Create your quilt sandwich by layering the backing fabric (wrong side up), the batting, and your pieced top (right side up). Smooth out each layer and pin or baste them together securely.
There are a few quilting options depending on your skill level and equipment:
Use matching or neutral thread colors to avoid distracting from the design. Once the quilting is complete, trim any excess batting and backing to match the top edge.
Next, add binding around the edges. Cut strips of fabric 2.5” wide, fold in half lengthwise, and sew them to the front of the runner with a ¼” seam. Fold the binding over the edge to the back and hand stitch or machine sew in place.
A neat binding finish gives your table runner that professional, polished look and protects the edges from wear.
Now that your Patriotic Table Runner is complete, it’s time to display it proudly! This handmade piece will become the centerpiece of your patriotic gatherings and add a welcoming touch to any setting.
Place the runner down the center of your dining or buffet table. Pair it with white or blue plates, red napkins, or mini American flags for a coordinated look. Add candles, fresh flowers, or a small gnome in patriotic colors for added flair.
This table runner isn’t just for the Fourth of July—it works beautifully for Memorial Day, Flag Day, Labor Day, and other patriotic events. You could even make several runners in different patterns for rotating seasonal displays.
If you’re hosting a picnic or outdoor BBQ, lay your runner across a folding table or wooden surface. It protects your table and enhances your setup instantly.
Caring for your runner is easy. Machine wash on gentle in cold water, lay flat or hang to dry, and press with an iron to smooth wrinkles before storing for next year.
Consider making a few runners as gifts for friends or family. It’s a thoughtful, handmade touch that anyone would appreciate during patriotic holidays.
Is this project suitable for beginners?
Absolutely. The Patriotic Table Runner Tutorial uses basic sewing techniques and can be completed with minimal experience. It’s a great first quilting project.
How long does it take to complete a table runner?
On average, 3 to 5 hours depending on your pattern complexity and sewing speed.
What size should a patriotic table runner be?
A typical size is 12” x 48”, but you can adjust it based on your table’s dimensions or desired overhang.
Can I hand sew this project instead of using a machine?
Yes, though it will take longer. Machine sewing offers durability, but hand sewing adds a special touch.
Do I need to prewash the fabric?
Prewashing is recommended to prevent shrinkage and color bleeding, especially with red and blue fabrics.
Can I use scraps or fat quarters?
Definitely. This is a great scrap-busting project. Fat quarters and leftover strips work perfectly for patchwork designs.
This Patriotic Table Runner Tutorial is more than just a sewing project—it’s a chance to express creativity, honor national pride, and make something beautiful and lasting. Whether you’re celebrating a special holiday or just want to bring that red, white, and blue spirit into your home, this project is both meaningful and enjoyable.
We covered every step from fabric selection and cutting to quilting and finishing, ensuring you have all the tools and tips to make a stunning table runner. Handmade décor adds warmth to any celebration, and this runner is sure to become part of your annual traditions.
✨ Have you tried this tutorial? We’d love to hear your thoughts! Share your experience in the comments and let us know what kind of patterns you’d like to see next. Your feedback helps keep our crafting community growing! 🇺🇸


