
Crochet Multi-Purpose Blouse, Shawl, Runner Model

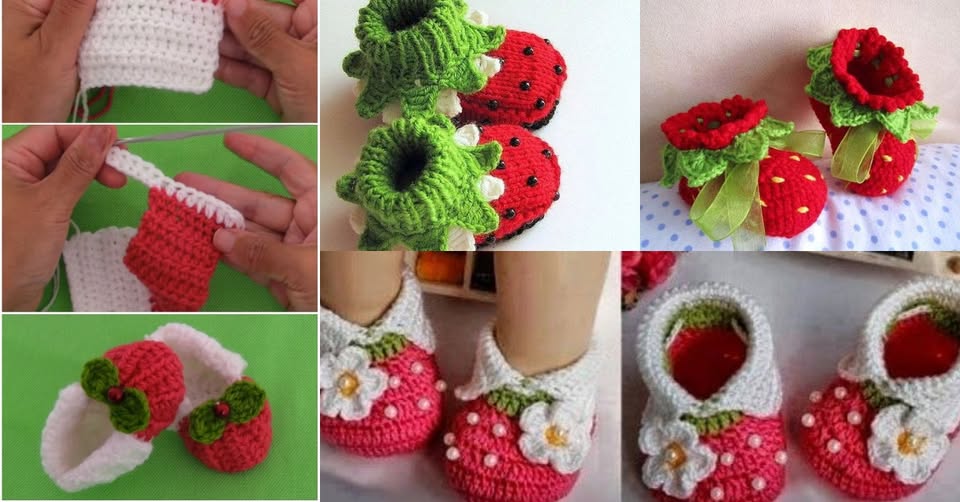
If you’re looking for a sweet and creative baby project, the Crochet Strawberry Booties – Ideas and Tutorial will capture your heart instantly.
These adorable little shoes combine practicality and charm, wrapping tiny feet in warmth and style. Inspired by the juicy red fruit, these booties are the perfect handmade gift for baby showers, birthdays, or just because.
The Crochet Strawberry Booties – Ideas and Tutorial offers a simple yet delightful project suitable for both beginner and intermediate crocheters.
With a mix of bright colors, small details like seeds and leaves, and soft yarns, these booties become not just functional, but also a statement piece in any baby’s wardrobe.
In this article, we’ll dive into a step-by-step guide, creative variations, and helpful tips to make your crochet strawberry booties truly unique.
Whether you’re creating your first pair or adding new designs to your handmade collection, there’s inspiration here for everyone.
The Crochet Strawberry Booties – Ideas and Tutorial has become popular for good reasons—it combines cuteness, comfort, and creativity in one small project.
First and foremost, these booties are adorable. The strawberry design, with red bases, white seed embroidery, and green leafy cuffs, instantly grabs attention and makes people smile.
They are also functional. Booties help keep a baby’s feet warm and protected, especially in cooler weather or air-conditioned rooms. And because they’re crocheted, they’re breathable and gentle on sensitive skin.
Another benefit is that they’re customizable. You can experiment with shades of red, add embellishments like buttons or ribbons, and even switch up the yarn texture for a fuzzy strawberry look.
Creating these booties is also a great stash buster. You can use leftover yarn from other projects to complete a pair. Since they’re small, they don’t require much material.
They’re perfect for gift-giving. Handmade gifts like these show extra thought and care. They can be paired with other strawberry-themed items like hats, blankets, or dresses.
Finally, they’re a fun way to learn or practice crochet skills, including shaping, increasing and decreasing stitches, and simple embroidery.
Before diving into the Crochet Strawberry Booties – Ideas and Tutorial, let’s gather the essentials.
You’ll need soft baby-friendly yarn—usually cotton or acrylic. For the classic strawberry look, you’ll want red for the main body, green for the leaves, and white or yellow for the seeds.
A crochet hook size 3.5mm or 4mm works best for baby booties. Use the size recommended for your yarn to ensure a snug and comfortable fit.
You’ll also need scissors, a tapestry needle, and stitch markers to keep track of rounds, especially for the toe and heel shaping.
Know your basic stitches:
For the seed detailing, you can use a simple embroidery stitch. Just weave in short vertical dashes or “V” shapes to mimic real strawberry seeds.
Optional tools include buttons or snap fasteners if you want to add closure straps, and ribbons if you’re aiming for a decorative finish.
Ready to make your own Crochet Strawberry Booties – Ideas and Tutorial? Here’s a beginner-friendly guide broken into clear steps.
Step 1: Create the sole
Begin with a chain of 9-11 stitches, depending on size. Work around it with single and half-double crochet stitches to shape the oval sole. Increase at both ends to round it out.
Step 2: Build the sides
Work single crochet stitches around the sole to build the sides of the bootie. This usually takes 3-4 rounds. Keep the tension consistent to ensure the bootie retains its shape.
Step 3: Shape the toe
To shape the front, decrease stitches in the toe area across 2–3 rows. This rounds the front and makes space for the baby’s toes. Test fit with a model or size chart if needed.
Step 4: Add the strawberry look
Switch to red yarn for the body of the strawberry. Use white or yellow thread to embroider tiny “seeds” evenly across the top area. These simple accents make a big visual impact.
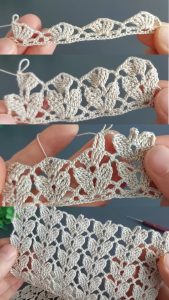
Step 5: Create the leafy cuff
Using green yarn, crochet a leafy top using chains and picot or shell stitch patterns to mimic real leaves. This part adds the charming strawberry crown to the bootie.
Step 6: Finish and weave in ends
Secure all yarn ends, make sure the bootie is symmetrical and neat. Optionally, block the booties for better shape and fit.
The Crochet Strawberry Booties – Ideas and Tutorial is just the starting point. Let your creativity flourish with these fun variations.
Add a strap or tie
For better fit, especially on wiggly babies, add a buttoned strap or a crocheted tie across the front.
Try other fruits
Once you’ve mastered strawberries, why not try blueberries, pineapples, or watermelons? Just switch up the colors and add themed details.
Make a matching set
Create a full strawberry-themed outfit with a hat, mittens, and blanket in matching colors and motifs. Great for gifting!
Play with yarn textures
Use fuzzy yarn for a unique strawberry look or cotton yarn for a clean and breathable finish. The texture can change the style dramatically.
Add embellishments
Sew on tiny flowers, beads, or a label tag that says “Handmade with love.” These small details add personality to your creation.
Size it up
Adjust the pattern slightly for toddlers or preemies. Just modify the stitch count and rows accordingly. Always use a sizing chart for accuracy.
Are these booties suitable for beginners?
Yes! With basic stitches and a simple shape, even beginners can follow the pattern. Embellishments like leaves and seeds can be added as your skills grow.
What size do these booties fit?
Most patterns are sized for 0–6 months, but you can adjust the number of stitches or use larger yarn and hooks to size up.
Can I wash these booties?
Yes, especially if made with baby-safe yarn. Machine wash on a gentle cycle or hand wash, then lay flat to dry.
Is it safe to use buttons on baby booties?
If you add buttons, be sure they’re securely sewn on and cannot be pulled off easily. For safety, you might use sewn ties or velcro instead.
Can I sell finished booties made from a free pattern?
Generally, yes, you can sell finished items if you’re not selling the pattern itself. Check the designer’s permissions if using a specific pattern.
How long does it take to make one pair?
Most crocheters can complete a pair in 2–3 hours. If you’re new, it might take a bit longer, but it’s a great weekend project!
The Crochet Strawberry Booties – Ideas and Tutorial is a delightful and rewarding project that blends charm and function into one tiny package. From soft yarns to adorable leafy tops, these booties make perfect gifts, adorable keepsakes, or items to sell at craft markets.
We’ve explored the materials, basic steps, fun variations, and answered some of the most common questions. Now it’s your turn to grab your hook and bring these little fruits to life.
If you’ve tried this pattern or have your own twist to share, leave a comment below! We’d love to hear your thoughts, feedback, or photos of your finished strawberry booties. Happy crocheting!


