
Crochet Multi-Purpose Blouse, Shawl, Runner Model

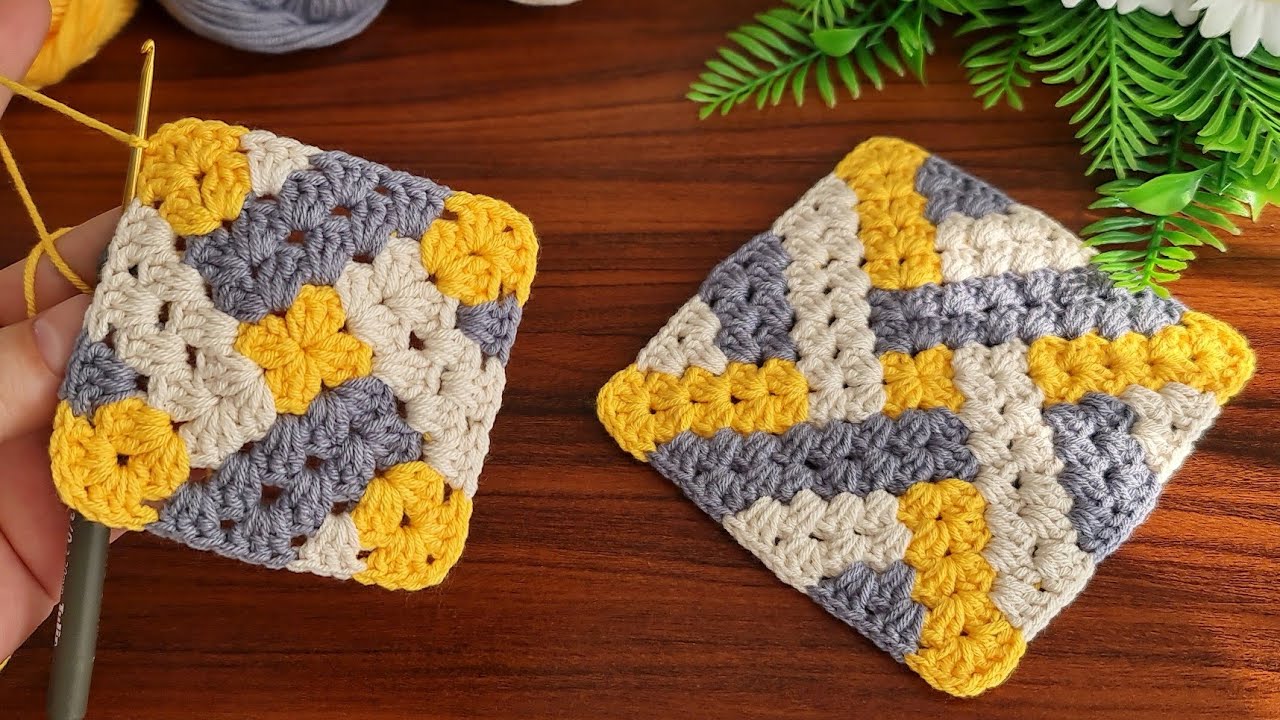
Classic Granny Square 3 Colors, Striped – Free Pattern is a delightful and timeless crochet design that continues to inspire both beginners and seasoned crocheters alike. Its colorful, structured look adds a warm, handmade charm to any blanket, pillow, bag, or decorative project.
This versatile pattern allows creative freedom while offering a structured and relaxing crochet experience.
The Classic Granny Square 3 Colors, Striped – Free Pattern uses basic stitches, making it accessible even to those just starting out with crochet. The use of three complementary or contrasting colors adds dimension, making each square feel unique and eye-catching.
Whether you plan to use this pattern for a full-size afghan or as decorative appliqués, this technique creates endless opportunities for creative expression.
This article will guide you through how to make the most of the Classic Granny Square 3 Colors, Striped – Free Pattern, including ideas for color selection, yarn types, practical uses, and helpful tips to ensure your squares come out beautifully each time. Let’s dive into the colorful world of striped granny squares!
The Classic Granny Square 3 Colors, Striped – Free Pattern is built on a simple foundation of double crochet clusters. These clusters are grouped in sets of three and arranged in a square shape with chain spaces at each corner to allow growth with each round.
One of the things that makes this pattern so enjoyable is its repetitiveness. After learning the basic round structure, you can create multiple squares with ease. The rhythmic stitch pattern helps build muscle memory and makes this an ideal project for crocheting while relaxing.
The key to this specific version lies in the color changes. Each round is worked in a different color, often in a repeating 3-color sequence, giving the finished piece a bold and lively look. The striped nature adds texture and a unique visual appeal.
When planning your project, consider the weight and type of yarn. Cotton and acrylic are both great choices for this pattern. Make sure the yarns are of similar thickness to ensure uniform tension and sizing across all squares.
A 4.0 mm or 4.5 mm hook is typically recommended for worsted-weight yarn. Keep a tapestry needle nearby for weaving in the ends as you change colors—this will keep your project neat and durable over time.
Finally, always block your squares before joining. Blocking helps maintain the square shape and ensures that your finished item looks professional and polished.
Color selection is crucial for achieving the right look in your Classic Granny Square 3 Colors, Striped – Free Pattern. While traditional granny squares often use bright, contrasting colors, a more modern look can be achieved with soft pastels or neutral tones.
Start by choosing a dominant color that will appear in every square. Then select two accent colors to rotate through each round. This technique adds consistency while keeping each square visually interesting.
Use color theory to your advantage. Complementary colors like blue and orange or analogous shades like teal, blue, and green can enhance your project’s overall aesthetic. If you’re feeling adventurous, try variegated yarn for a surprise twist.
When choosing yarn, prioritize comfort and durability. Acrylic yarns are budget-friendly and come in a wide range of colors, while cotton yarns offer a more refined finish and hold their shape better over time.
If your project is intended as a gift, consider the recipient’s color preferences or home décor. For baby blankets, soft colors like mint, lavender, and pale yellow work beautifully. For a retro vibe, embrace bold red, yellow, and turquoise combinations.
Don’t forget to buy all your yarn from the same dye lot if possible. This helps prevent minor color inconsistencies that can become noticeable in a multi-square project.
Lastly, keep your color sequence consistent if you want a uniform pattern. Alternatively, randomizing colors can give a more playful, eclectic effect.
To begin the Classic Granny Square 3 Colors, Striped – Free Pattern, start with a magic ring or a simple chain-4 loop. The first round is typically made with your dominant color. Begin by chaining 3 (this counts as your first double crochet), then work two double crochets into the ring.
Chain 2 to form your corner, then work three more double crochets into the ring. Repeat the process until you have four groups of 3 double crochets, separated by chain-2 corners. Slip stitch into the top of the starting chain to join the round.
For round two, switch to your second color. Slip stitch into the next chain space, chain 3, and work two more double crochets. Chain 2, and then work 3 double crochets into the same space. Continue around, placing 3 double crochets, chain 2, and 3 more double crochets in each corner.
As you move to round three with your third color, continue expanding your square by adding double crochet clusters between previous ones, always placing chain-2 spaces at each corner. Keep your tension even and consistent.
Repeat rounds, continuing your color sequence. The square will grow larger with each additional round. Most granny squares used in projects are between 4 and 7 rounds, depending on the desired size.
Finish off each color change by fastening off and weaving in ends carefully. This helps maintain the square’s structure and keeps the back looking clean.
Once all your squares are completed, decide on a joining method. Options include slip stitch join, whip stitch, or even a join-as-you-go method using single crochets. Border your project with one or two rounds of a neutral color for a clean, finished look.
The beauty of the Classic Granny Square 3 Colors, Striped – Free Pattern is that it can be used in so many different ways. The most common application is a blanket or afghan, but your imagination is the only limit.
Try making cushion covers by joining squares into a front panel and sewing it to a fabric or crocheted backing. This instantly adds handmade charm to your living space.
You can also use these colorful squares to create bags. A simple tote or market bag made from 13 granny squares is both practical and stylish. Add a lining and handles for durability.
For smaller projects, consider potholders or coasters. Use heat-resistant yarn for kitchen accessories, and don’t forget to add a loop for hanging.
Make wearable items like shawls, vests, or skirts using joined granny squares. These projects stand out and show off your crochet skills while offering comfort and flair.
Seasonal décor is another fun idea. Use themed colors to create throws or banners for holidays—like red, white, and blue for summer or green, red, and gold for the winter holidays.
Lastly, incorporate granny squares into scrapbooking or wall art. Mount mini-squares onto canvas or wood for a rustic, modern display that celebrates the art of crochet.
What type of yarn works best for this pattern?
Worsted weight acrylic or cotton yarn is ideal. Choose yarns of the same weight for consistent sizing across all squares.
How many colors do I need for this version of the granny square?
This pattern uses three colors per square. You can repeat these colors in a set sequence or mix and match them across different squares.
Do I have to block my granny squares?
Blocking is recommended for this project. It helps maintain the square shape and makes assembling them easier and neater.
Is this pattern suitable for beginners?
Yes! The Classic Granny Square 3 Colors, Striped – Free Pattern is a perfect beginner project. It uses basic stitches and helps improve color-change techniques.
How do I join multiple granny squares together?
You can use slip stitch, whip stitch, or single crochet joins. Join-as-you-go methods are also popular and save time.
What size should my finished granny squares be?
The size depends on how many rounds you make. Typically, granny squares range from 4×4 inches to 6×6 inches or larger depending on your project.
The Classic Granny Square 3 Colors, Striped – Free Pattern offers endless creativity and timeless charm. From blankets and cushions to bags and clothing, this pattern is both functional and beautiful. With just three colors, you can transform simple yarn into vibrant works of art that bring joy to your space and those around you.
We hope this guide helped you feel inspired and ready to start your next crochet project using the Classic Granny Square 3 Colors, Striped – Free Pattern. If you enjoyed this tutorial, please leave your honest opinion and share any suggestions or ideas you might have. We’d love to hear how you use your granny squares and what colors you choose!


