
Crochet Multi-Purpose Blouse, Shawl, Runner Model

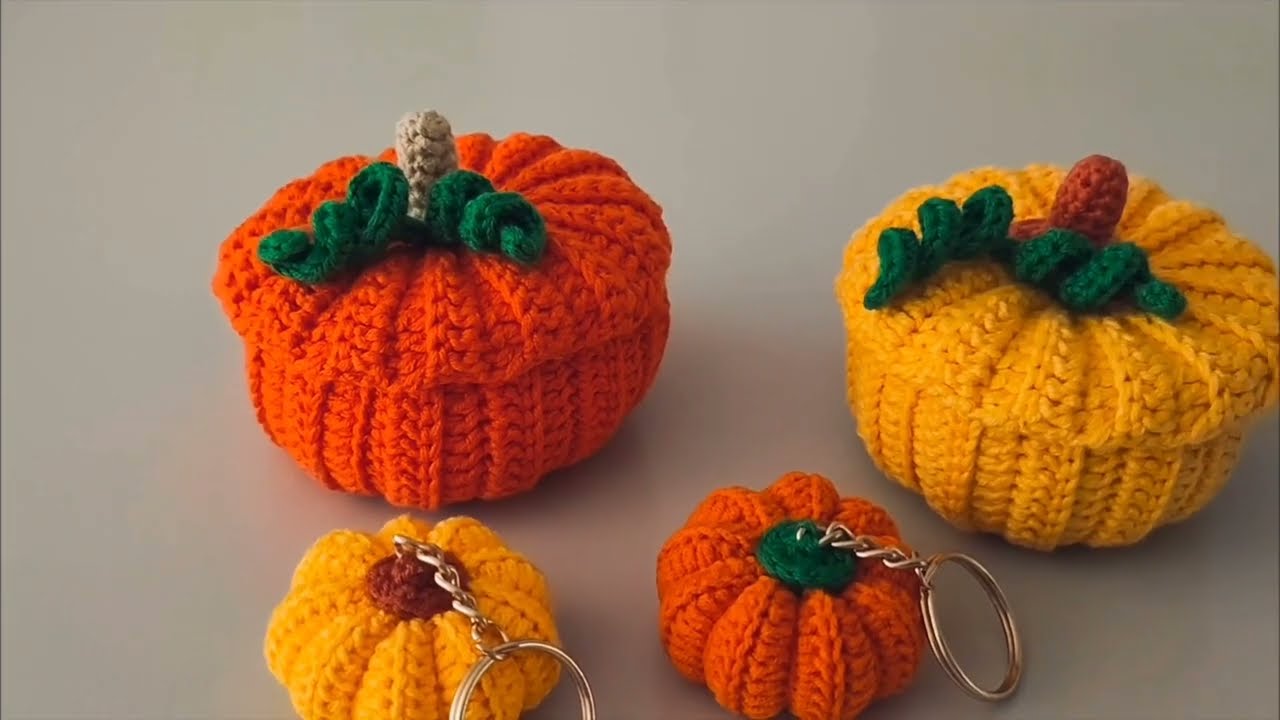
Learning how to crochet a sturdy pumpkin basket for autumn – free pattern is a delightful way to welcome the fall season into your home. This practical yet whimsical project allows crocheters of all levels to explore creativity while making something both decorative and functional.
Whether you want to use it for candy, display, or small storage, a pumpkin basket is perfect for adding cozy vibes to your autumn decor.
With fall approaching, many crafters look for festive, seasonal patterns that also serve a purpose. The crochet pumpkin basket fits this bill perfectly.
It’s not just another decorative piece—it’s a useful, charming accessory for Halloween parties, Thanksgiving tablescapes, or just organizing craft supplies in style. This pattern emphasizes sturdiness, making your finished project hold its shape and stand out in any room.
The beauty of a sturdy crochet pumpkin basket lies in its versatility. You can play with colors, sizes, and yarn types while still sticking to a structure that works beautifully. And the best part? We’re offering this free pattern to guide you step-by-step through every detail, ensuring a rewarding and enjoyable crochet experience.
Before diving into the stitches, selecting the right materials is key to making a sturdy pumpkin basket. Durability and structure begin with yarn and tools.
Thicker yarns like bulky weight or super bulky yarn are ideal. These types give your basket a firm structure without having to double up strands. Cotton yarn is highly recommended as it provides both texture and strength.
For a tight stitch and rigid fabric, you should use a smaller hook than usual. For instance, if your yarn recommends a 6.0 mm hook, try using a 5.0 mm or even a 4.5 mm. This technique tightens the stitches, adding stability.
You may also want to use a stitch marker, especially when working in the round. It helps keep track of rows and ensures a symmetrical, clean basket shape.
Optional but helpful additions include a plastic canvas or sturdy base sewn into the bottom for added support. This is especially helpful if you plan to fill your basket with heavier items.
Finally, choose your colors! Traditional orange with green for the stem is classic, but experimenting with earthy tones or even white pumpkins can make your basket unique.
Creating the pumpkin shape involves working in the round and increasing the size gradually to form a bowl-like structure.
Start by forming a magic ring and crocheting your first round of single crochets. This sets the foundation of the basket.
In the next few rounds, increase evenly by adding stitches at regular intervals. This forms the base of the basket. The wider your base, the more spacious your pumpkin basket will be.
Once the base reaches your desired diameter, continue to build upward without increasing. This creates the body of the basket. Use tight stitches to enhance structure.
For texture and visual appeal, consider using back-loop-only single crochet or waistcoat stitch. These stitches provide ridges and a “ribbed” pumpkin-like surface.
When you reach your desired height, stop increasing and prepare to close off the top edge. Optionally, you can add a final round using slip stitches for a cleaner edge.
To make the shape more “pumpkin-like,” thread yarn vertically through the basket after stuffing and sewing the top. Pull gently to create segments, and knot securely.
No crochet pumpkin basket is complete without a cute stem on top! You can crochet a simple cylindrical stem and sew it securely onto the center of the lid or body.
Use a darker or contrasting color yarn, like brown or forest green, to make the stem stand out. A simple spiral or tube made from single crochets works well.
If you want a more whimsical look, consider curling the end of the stem by decreasing gradually or using a pipe cleaner inside.
To add even more fall charm, crochet a few leaves using a simple leaf pattern. These can be attached near the stem using yarn or a hot glue gun (if not meant for heavy use).
You can also embellish your pumpkin with tiny crocheted flowers, vines, or beads for a festive look that reflects your personal style.
Optional: Sew on a fabric or yarn tag to personalize your project or make it a memorable handmade gift.
Now that your crochet pumpkin basket is ready, it’s time to decide how to showcase it. One popular option is using it as a centerpiece filled with mini pumpkins or dried flowers.
For Halloween, it’s perfect for holding individually wrapped candy. The sturdy design ensures it stands upright even when full.
Use the basket in a kid’s room or craft area to store crayons, markers, or small toys. It adds seasonal flair while being practical.
If you crochet multiple baskets in different sizes, you can nest them together for easy storage or place them throughout your home.
You can also turn your basket into a gift container. Fill it with baked goods, candles, or yarn skeins for a creative and personal autumn gift.
Place your basket by the entryway to hold keys, mail, or gloves. It keeps clutter at bay while maintaining that cozy, welcoming atmosphere.
What type of yarn is best for a sturdy pumpkin basket? Bulky or super bulky cotton yarn works best. It provides durability, structure, and a neat finish.
Can beginners follow this free pattern easily? Yes! The pattern is beginner-friendly with simple stitches like single crochet and slip stitch. Just follow the steps and take your time.
Do I need a plastic base for the basket? It’s optional but recommended for extra sturdiness. You can use a plastic canvas or sew in a cardboard piece.
How long does it take to complete the basket? Most crocheters can complete the project in one or two evenings, depending on experience and the size of the basket.
Can I wash the finished pumpkin basket? Yes, but hand washing is recommended, especially if you’ve added embellishments like leaves or flowers.
Can I make the basket in colors other than orange? Absolutely! Feel free to explore with beige, white, green, or even multicolor to suit your fall decor.
In this article, we explored how to crochet a sturdy pumpkin basket for autumn – free pattern, walking through everything from selecting the right yarn to adding final touches like leaves and stems. This project is perfect for bringing warmth and functionality to your seasonal decorations while showcasing your crochet skills.
Whether you’re a beginner or a seasoned crocheter, this fun, festive basket makes a lovely handmade addition to any autumn celebration. We’d love to hear how your pumpkin basket turned out! Please leave a sincere comment below sharing your experience, tips, or even photos—and feel free to suggest what tutorials you’d like to see next!


