
Crochet Multi-Purpose Blouse, Shawl, Runner Model

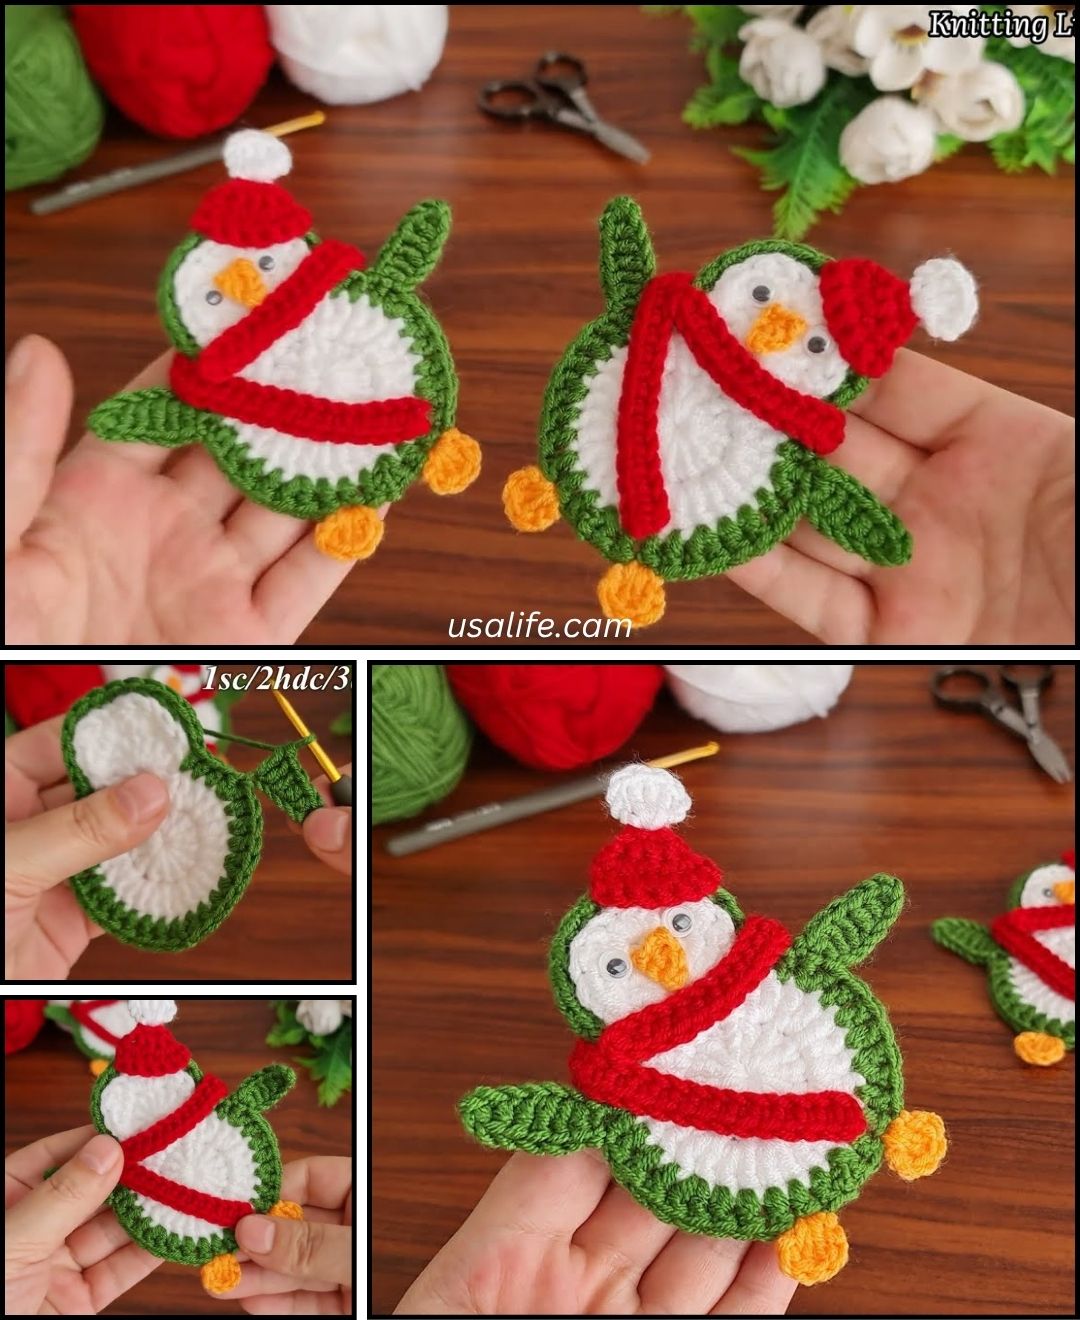
Learning how to crochet a penguin ornament – a detailed guide is a fun and rewarding project that brings the charm of handmade crafts to your holiday decorations or year-round home decor. Crocheting a penguin ornament lets you combine creativity with the cozy appeal of crochet.
Whether you are an experienced crocheter or a beginner eager to try something new, this guide will walk you through every step with clarity and warmth. This makes the process accessible and enjoyable for crafters of all levels.
The appeal of a penguin ornament lies not only in its adorable appearance but also in the versatility it offers. You can use different yarn colors, add embellishments, or personalize your penguin with scarves, hats, or buttons.
This is where the magic of amigurumi and decorative crochet intersect, creating a miniature art piece that brings smiles. This project also makes a perfect gift for friends, family, or anyone who appreciates handmade treasures.
Understanding how to crochet a penguin ornament – a detailed guide also means embracing the value of patience and precision. Each stitch counts toward shaping your little penguin’s body, wings, and face, making your finished piece a charming symbol of your effort and care.
The following sections will break down the materials, steps, tips, and finishing touches you need to bring your penguin ornament to life.
Selecting the best materials is the first essential step in learning how to crochet a penguin ornament – a detailed guide. Since ornaments are decorative pieces, the choice of yarn influences both appearance and durability. Cotton yarn is highly recommended because it has a nice stitch definition and a firm texture, which helps your ornament hold its shape well.
The yarn weight typically used for amigurumi projects, including penguin ornaments, is light worsted or DK weight. These sizes are perfect for creating detailed shapes without making the ornament too bulky. Choosing black, white, and orange yarn is classic for penguin coloring, but feel free to experiment with other colors if you want a creative twist.
You’ll also need a small crochet hook size, usually between 2.5mm to 3.5mm, to ensure your stitches are tight enough to avoid gaps where stuffing could show through. In addition, a tapestry needle is necessary for sewing parts together and weaving in ends neatly.
Stuffing is another critical material. Use polyester fiberfill for a soft but firm interior that gives your penguin a nice three-dimensional shape. Avoid heavy fillers so the ornament remains lightweight enough to hang on branches or hooks without pulling down.
Safety eyes or embroidered eyes can be used depending on your preference and the intended recipient of the ornament. Embroidered eyes are especially recommended if the ornament is meant for children to avoid choking hazards.
Finally, a small ribbon or loop can be sewn or crocheted to the top of your penguin for hanging purposes. Choose a color that complements your yarn and adds to the overall aesthetic of your ornament.
Understanding how to crochet a penguin ornament – a detailed guide requires a clear, stepwise approach to ensure success. The process begins with the penguin’s body, which is typically crocheted in continuous rounds. Start with a magic ring and gradually increase stitches to form an oval or round shape, depending on your chosen pattern.
Once the base of the body is established, you work upwards, shaping the torso by alternating increases and regular stitches to create a natural penguin silhouette. Changing yarn colors at strategic points helps define the penguin’s classic black back and white belly.
After the body, the wings are crocheted separately, often starting with fewer stitches and increasing slightly to form a tapered shape. These are then sewn firmly to the sides of the body. The wings give your penguin character and dimension.
The beak and feet are usually made with orange yarn. Small and simple, these features can be crocheted or embroidered depending on your skill level and preference. Attaching these parts securely is important to maintain the integrity of your ornament.
Adding the eyes either with safety eyes or by embroidering them gives life to your penguin. Position them evenly to maintain symmetry and cuteness.
Lastly, don’t forget to add the hanging loop or ribbon. This finishing touch turns your crochet creation into a functional ornament ready to brighten any space.
There are several helpful tips to keep in mind when following how to crochet a penguin ornament – a detailed guide to make sure your project turns out beautifully. One of the most important is maintaining consistent tension throughout your work. Uneven tension can lead to misshapen pieces or holes that reveal stuffing.
Another useful tip is to count your stitches regularly. Amigurumi shapes rely heavily on precise stitch counts to achieve the intended design, so using stitch markers can help keep track of rounds and decreases.
Blocking your finished pieces before assembly is optional but can improve the final shape and make sewing parts together easier. Lightly shaping your penguin’s body or wings while damp can create a polished look.
If you’re a beginner, start with a simple pattern version and gradually try more complex designs as you build confidence. Don’t rush—taking your time results in better craftsmanship and more enjoyment.
For embellishments like scarves, hats, or buttons, always attach securely and keep safety in mind, especially if the ornament might be handled by children.
Finally, take photos of your work as you go. This documentation can help you remember your process for future projects or share your success with other crochet enthusiasts.
Once you’ve mastered how to crochet a penguin ornament – a detailed guide, the possibilities for customization are endless. You can add accessories like a tiny crochet scarf or hat to give your penguin seasonal flair or personality.
Color variations also make fun customizations. Pastel colors create a soft, whimsical look, while bright, bold hues can make your ornament stand out as a modern piece of decor.
Adding small buttons, beads, or embroidery details such as snowflakes or hearts can make your ornament uniquely yours. Just be mindful of safety if the ornament is for children.
Consider personalizing your penguin by stitching initials or special dates on the back. This adds sentimental value and turns your creation into a treasured keepsake.
You can also experiment with different yarn textures, such as fuzzy or sparkly yarn, to give your penguin a unique tactile appeal.
Finally, creating a family of penguin ornaments in varying sizes and styles can be a charming display or gift set idea.
Is crocheting a penguin ornament difficult for beginners?
No, many patterns are designed with beginners in mind, featuring simple stitches and clear instructions. With patience and practice, you can create an adorable penguin ornament.
What yarn should I use?
Cotton yarn in light worsted or DK weight is ideal for durability and stitch definition. Choose colors like black, white, and orange for a classic look.
How do I avoid holes in my amigurumi?
Use a smaller crochet hook than recommended on your yarn label to create tight stitches that don’t leave gaps where stuffing can peek through.
Can I wash my finished penguin ornament?
Yes, but gently hand wash with mild soap and air dry to maintain shape and color.
How do I attach safety eyes safely?
Ensure safety eyes are pushed firmly through the stitches and secured with the locking backs provided to prevent them from coming loose.
Can I make different animals using similar techniques?
Absolutely! Once you understand amigurumi basics, you can apply similar techniques to create various animals and shapes.
In this article, we have thoroughly explored how to crochet a penguin ornament – a detailed guide, covering everything from material selection and step-by-step instructions to tips for perfecting your work and creative customization ideas. This guide aims to empower crocheters of all skill levels to create their own charming penguin ornament with confidence and joy.
We encourage you to try this project and share your experiences. Your sincere feedback and suggestions help build a vibrant, supportive crafting community. Please leave your thoughts and ideas in the comments — we can’t wait to hear from you!


