
Crochet Multi-Purpose Blouse, Shawl, Runner Model

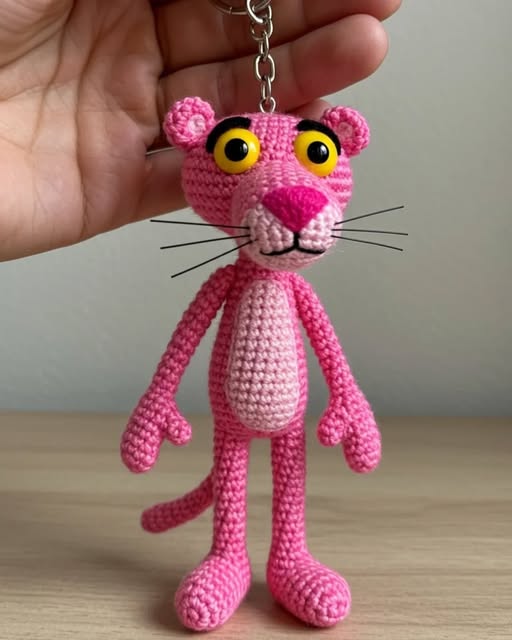
Pink Panther Amigurumi – Free Pattern is one of the most adorable and nostalgic crochet projects you can create, combining childhood memories with the satisfying art of amigurumi.
If you’ve been searching for a delightful, eye-catching piece that stands out in your handmade collection, this free pattern is the perfect way to bring the iconic Pink Panther to life with yarn and a hook.
Whether you’re a seasoned amigurumi artist or a beginner looking to take on a fun challenge, this pattern will guide you through every step.
There’s something deeply joyful about crafting characters we grew up with. The Pink Panther Amigurumi – Free Pattern not only taps into that joy but also introduces an engaging project that’s ideal for gifting or collecting.
The design is crafted to capture the character’s long limbs, expressive eyes, and trademark smirk—all through clever crochet techniques. With just basic materials and your favorite soft pink yarn, you’ll be amazed at how quickly your Pink Panther begins to take shape.
This Pink Panther Amigurumi – Free Pattern is thoughtfully designed to be approachable while still teaching useful skills like shaping, color changes, and expressive facial embroidery. You’ll get to practice increasing and decreasing stitches, working in the round, and joining limbs—all while having fun.
Let’s walk through how to make your own plush, cuddly Pink Panther and learn new techniques along the way.
To begin this project, gather all the necessary tools and yarns. The materials for the Pink Panther Amigurumi – Free Pattern are quite simple, making it budget-friendly and ideal for crocheters who enjoy using leftovers from other projects. You’ll need worsted weight yarn in pink, white, and black. Acrylic or cotton yarns both work well, though acrylic tends to give a softer finish.
You’ll also need a 2.5mm or 3mm crochet hook to ensure your stitches are tight enough so the stuffing doesn’t show. Stitch markers can help you keep track of your rounds, especially since amigurumi is mostly worked in continuous spirals. A yarn needle will come in handy for sewing the parts together and embroidering facial details.
Don’t forget safety eyes or embroidery thread if you prefer a completely yarn-based design. The Pink Panther Amigurumi – Free Pattern allows for flexibility here—some makers prefer felt for expressive eyes while others go for classic safety eyes for a polished finish. Make it your own!
Polyester stuffing is essential for shaping the body and limbs. If you want your Pink Panther to sit upright, a small weighted pouch or plastic pellets at the bottom can help with balance. These little touches bring professionalism to your crochet creations and give them life.
Scissors are, of course, a must, and a comb or pet brush can help fluff up the yarn slightly if you’re aiming for a softer, plushier finish. Keep everything organized in a project bag so you can crochet on the go or while watching your favorite show.
With everything in place, you’re ready to start crocheting your very own Pink Panther Amigurumi – Free Pattern and bring this iconic character to life.
The foundation of this pattern lies in common amigurumi techniques, so even beginners with basic knowledge can follow along confidently. You’ll start with the magic ring, which forms a tight, seamless circle at the base of most parts. This technique is perfect for creating rounded shapes like the head and limbs.
Single crochet is the most frequently used stitch in the Pink Panther Amigurumi – Free Pattern. Mastering the single crochet in the round is key to forming the panther’s sleek body. You’ll also use increases and decreases to shape the features and ensure a well-proportioned figure.
Invisible decrease is especially useful for a neat finish, helping to reduce bulk in the stitches. It makes the body transitions smoother and cleaner, which is ideal for a polished amigurumi. This technique is used for shaping the snout, body curves, and other finer details.
Color changing is another skill you’ll practice in this project. For instance, you may switch to white yarn for the belly or face, giving the Pink Panther his distinct, recognizable features. Secure and neat color changes make the toy look seamless and professional.
Stitch counting is critical in amigurumi. Because you’re building shapes gradually, keeping track of your rows and increases ensures that both legs and arms are the same size. Use a stitch marker or a simple piece of contrasting yarn to mark the beginning of each round.
Lastly, assembling the amigurumi is an important phase. The Pink Panther Amigurumi – Free Pattern includes instructions on how to sew each part securely and symmetrically. Pay close attention to placement, especially for the limbs, tail, and ears—they give the piece its final animated personality.
Start with the head. Using pink yarn, form a magic ring and build up with rounds of single crochet, adding increases to shape the dome. Midway through, you’ll incorporate shaping for the muzzle and nose. Stuff the head as you go to maintain firmness.
For the body, work from the bottom up, beginning with a wider base to allow the Pink Panther to sit. This part involves simple increases and decreases to taper the waist. Keep your stuffing evenly distributed to avoid lumps. If adding a weighted pouch, insert it at the base now.
Next are the arms and legs. Each limb is crocheted separately and attached to the body. Their signature long, slim look comes from a consistent number of stitches without too many increases. Don’t overstuff the limbs—leave them flexible so the panther can pose naturally.
Crocheting the tail is straightforward: a long, slender tube made with simple rounds. You can curl it slightly or leave it straight depending on how you want the final piece to sit. Attach it securely to the lower back of the body.
The ears are small, rounded pieces that add a lot of charm. Make sure they’re placed evenly on the head. For added flair, you can use a bit of white or black yarn to edge the ears, mimicking the cartoon details.
Finally, focus on the face. This step brings the panther to life. Embroider the nose, mouth, and eyes carefully using a tapestry needle and black or white yarn. If using safety eyes, insert them before fully closing the head. Position the features evenly for maximum cuteness.
One of the best parts of working with the Pink Panther Amigurumi – Free Pattern is how customizable it is. While the traditional Pink Panther is light pink, feel free to experiment with colors—make a blue panther, or one with stripes for a quirky twist. Crochet is art, after all!
You can also adjust the size of the panther by simply using thicker yarn and a larger hook for a jumbo version, or finer thread and a smaller hook for a mini version. This makes the pattern versatile for keychains, plushies, or even nursery decor.
Adding accessories gives personality. Think about a mini scarf, hat, or even a tiny detective magnifying glass. These small extras can turn your creation into a themed gift or character with a story.
Don’t be afraid to embroider the face instead of using safety eyes, especially if the toy is for a small child. It’s safer and allows for a more cartoon-like expression. You can also needle-felt some of the features for added texture.
Practice patience. Amigurumi can be slow and detailed, especially when shaping and assembling multiple parts. Taking your time with the Pink Panther Amigurumi – Free Pattern ensures that each part aligns and the final piece looks polished.
Most importantly, have fun. This project is designed to be both enjoyable and satisfying. Once you finish, you’ll have a cuddly, hand-crafted Pink Panther that showcases your crochet skills and creativity.
What skill level is required for this Pink Panther amigurumi?
This pattern is best for advanced beginners or intermediate crocheters. Basic knowledge of amigurumi and common stitches like single crochet, increase, and decrease is essential.
How long does it take to complete the Pink Panther amigurumi?
Depending on your speed and experience, it can take 6 to 10 hours. Breaking it into sessions helps avoid fatigue and keeps your stitches consistent.
Can I use different yarn weights?
Yes, but be aware that it will affect the size. Thicker yarn and larger hooks will create a larger panther. Adjust stuffing and stitch counts as needed.
Is it safe for babies or toddlers?
If you’re making it for a young child, use embroidered or felt eyes instead of safety eyes, and avoid small detachable parts to ensure safety.
Can I sell items made from this pattern?
Yes, typically handmade items from free patterns can be sold, but it’s courteous to credit the pattern source and not sell the pattern itself.
What if I make a mistake during the shaping?
Don’t panic. Mistakes can often be fixed by adjusting a few stitches or reshaping with stuffing. You can also undo a few rounds if necessary—it’s part of the process.
In this detailed tutorial, we explored how to bring the Pink Panther Amigurumi – Free Pattern to life from yarn to finished plush. From choosing your materials to learning new crochet techniques and customizing your final piece, every step is a chance to grow creatively. The result is a soft, charming toy that celebrates a classic character while showcasing your handmade talent.
If this guide helped you or inspired your crochet journey, we’d love to hear from you. Please leave a sincere comment below sharing your thoughts or suggestions. Your feedback helps us continue crafting content that supports and delights the crochet community.


