
Crochet Multi-Purpose Blouse, Shawl, Runner Model

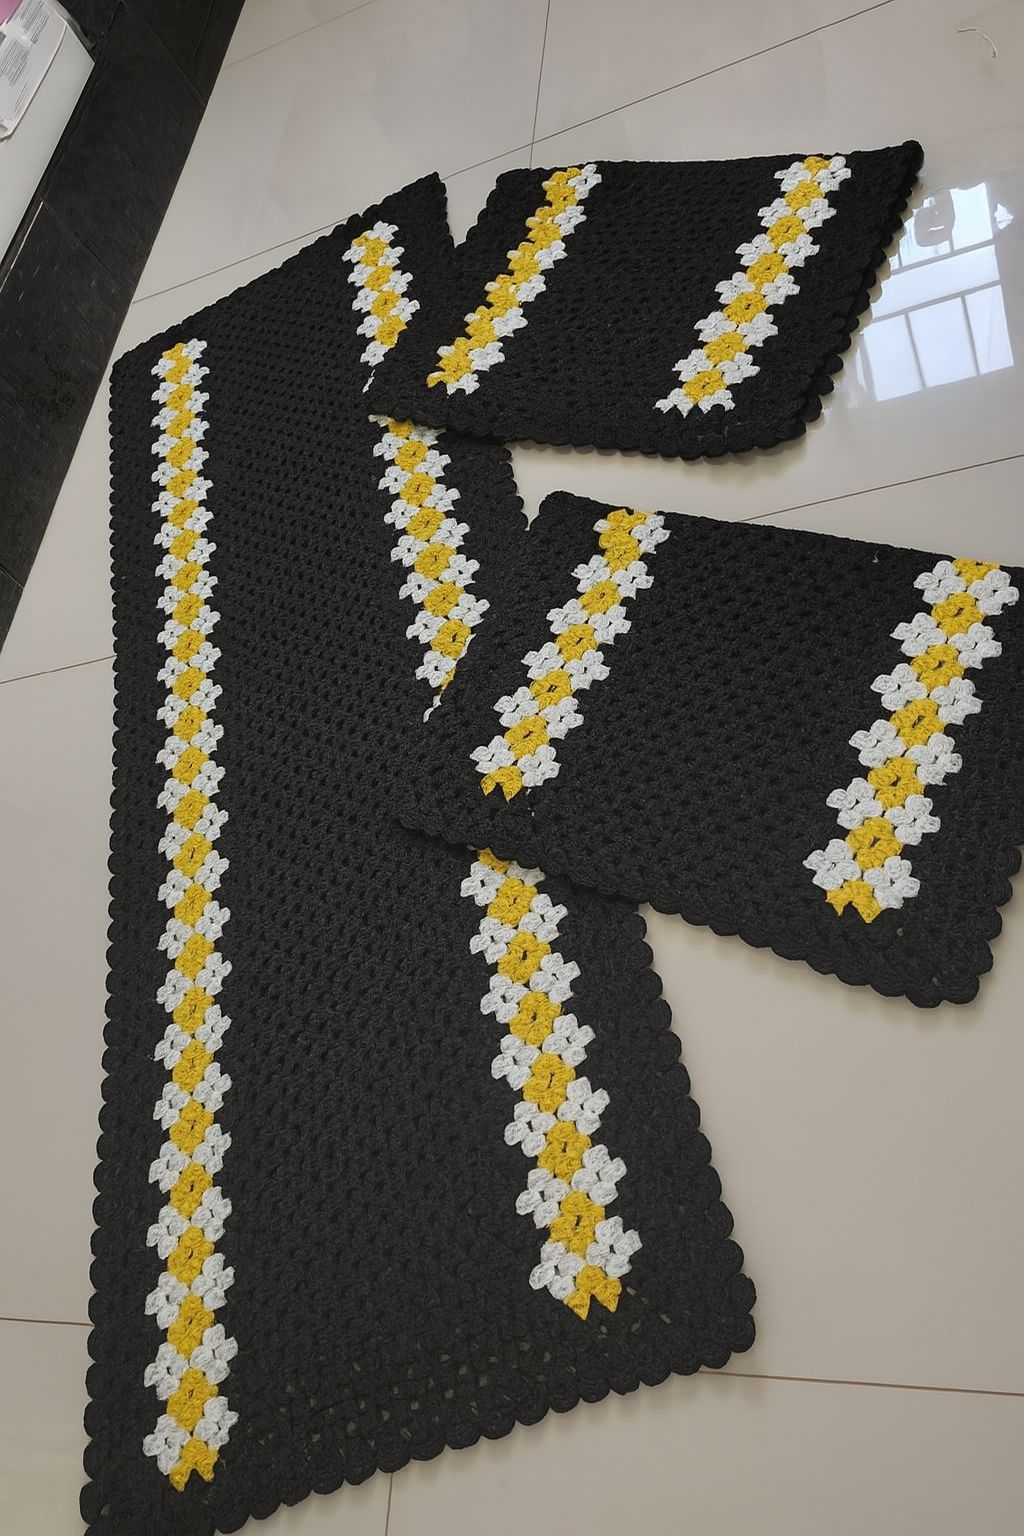
The PRACTICAL CROCHET BLOCK RUNNER – COMPLETE STEP BY STEP is a perfect blend of beauty and function. It’s a crochet project that brings creativity into everyday spaces while offering a relaxing and fulfilling experience for crafters.
Whether you’re new to crochet or experienced with yarn and hook, this tutorial will guide you in creating a beautiful and useful piece for your home.
Crochet block runners are ideal for adding a decorative touch to dining tables, sideboards, or even coffee tables. Unlike one-piece table runners, they are made from individual squares or blocks that are stitched together. This method makes the process more manageable and customizable.
With the PRACTICAL CROCHET BLOCK RUNNER – COMPLETE STEP BY STEP, you’ll have the opportunity to use colors and textures creatively.
One of the most satisfying parts of this project is watching the individual blocks come together into a cohesive and practical piece. Each block is a small canvas where you can practice your stitches, play with patterns, and build confidence.
This article walks you through the entire journey, offering inspiration and instruction so you can confidently make your own PRACTICAL CROCHET BLOCK RUNNER – COMPLETE STEP BY STEP.
Before jumping into your yarn stash, it’s important to understand what makes a crochet block runner unique. It’s more than just squares—it’s about design, alignment, and thoughtful assembly. Starting with this foundation ensures you know where you’re going before you begin.
The most common stitch used for runners is the double crochet stitch, which gives a solid but flexible fabric. However, you can easily incorporate half double or treble crochets for added texture. Sticking to the same stitch across all blocks will provide a more uniform look.
When it comes to choosing yarn, cotton is a popular choice for its durability and ease of cleaning. Since table runners are often exposed to spills and dust, it’s practical to use a fiber that holds up well to washing.
The size of the individual blocks will directly affect the final dimensions of your runner. A set of 6 to 12 blocks, depending on your table length, is a great place to start. Each block can be 4 to 6 inches square. This size makes them easy to manage and arrange.
Color choice plays a major role in the final look. Consider whether you want your runner to be neutral and classic or vibrant and playful. Solid colors are easier to coordinate, while variegated yarn adds a whimsical feel.
Finally, plan your layout before assembling your blocks. Arrange them on a flat surface and play with the order. This visual guide will help you achieve a balanced and symmetrical design.
Now that you’ve prepped your materials and design, it’s time to begin creating the blocks. The instructions here follow a simple yet elegant pattern suitable for all levels.
Start with a slip knot and chain 20 stitches. This will form the foundation of your block. If you want a slightly larger block, increase the number of chains in multiples of 2.
For Row 1, work one double crochet into the third chain from your hook, then continue double crocheting across the row. You should have 18 stitches total.
Chain two and turn your work. Continue to double crochet across each row until your block is square. This will typically take about 14 to 16 rows depending on your tension and yarn weight.
Once your square is complete, fasten off and weave in the ends securely. Use a yarn needle to hide any tail ends within the fabric to keep it neat.
Repeat the block-making process until you have the desired number of blocks. You can use one color throughout or switch colors for a mosaic-style design.
After all your blocks are finished, block them using steam or a light spray of water and pinning to size. This helps even out any curling and ensures uniformity before assembling.
With your stack of beautiful blocks ready, it’s time to assemble your crochet block runner. There are several joining methods, and each creates a different visual effect.
One common method is the whip stitch. Lay two blocks together, right sides facing, and sew through the outer loops using a yarn needle. This creates a flat, almost invisible seam.
If you prefer a more textured look, try the single crochet join. Place two blocks together and work single crochet stitches across the edges, joining them as you go. This method adds a raised ridge between blocks.
The join-as-you-go method is ideal for those who want to reduce finishing time. You work the final row of each block while joining it to its neighbor. It’s fast, efficient, and provides a neat finish.
Arrange your blocks in rows before sewing or crocheting them together. Make sure the color flow and stitch alignment look good when viewed from a distance.
Once your runner is fully assembled, crochet a border around the entire edge for a finished touch. A simple single crochet or scalloped edge works well.
Fasten off and weave in any remaining ends. Give the whole piece a final gentle blocking to relax the stitches and ensure the runner lies flat.
One of the joys of making a PRACTICAL CROCHET BLOCK RUNNER – COMPLETE STEP BY STEP is the ability to make it uniquely yours. Here are ideas to personalize your project.
Add buttons to the corners of the blocks for a farmhouse-chic vibe. Choose natural wood or painted buttons that complement your color palette.
Use embroidered stitches on select blocks for a handmade touch. Simple motifs like stars, hearts, or leaves add character and charm.
If you’re making a holiday version, incorporate themed colors like red, green, gold, or even metallic yarn. You can also alternate blocks with snowflakes or tree shapes.
For a more modern look, experiment with geometric designs and bold, contrasting colors. Black and white or jewel tones can turn your runner into a statement piece.
To make the project even more functional, line the underside with non-slip backing. This helps the runner stay in place on smooth surfaces like polished wood or glass.
Consider gifting your finished piece! Add a handmade tag, wrap it nicely, and offer it as a heartfelt present for a housewarming, wedding, or holiday gift.
1. Can I use different stitches in each block? Yes, you can mix stitches to create texture. Just ensure each block ends up the same size for smooth assembly.
2. What is the best yarn for a crochet block runner? Cotton yarn is ideal for durability and easy washing. Blends with acrylic can also work if you want more color variety.
3. How do I keep my blocks from curling? Blocking is key. Steam or spray the blocks and pin them flat to dry. Using consistent tension during crochet also helps.
4. How do I calculate how many blocks I need? Measure the desired runner length and divide by your finished block size. Add extra blocks if you want some overhang on the table.
5. Can beginners follow this pattern? Absolutely. The steps are easy, and you can stick to basic stitches until you feel confident to try variations.
6. How long does it take to finish a runner? It depends on your pace and how many blocks you make. On average, 1-2 weeks with regular evening crocheting is enough.
The PRACTICAL CROCHET BLOCK RUNNER – COMPLETE STEP BY STEP is a delightful and rewarding project for crochet lovers of all skill levels. From the first chain to the final stitch, it offers opportunities to learn, experiment, and create something truly useful and beautiful for your home. By following the clear steps and incorporating your personal flair, you can craft a table runner that showcases your creativity and skill.
We hope this guide has inspired you to begin your own PRACTICAL CROCHET BLOCK RUNNER – COMPLETE STEP BY STEP. If you’ve already tried this pattern or have tips of your own, feel free to share your honest opinion and suggestions in the comments. Happy crocheting!


