
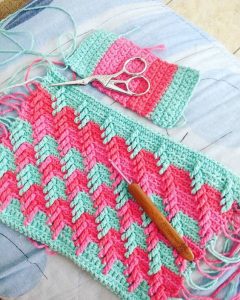
Crochet Multi-Purpose Blouse, Shawl, Runner Model

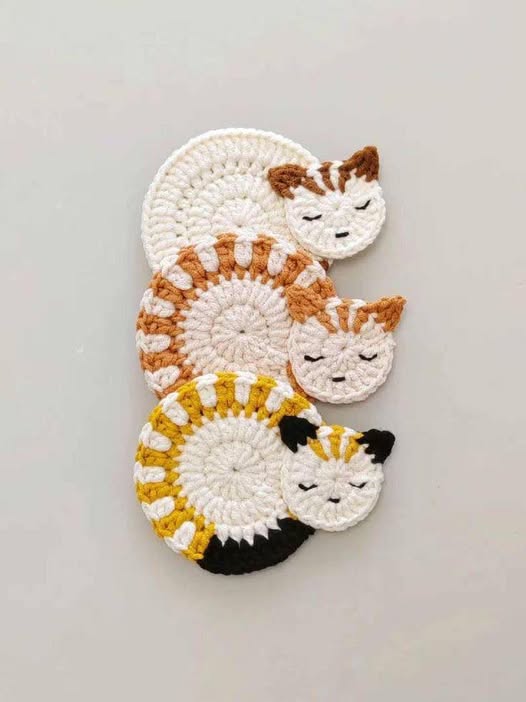
Sleepy Cat Coaster Crochet – Pattern is a delightful project for crochet lovers who enjoy mixing practicality with cuteness. If you’re a fan of feline charm and handmade home accessories, this project will warm your heart.
The combination of soft yarn, simple stitches, and the adorable sleepy cat face makes this coaster a cozy addition to any table or craft collection.
This Sleepy Cat Coaster Crochet – Pattern is perfect for both beginners and seasoned crocheters. You don’t need complicated skills to create something beautiful and functional.
With a few basic techniques and a bit of patience, you’ll have a set of sweet cat face coasters ready to gift or decorate your space. They also make wonderful last-minute presents for cat lovers!
Using this Sleepy Cat Coaster Crochet – Pattern, you’ll learn how to shape the circular face, add pointy ears, and embroider sleepy eyes and whiskers for that charming expression.
Not only will this pattern teach you to improve your crochet control and detailing, but it will also provide the satisfaction of finishing a project quickly. Let’s dive in and discover how to bring these adorable sleepy kitties to life!
To begin with the Sleepy Cat Coaster Crochet – Pattern, gather a few essential supplies. You’ll need worsted weight cotton yarn in at least two colors—one for the base and one for the embroidery details. Cotton yarn is perfect because it’s absorbent and holds its shape well for coasters.
A 4.0mm crochet hook is generally recommended for this pattern. However, if you tend to crochet tightly or loosely, you may want to adjust your hook size to ensure the coaster lies flat and doesn’t curl. Always test with a swatch before starting the main project.
You’ll also need a yarn needle for stitching on the sleepy cat face details. Small scissors and a stitch marker may come in handy, especially when working in the round to keep track of your stitches and increases.
Optional tools include safety pins to temporarily place the ears or face before sewing them in. You can also use embroidery floss instead of yarn for more defined facial features, depending on your desired look.
Having the right tools is half the battle in making a polished and durable coaster. Keep everything within reach before you start crocheting so that your flow isn’t interrupted as you move through the pattern.
Finally, always check that your yarn colors contrast nicely, especially when adding eyes and whiskers. The face should stand out from the base for a more expressive and appealing result.
The base of the Sleepy Cat Coaster Crochet – Pattern is a simple round shape, which forms the cat’s head. Begin with a magic ring and crochet in continuous rounds using single crochet stitches. This gives the coaster a clean, even finish without noticeable seams.
After your magic ring, you’ll start increasing evenly in each round. Typically, this means adding 6 stitches per round. Keep your tension relaxed and consistent so the coaster doesn’t buckle or ripple. Flatness is key in this step.
By round 5 or 6, your circle should be large enough to serve as a standard coaster. Aim for approximately 4.5 to 5 inches in diameter. If you prefer larger coasters—for mugs or bowls—feel free to add an extra round or two using the same increase pattern.
Once your circle is the right size, slip stitch to join the final round and fasten off. Weave in your ends securely. It’s important to hide them neatly on the back side since coasters are frequently handled and washed.
Make sure the edges are smooth and even. You can steam block the circle slightly if needed to encourage it to lie flat. This helps give your sleepy cat face a nice canvas.
Repeat this base step if you’re making a matching set of coasters. Keeping the base consistent ensures each piece looks uniform when displayed together.
No Sleepy Cat Coaster Crochet – Pattern is complete without the signature ears and sleepy facial features. Let’s add those playful finishing touches to bring your coaster to life!
To crochet the ears, make two small triangles using single crochets. You’ll work flat rows, starting with a base of 5 stitches and decreasing by one stitch on each side to create the triangle. These ears are then sewn onto the top edge of the circle.
Before attaching, position the ears with pins to check placement. They should be evenly spaced and slightly angled outward for that classic cat silhouette. Use the same yarn color as the base or a contrasting one for a fun twist.
Once the ears are in place, use black or dark yarn to embroider closed eyes with long lashes, giving your cat a dreamy, sleepy look. Stitch two curved lines across the face about one-third from the top. Be gentle to avoid puckering the base.
Add a small triangle nose using pink yarn or embroidery floss. Place it just below the eyes, then use light gray or black yarn to create six whiskers—three on each side of the nose. You can stitch them in a straight or slightly curved line.
These little touches give your coaster so much personality. Customize the expression if you like—add blush marks, a little smile, or even stripes to create a variety of cat styles!
After all the stitching, weave in the embroidery ends securely. Be sure nothing is loose or rough that could catch on cups or hands.
Now that your Sleepy Cat Coaster Crochet – Pattern is complete, it’s important to care for your creation properly. Cotton yarn is durable and washable, but gentle handling helps it last longer.
To clean, hand wash your coasters in cold water with mild soap. Lay flat to dry, reshaping the ears and face while it’s damp. Avoid wringing out or twisting, as that can distort the shape.
These sleepy cat coasters are excellent gifts for birthdays, holidays, housewarmings, or “just because” moments. Pair a set of 4 with a mug and a bag of coffee or tea for a thoughtful, handmade present.
You can also package them in eco-friendly boxes or wrap them with ribbon for a boutique-style appearance. People love receiving handmade gifts—especially ones that are this cute and practical.
If you’re selling your crochet creations, these coasters are a great product. They’re quick to make, inexpensive, and appealing to a wide audience. Keep a few on hand for craft fairs or small business inventory.
Encourage customers to care for the coasters properly by including a small care card with instructions. That way, your beautiful work stays in use and looking lovely for a long time.
What yarn is best for the Sleepy Cat Coaster Crochet – Pattern?
Worsted weight cotton yarn is ideal because it’s absorbent, washable, and holds shape well. It also gives a nice surface for embroidery.
Can beginners make this coaster pattern?
Absolutely! The stitches used are simple, mainly single crochet. The face embroidery requires some care, but it’s achievable for beginners.
How long does it take to make one coaster?
On average, it takes about 1 to 1.5 hours, depending on your skill level and speed. Once you make the first, the rest go faster.
Can I use this pattern to make a cat-themed wall hanging or decoration?
Yes! Simply add a loop to the top and turn it into a small wall décor piece or add stuffing and make it a soft toy.
Do I need safety eyes or can I just embroider the face?
For safety and simplicity, embroidery is recommended. It keeps the surface flat and safe, especially if given to children.
Can I sell the finished coasters?
Yes, as long as it’s your own handmade product, you’re welcome to sell the finished coasters. Just credit the pattern if applicable.
The Sleepy Cat Coaster Crochet – Pattern is a charming, beginner-friendly project that combines fun design with practical use. From creating the base circle to adding the adorable sleepy face and ears, this pattern teaches you how to make something truly delightful. It’s a quick project that makes a big impact—whether you keep it for yourself or share it with a friend.
If you enjoyed this pattern, we’d love to hear your thoughts! Leave your honest opinion and let us know how your coasters turned out. Have any tips or ideas for customizing them? Share your suggestions and help other crafters bring their sleepy cats to life too! 🧶🐱


