
Pie Carrier Sewing Pattern

Learning how to make a cute zipper bag – pattern is a fun and rewarding sewing project for crafters of all levels. Whether you’re a beginner looking for a simple tutorial or an experienced sewist seeking a relaxing afternoon project, this pattern is the perfect choice. It’s not only useful and adorable but also makes for a lovely handmade gift.
The beauty of this project lies in its versatility. You can personalize each bag with different fabrics, patterns, and sizes, making it ideal for storing makeup, art supplies, small tools, or even snacks.
Plus, learning how to make a cute zipper bag – pattern helps build foundational sewing skills that you can use in many other projects down the road.
Throughout this article, we’ll walk you through the steps, materials, and tips you need to create your own cute zipper bag.
This guide is detailed and beginner-friendly while remaining optimized for search engines. By the end, you’ll feel confident in your ability to stitch up something both practical and charming.
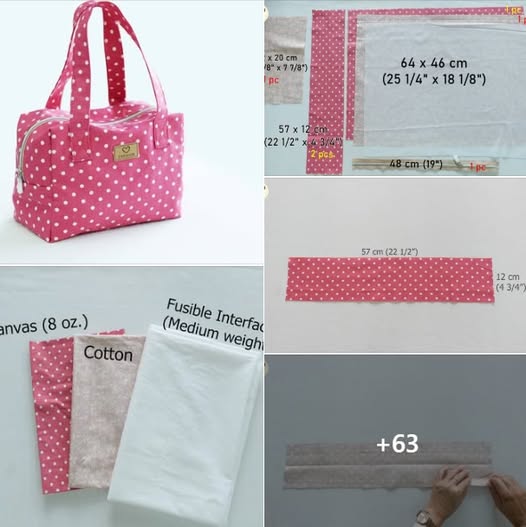
The first step in understanding how to make a cute zipper bag – pattern is gathering your materials. Fortunately, most of the supplies are easy to find and may already be in your sewing kit. You’ll need two fabric pieces for the outside and two for the lining, a zipper, matching thread, pins, scissors, and a sewing machine.
When selecting your fabric, choose cotton or canvas for a structured bag, or go with quilting cotton for something soft and flexible. Fat quarters are a great option, especially if you’re making several bags. Don’t forget interfacing if you want the bag to be sturdier or hold its shape better.
A good-quality zipper is essential. If this is your first time sewing a zipper, choose a plastic one around 9 to 12 inches long. Metal zippers are also great, but they can be trickier for beginners. Make sure the zipper matches or complements your fabric colors.
Thread choice is equally important. A polyester thread is strong and will hold up well with daily use. Try to use a color that blends in with your fabric for a clean, finished look. If you want to add a bold touch, go for contrasting thread to make your stitching stand out.
A rotary cutter or sharp scissors is crucial for cutting clean, straight lines. You’ll also need a ruler or measuring tape and some marking chalk or a fabric pen. Accuracy at this stage will help your bag turn out neat and even.
Lastly, your sewing machine doesn’t need to be fancy. A basic straight stitch function is enough. If you have a zipper foot, that’s a bonus—it makes installing the zipper much easier. With these supplies, you’re all set to dive into the fun of learning how to make a cute zipper bag – pattern.
Once your materials are ready, it’s time to begin sewing. Let’s go step-by-step through how to make a cute zipper bag – pattern so you can follow along with confidence and clarity.
Start by cutting your fabric pieces. You’ll need two outer pieces and two lining pieces, typically measuring 9” x 6”. If you’re using interfacing, cut two pieces the same size as your outer fabric and fuse them using your iron. This step will help give your bag structure and durability.
Next, layer one outer piece right side up, place the zipper on top facing down, and then add the lining on top, right side down. Line up the edges and pin them in place. This sandwich technique is key to getting a smooth zipper installation.
Sew along the top edge using a zipper foot. Go slowly and remove the pins as you sew. Once done, flip the fabrics so both are right sides out, then press with an iron for a crisp finish. Repeat the same process on the other side of the zipper with the remaining pieces.
Once both sides are sewn and pressed, topstitch along the edges of the zipper. This not only gives a professional look but also prevents the fabric from catching in the zipper. It’s a small detail that makes a big difference in how the final product feels and functions.
Open the zipper halfway (very important!), then match the outer fabrics together and the linings together, right sides facing. Pin around all the edges, leaving a 2–3 inch opening in the lining section for turning the bag inside out.
Sew all the way around the edge using a 1/4” seam allowance. Once finished, trim the corners and turn the bag right side out through the lining opening. Push out the corners with a blunt object, sew the opening closed by hand or machine, and tuck the lining inside. You’ve just completed how to make a cute zipper bag – pattern!
One of the best parts of learning how to make a cute zipper bag – pattern is how customizable it is. There are countless ways to personalize your bag and make it your own. From fabric choices to embellishments, the sky’s the limit.
Try using themed fabric for holidays, hobbies, or characters—great for gifts! You can also mix and match fabric scraps for a fun patchwork style. Bold prints work well for the outside, while soft or light colors make great linings.
Add embellishments like embroidery, applique, or iron-on patches to give your zipper bag extra flair. If you enjoy hand sewing, a few decorative stitches can enhance the look and showcase your personality.
Experiment with the shape and size. Make it wider for a pencil pouch, taller for a glasses case, or larger for a travel bag. Once you’ve mastered the basic technique of how to make a cute zipper bag – pattern, adapting the design becomes easy.
Switch up the zipper style. Add a fun tassel or bead to the zipper pull, or use colorful zippers for contrast. Some even like to use invisible zippers for a sleek, seamless finish.
For functional customization, consider adding inner pockets or a keyring loop inside the lining. This transforms a simple zipper bag into something even more practical and stylish for daily use.
Don’t forget to label your creation! A small fabric tag with your name or brand gives it a professional touch, especially if you’re planning to sell or gift the bags. This simple pattern opens the door to countless creative options.
If you’re new to sewing, you might run into a few bumps. But don’t worry—how to make a cute zipper bag – pattern is a great beginner project, and most problems are easy to solve with a few tips.
Always press your fabric before you begin. Ironing removes wrinkles and helps you cut and sew more accurately. Crisp fabric is easier to work with, especially when aligning layers with the zipper.
Use plenty of pins or clips when sewing around the zipper and edges. Keeping the layers aligned prevents shifting and helps your stitches stay straight. If your fabric is slippery, sewing slower can help you keep better control.
Having trouble with the zipper? Practice on scrap fabric first. Getting used to the zipper foot and how it feeds through the machine will build your confidence. Also, make sure to keep the zipper partially open before sewing around the edge—this makes it possible to turn the bag inside out.
If your corners are too bulky, try trimming the seam allowances or snipping the corners diagonally before turning the bag. This creates clean, sharp points once it’s flipped.
Stitching too close to the zipper teeth can cause snags. Make sure your stitches are about 1/8″ away from the edge. It may seem like a small adjustment, but it makes a big difference in functionality.
Finally, don’t be discouraged by small mistakes. Every crafter learns through trial and error. With each bag you make, you’ll become more skilled and confident in your sewing abilities. Before long, you’ll be teaching others how to make a cute zipper bag – pattern!
What size should I cut the fabric for a standard zipper bag?
A good starting size is 9” x 6” for both the outer and lining pieces. You can always adjust to make your bag larger or smaller depending on your needs.
Do I need a zipper foot for this project?
While not strictly necessary, a zipper foot makes sewing close to the zipper teeth easier and more precise, especially for beginners.
Can I make this bag without a sewing machine?
Yes, it’s possible to sew it by hand using a backstitch, but it will take more time. A sewing machine makes the process faster and cleaner.
What type of fabric works best?
Cotton, canvas, or quilting fabric work well. Thicker fabrics may need interfacing for added structure, while lighter fabrics create softer bags.
How do I avoid sewing the zipper closed?
Make sure to keep the zipper open halfway before sewing the edges together. This allows you to flip the bag inside out after sewing.
Can I wash the zipper bag in the machine?
Yes, if you use washable fabric and thread. Avoid embellishments that may not hold up in the wash. Always use gentle cycles.
In this tutorial, we explored step-by-step instructions for how to make a cute zipper bag – pattern—from materials and cutting, to sewing, customizing, and finishing. This fun and practical project is perfect for beginners and can be completed in just a short afternoon. Whether you’re making it for yourself or as a gift, it’s sure to impress.
We hope this guide inspired you to start stitching! Have you made your first zipper bag yet? We’d love to hear your feedback. Leave a sincere opinion or suggestion in the comments to help us grow and support more makers like you.


