
Pie Carrier Sewing Pattern

Learn how to make a kitchen apron – Pattern is a fun, practical, and creative sewing project that can be enjoyed by beginners and experienced crafters alike.
A kitchen apron is more than just a piece of fabric; it’s a tool that protects your clothes, expresses your style, and makes time in the kitchen more comfortable. Whether you love baking, cooking, or even gardening, having your own handmade apron adds a personal touch to your activities.
Making a kitchen apron at home allows you to choose fabrics, colors, and styles that match your personality. It’s also an excellent way to practice sewing skills, learn new techniques, and create a functional piece you can use daily or gift to someone special.
By following a kitchen apron pattern, you can craft something that looks professional without spending a fortune on store-bought aprons.
In this guide, we will walk through every step of the process, from choosing the right materials to adding final touches that make your apron unique. With the right kitchen apron pattern, you can create a durable, stylish, and perfectly fitted apron in just a few hours. Let’s get started and discover how easy and rewarding it is to make your own.
Selecting the correct fabric is the foundation of a successful Learn how to make a kitchen apron – Pattern project. Cotton is a popular choice because it’s easy to sew, breathable, and washable. Canvas and denim are great options for heavy-duty aprons, while linen offers a lightweight and elegant feel.
The color and print you choose can reflect your personality or match your kitchen decor. Solid colors are timeless, while patterned fabrics bring fun and vibrancy to your apron. Always pre-wash your fabric before cutting to avoid shrinking after the apron is made.
Along with fabric, you’ll need the right tools: a sewing machine, sharp fabric scissors, pins or clips, a measuring tape, chalk or a fabric marker, and thread that matches or contrasts nicely with your fabric. Having all materials ready before you start saves time and prevents interruptions.
Don’t forget about extra elements such as bias tape for edging, interfacing for reinforcement, or even decorative trims. These details make your apron stand out and feel more personalized.
When shopping for materials, consider durability. A kitchen apron is exposed to heat, stains, and frequent washing, so strong seams and quality fabric are key to making it last.
Lastly, ensure you have a well-lit, clean workspace where you can cut and sew comfortably. A smooth, organized surface will help you measure and assemble your apron with precision.
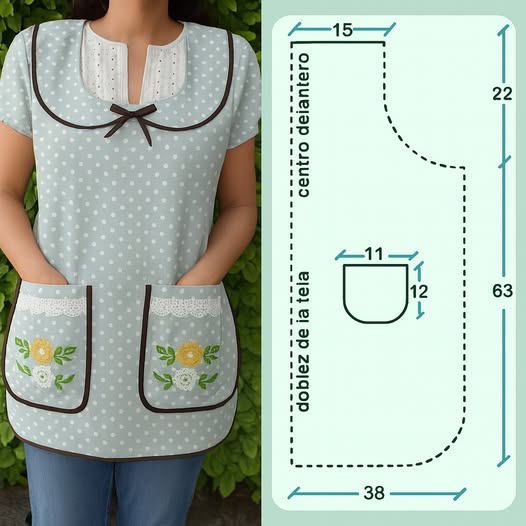
Once you have your materials, it’s time to cut the fabric according to the kitchen apron pattern. Patterns can be store-bought or homemade, but make sure you select the right size for your body.
Lay the fabric flat on your work surface and place the pattern pieces on top. Use pins or weights to hold them securely in place, ensuring they don’t shift while you cut. Accuracy at this stage ensures the apron will fit well and look neat.
Follow the pattern’s markings carefully. Most aprons have a main body piece, neck strap, and waist ties. Some designs include pockets or decorative panels, which you can cut separately.
Cut slowly and smoothly with sharp scissors, keeping your hand steady to avoid jagged edges. If you’re using patterned fabric, pay attention to alignment so the design flows naturally across the apron.
Mark any darts, folds, or notches indicated on the pattern. These will guide you during assembly and help you match pieces correctly.
Once all pieces are cut, keep them organized. Group similar sections together, such as straps or pocket pieces, so they’re easy to find when you start sewing.
Now that your fabric pieces are ready, it’s time to sew your Learn how to make a kitchen apron – Pattern project into shape. Begin with the main body of the apron, finishing the edges with a double fold hem or bias tape for a clean, professional look.
Attach the neck strap securely to each upper corner. Adjustable straps can be made using D-rings or buckles, allowing you to fit the apron perfectly around your neck.
Sew the waist ties to each side of the apron. Make sure they are long enough to wrap around and tie comfortably. Reinforce the stitching for extra strength, especially if the fabric is heavy.
If your pattern includes pockets, sew them before attaching the straps. Position them evenly and reinforce the top edges, as pockets tend to receive frequent use.
Use a straight stitch for most seams, but consider zigzag stitching or overlocking for raw edges to prevent fraying. Matching thread creates a subtle look, while contrasting thread can add a decorative touch.
Press seams with an iron as you go. This not only makes your apron look crisp and neat but also helps the seams sit flat and professional.
The last step in your kitchen apron pattern project is adding the special touches that make it truly yours. Decorative trims, embroidery, or appliqué can turn a simple apron into a statement piece.
Consider adding a monogram or embroidered design to personalize it. This is a wonderful way to create a gift for someone who loves cooking or baking.
You can also play with pocket shapes—curved, angled, or layered pockets not only look stylish but can also be functional for holding utensils or recipes.
If you enjoy color blocking, combine two or more fabrics for the main body and straps. This creates a fun and eye-catching design.
For extra durability, double-stitch high-stress areas like strap connections and pocket edges. This ensures your apron will withstand regular wear and washing.
Finally, give your apron a last press with the iron to smooth out any wrinkles. Now it’s ready to wear and show off in the kitchen.
1. What is the best fabric for a kitchen apron?
Cotton is ideal for most aprons because it’s breathable, easy to sew, and washable. For heavy-duty use, choose canvas or denim.
2. Can I make a kitchen apron without a sewing machine?
Yes, you can hand-sew an apron, but it will take longer. Use small, tight stitches to ensure durability.
3. How much fabric do I need for an apron?
Generally, 1 yard (about 1 meter) of fabric is enough for a standard adult apron, depending on the pattern.
4. How do I make an apron adjustable?
Use D-rings, buckles, or sliding adjusters on the neck strap to allow for different fits.
5. Can I add waterproofing to my apron?
Yes, you can use waterproof fabric or apply a water-repellent spray to protect against spills.
6. How do I clean a handmade kitchen apron?
Wash according to the fabric’s care instructions, usually in cold or warm water with mild detergent.
Making your own Learn how to make a kitchen apron – Pattern is a rewarding project that combines creativity, practicality, and skill-building. From selecting fabric to adding personal touches, every step lets you craft something functional and beautiful.
Whether for yourself or as a gift, a handmade apron is always a useful and thoughtful creation. If you enjoyed this guide, share your thoughts and suggestions—we’d love to hear your opinion and ideas for future projects.


