
Crochet Multi-Purpose Blouse, Shawl, Runner Model

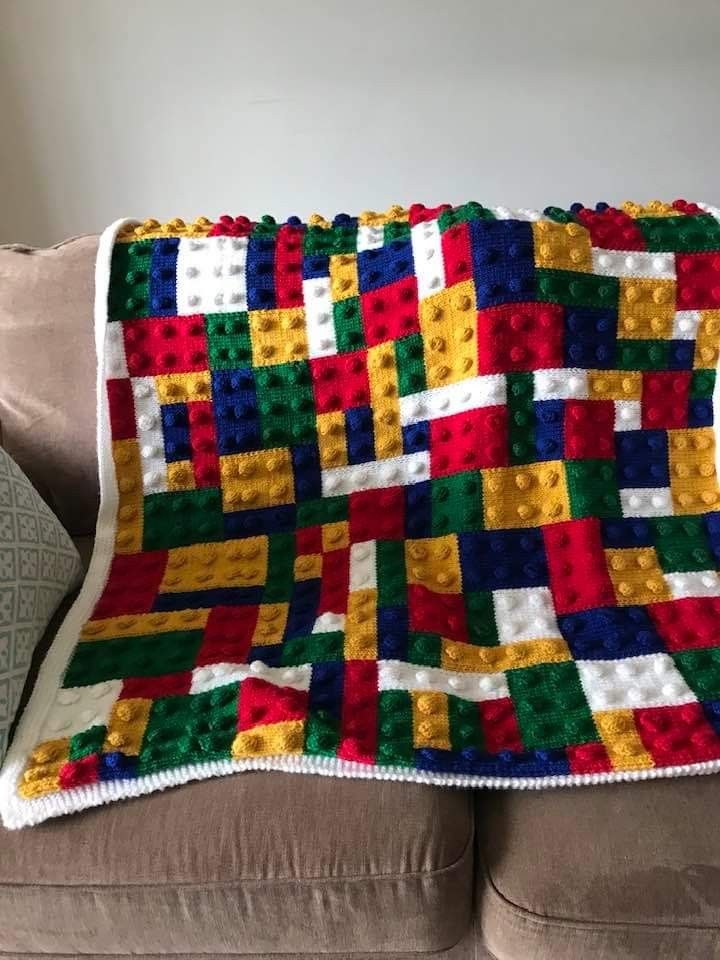
The Lego Blanket Pattern – Free Crochet Tutorial is one of the most creative and playful projects you can try if you love crocheting and enjoy making fun, colorful designs. This crochet pattern captures the imagination of both kids and adults, turning the timeless idea of building blocks into a cozy and unique blanket.
Whether you are a beginner looking for a simple but exciting project or an advanced crocheter who enjoys working with vibrant shapes, this pattern is a great way to mix fun with practicality.
Crocheting a blanket inspired by Lego blocks means you will be working with rectangular or square pieces that mimic the famous building bricks. The final result is not only warm and functional but also decorative, making it a perfect gift for children, Lego fans, or anyone who appreciates creative handmade items.
With a step-by-step approach, you can easily create a project that looks complex but is actually beginner-friendly.
In this article, we are going to explore how the Lego Blanket Pattern – Free Crochet Tutorial works, what materials you will need, different color ideas, and tips to ensure your finished blanket looks neat and polished.
By the end, you will feel ready and confident to start your own project. Let’s dive into the world of yarn and creativity while keeping the building block inspiration alive.
The first step in working with the Lego Blanket Pattern – Free Crochet Tutorial is to gather all the materials and tools. For this project, you will need yarn in multiple bright colors, such as red, blue, green, yellow, and orange, to mimic the playful Lego style. Using a soft worsted-weight yarn works well since it creates a durable but cozy finish. A standard crochet hook size like 5mm or 5.5mm is ideal for this blanket.
Once you have your supplies ready, it’s time to understand the construction of the blocks. Each block will be crocheted as a rectangle or square with added small circular pieces on top to represent the iconic Lego bumps. These little details give the blanket its unique and recognizable design, making it stand out among other crochet blankets.
The beauty of this pattern is its flexibility. You can make a small baby blanket, a medium throw, or even a large bedspread depending on how many blocks you choose to create. It’s entirely customizable, which means you can adjust the size to suit your needs and preferences.
Beginners will enjoy this project because it does not require complicated stitches. The basic building blocks are made using simple stitches like single crochet, half-double crochet, or double crochet, depending on the tutorial style. This makes it approachable even if you are just learning.
Another advantage is the modular nature of the project. Since each block is made separately, you can work on them in small sessions and then join them together later. This makes the project portable and convenient to work on anywhere.
Finally, remember that patience is key when starting. While the Lego Blanket Pattern – Free Crochet Tutorial is straightforward, the number of blocks required can be many. But with consistent effort, you’ll soon see the blanket grow into a colorful masterpiece.
To begin, start by making the base block. Typically, this is a rectangle made with rows of double crochet stitches. The size of your rectangle can vary, but keeping consistent dimensions across all blocks is essential for a polished finish. Once the base is complete, fasten off and weave in the ends.
Next, create the small circular bumps that sit on top of each block. These are usually crocheted as small flat circles using simple increases. For example, you may begin with a magic ring, crochet a small number of single crochets into it, and increase evenly around until you have a small circle.
Attach the bumps securely to the rectangular block. Usually, six bumps are placed evenly on each block to resemble Lego bricks accurately. You can sew them on using a tapestry needle and the same yarn color as the block, ensuring they stay firmly in place.
Once your blocks are ready, it’s time to join them together. You can use a whip stitch, slip stitch join, or single crochet join, depending on your preferred style. Each joining method will give the blanket a slightly different look, so choose the one that feels most comfortable and visually appealing to you.
After joining the blocks, consider adding a border around the entire blanket. A border not only gives the piece a clean, finished appearance but also strengthens the edges, making the blanket more durable. A simple single crochet border in a neutral color can frame the colorful blocks beautifully.
Keep repeating these steps until you have the desired number of blocks joined together, and you’ll have a complete Lego Blanket Pattern – Free Crochet Tutorial result that looks impressive but was fun and straightforward to create.
One of the most enjoyable parts of the Lego Blanket Pattern – Free Crochet Tutorial is choosing your colors. Since Lego blocks are known for their bold shades, you can experiment with a rainbow theme, sticking to the classic Lego palette of red, blue, yellow, green, and white. Alternatively, you could create a pastel version for a softer and more delicate look.
For a child’s bedroom, you might match the colors of the blanket with their favorite Lego sets. This personal touch makes the blanket even more special and adds sentimental value. For adults who love nostalgia, you can stick with the traditional bold primary colors for a vibrant and playful design.
Another creative idea is to vary the size of the blocks. While most tutorials stick to a standard size for simplicity, making some larger and others smaller can create a unique patchwork effect. This makes the blanket more visually dynamic and less predictable.
You could also add texture by experimenting with stitch patterns. Instead of keeping all blocks in plain double crochet, try mixing in some textured stitches such as bobbles or puff stitches for added depth. This makes the blanket more tactile and interesting to the touch.
Personalization is another great idea. You can embroider initials, small designs, or even crochet additional appliqués to place on certain blocks. This adds uniqueness and makes the blanket a one-of-a-kind piece.
Lastly, don’t limit yourself to blankets only. Once you master the Lego block design, you can apply the same method to create cushion covers, rugs, or even wall hangings. The possibilities extend far beyond a blanket, making this pattern versatile and inspiring.
Consistency is crucial when making a project with multiple pieces. Ensure that every block is the same size so that your blanket looks even and professional when joined together. Blocking your pieces before assembly can help achieve uniformity.
Weaving in ends carefully is another important step. Since this project involves many different colors, you’ll have plenty of yarn tails. Take time to weave them securely so they do not unravel later.
When attaching the bumps, make sure they are sewn on tightly and evenly spaced. If they are loose, they might come off with use, and uneven placement can affect the blanket’s neat look. Precision pays off in this step.
Joining the blocks neatly will also make a big difference. Take time to align corners and edges properly. A clean join enhances the overall design and makes your finished project look polished.
Choose yarn that is both soft and durable, especially if the blanket will be used frequently or given as a gift for children. Washable yarns are the best option since they make care and maintenance easy.
Finally, enjoy the process. Large projects like the Lego Blanket Pattern – Free Crochet Tutorial can feel overwhelming, but breaking it into smaller steps makes it more enjoyable. Celebrate each finished block and watch your blanket grow piece by piece.
Q: Is the Lego Blanket Pattern beginner-friendly?
A: Yes, it is very beginner-friendly. The stitches used are simple, and the project is modular, so you can work on it at your own pace.
Q: How long does it take to complete the blanket?
A: The time depends on the size you want. A baby blanket might take a few weeks, while a large throw could take a couple of months, working a little each day.
Q: What yarn works best for this pattern?
A: Worsted-weight yarn in bright colors is ideal. Acrylic yarn is a popular choice because it is durable and easy to wash.
Q: Can I make other items with the Lego block design?
A: Absolutely! You can adapt the design to cushions, bags, rugs, or wall hangings for a playful touch.
Q: Do I have to follow the traditional Lego colors?
A: No, you can use any color palette you like. Pastels, neutrals, or even monochrome designs work beautifully.
Q: What is the best way to join the blocks together?
A: Many prefer whip stitch or single crochet joins. Choose the method that gives you the finish you prefer.
The Lego Blanket Pattern – Free Crochet Tutorial is a fun, creative, and beginner-friendly project that combines color, imagination, and practicality. From gathering materials and creating blocks to assembling and adding borders, every step allows you to enjoy the process of crocheting while producing a vibrant and unique piece. This blanket can be customized in countless ways, making it perfect as a gift or a personal treasure.
Now that you’ve learned how to create this project, I’d love to hear from you. Share your thoughts, experiences, and suggestions in the comments—your feedback is always welcome and helps inspire even more crochet creativity!


