
Crochet Multi-Purpose Blouse, Shawl, Runner Model

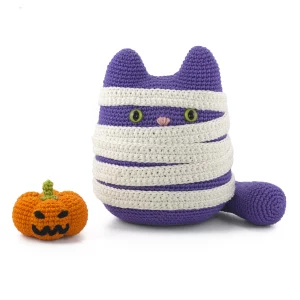
The Pip the Pumpkin – Pattern is a delightful project for anyone who loves seasonal crochet creations. This charming design captures the spirit of autumn and Halloween while also working beautifully as a year-round decorative piece.
Whether you are a beginner looking for a fun project or an advanced crocheter searching for a quick handmade gift idea, this pumpkin pattern is sure to brighten your collection.
Crochet pumpkin patterns have become timeless favorites because they are versatile, easy to customize, and can be displayed in many creative ways. The Pip the Pumpkin – Pattern stands out by offering a whimsical yet elegant design that you can adjust in size, color, and texture to suit your home décor or gift-giving needs.

With just a few materials and some basic crochet stitches, you can create a project that looks impressive but is surprisingly easy to make.
In this article, we’ll explore how to approach the Pip the Pumpkin – Pattern, how to customize it to your style, and some creative ways to display or gift it. We’ll also cover tips to ensure your pumpkin turns out neat and well-shaped. By the end, you’ll feel confident and excited to bring Pip the Pumpkin to life with your crochet hook.
One of the best things about the Pip the Pumpkin – Pattern is its adaptability. Unlike store-bought decorations that all look the same, this pattern lets you put your personal stamp on a classic fall icon.
It’s a project that appeals to beginners because it uses simple stitches like single crochet, increases, and decreases. For advanced crocheters, it offers opportunities for experimentation with yarn textures, color changes, and embellishments.
Another reason to love this pattern is how quickly it works up. Small pumpkins can be made in under an hour, making it an excellent last-minute project. Larger pumpkins can be crafted in a few evenings, making them perfect for mindful, cozy crochet sessions.
This project is also eco-friendly. By using leftover yarn from previous projects, you can turn scraps into charming pumpkins instead of letting them go unused. It’s a great way to recycle yarn while creating something beautiful.
Additionally, Pip the Pumpkin makes a great learning project. If you’re new to shaping in crochet, this pattern helps you practice forming three-dimensional pieces with ease. The shaping techniques can then be applied to other amigurumi or decorative crochet projects.
Finally, this pattern embodies the spirit of handmade gifts. A crocheted pumpkin can carry sentimental value when given to friends or family. It’s a small but thoughtful way to share the warmth of handmade art.
The Pip the Pumpkin – Pattern doesn’t require fancy tools or rare yarns, which makes it accessible to everyone. You’ll need just a few essentials to get started.
Yarn choice is important for the overall look of your pumpkin. Cotton yarn gives a smooth and defined texture, while acrylic or chunky yarns make the pumpkin soft and plush. You can even experiment with velvet or chenille yarn for a luxurious effect.
A crochet hook size suited to your yarn weight is recommended. Usually, a slightly smaller hook than the yarn label suggests will give tighter stitches, which helps keep the stuffing inside and gives the pumpkin a solid shape.
Other tools you’ll need include a yarn needle for sewing the seams and shaping the pumpkin, scissors, and some fiberfill stuffing. The stuffing helps the pumpkin hold its form and makes it soft to the touch.
Basic crochet stitches are all that’s required: single crochet, increases, and decreases. These are perfect for beginners to practice and for advanced crocheters to enjoy as a relaxing project.
Some versions of the pattern also use surface slip stitches to add decorative lines that mimic a pumpkin’s natural ridges. This detail adds realism and makes Pip the Pumpkin even more charming.
Finally, you’ll need a stem and leaf to complete the look. These can be crocheted separately and attached, or you can use natural materials like twigs for a rustic touch.
The Pip the Pumpkin – Pattern can be adapted for countless uses beyond just seasonal décor.
One popular option is using them as table centerpieces. A collection of pumpkins in different sizes and colors can bring warmth and charm to your dining room.
These pumpkins also make wonderful photo props, especially for children or seasonal photography sessions. They add a cozy handmade touch to autumn or Halloween themes.
Gift-giving is another great use. Crocheted pumpkins can be included in gift baskets, given as party favors, or presented as teacher appreciation gifts. Handmade items always stand out as thoughtful and personal.
You can also create a garland of small pumpkins by stringing them together. This makes a beautiful decoration for mantels, stair rails, or windows during fall.
For crafters who enjoy selling handmade items, Pip the Pumpkin is an excellent product for craft fairs or online shops. Its seasonal appeal ensures it will always have buyers.
Lastly, you can adapt the design for year-round use by changing the color palette. For example, white or pastel pumpkins can be displayed during spring or weddings as unique decorative pieces.
To achieve the best results with the Pip the Pumpkin – Pattern, a few tips can make all the difference.
First, maintain consistent tension throughout the project. Uneven stitches can create lopsided shapes, while tight, even stitches ensure a smooth finish.
Second, don’t skimp on stuffing. Adding enough fiberfill helps the pumpkin hold its round shape and gives it a pleasing squishiness. However, avoid overstuffing, which can stretch the stitches too much.
When sewing the top and bottom closed, take your time to pull the yarn tightly and create clear sections for the pumpkin ridges. This shaping step is what gives Pip the Pumpkin its realistic form.
If you want a more rustic look, consider using natural twine for the ridges instead of yarn. This small change can completely alter the pumpkin’s personality.
Experiment with color to make your pumpkin unique. Traditional orange is always a favorite, but green, cream, burgundy, or even multi-colored yarn can create striking results.
Lastly, add embellishments such as felt leaves, crocheted vines, or a tiny embroidered face to make your pumpkin stand out even more. Personal touches are what make handmade crafts truly special.
1. Is the Pip the Pumpkin – Pattern beginner-friendly?
Yes! It uses basic stitches and simple shaping, making it ideal for beginners.
2. How long does it take to make Pip the Pumpkin?
A small version can be completed in under an hour, while larger versions may take a few evenings.
3. Can I use any type of yarn for this pattern?
Yes, though cotton or acrylic yarns are most common. Chunky yarns make larger pumpkins, while thinner yarns make delicate mini versions.
4. Do I need special stuffing for the pumpkin?
Polyester fiberfill is most common, but you can also use fabric scraps or yarn leftovers as eco-friendly stuffing.
5. Can I wash the pumpkin once it’s made?
Yes, if you use washable yarn. Handwashing is recommended to preserve the shape and details.
6. How can I customize my pumpkin?
You can change colors, add faces, embellish with leaves, or even make a set of pumpkins in different sizes.
The Pip the Pumpkin – Pattern is more than just a seasonal craft — it’s a fun, versatile, and customizable project that anyone can enjoy. With simple stitches, minimal supplies, and endless creative options, this pattern is perfect for beginners and experienced crocheters alike.
Now that you’ve explored everything about Pip the Pumpkin, it’s time to pick up your hook and bring this charming creation to life. Have you ever tried making a crochet pumpkin before? Share your thoughts, experiences, and suggestions in the comments — your feedback can inspire other makers too!


