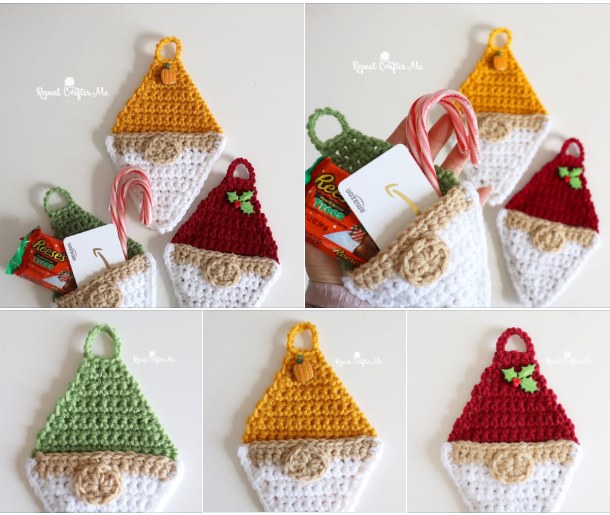
Crochet Gnome Pocket Ornaments – Gift Toppers & Treat Holders

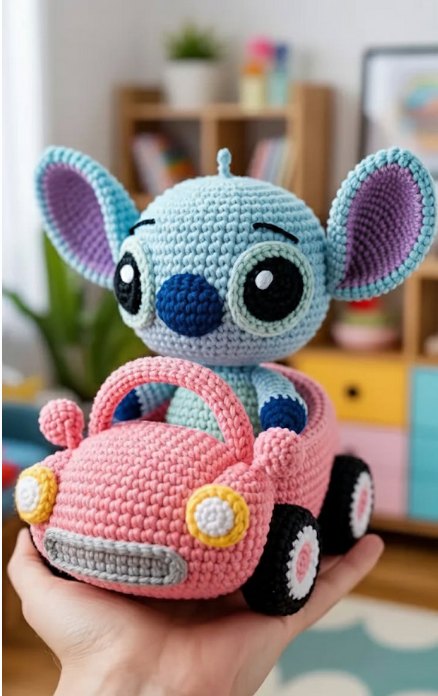
Amigurumi Stitch in Pink Car – FREE Crochet Pattern is a delightful and imaginative project that combines two charming ideas: the beloved blue alien character Stitch and a bright pink crochet car. This pattern allows you to create an adorable scene that will captivate anyone who loves amigurumi or unique handmade toys.
By using simple crochet stitches, clever shaping techniques, and vibrant yarn colors, you can bring this playful design to life. The Amigurumi Stitch in Pink Car – FREE Crochet Pattern is perfect for gifting, decorating a child’s room, or adding a whimsical touch to your collection of crochet creations.
Creating this amigurumi project is a fun and rewarding experience. Not only do you get to practice your crochet skills, but you also have the chance to experiment with colors and textures to make your piece truly unique. The combination of a recognizable character and a bright, cheerful vehicle makes this project stand out among other amigurumi designs.
Whether you’re crafting for yourself, a loved one, or a special occasion, this pattern is sure to bring smiles. Using the Amigurumi Stitch in Pink Car – FREE Crochet Pattern, even intermediate-level crocheters can enjoy crafting something special that feels professional and polished.
One of the best aspects of this project is its versatility. You can customize the size, colors, and even small details to suit your style or the recipient’s preferences. This amigurumi makes an excellent handmade gift for fans of Stitch or anyone who appreciates creative, handcrafted items. It also serves as a charming display piece for your home or workspace.
In the following sections, we’ll explore the materials you’ll need, the step-by-step process, customization tips, and how to care for and display your finished project.
To start your Amigurumi Stitch in Pink Car – FREE Crochet Pattern, gather the necessary materials. Choose worsted weight yarn in a bright pink shade for the car body, blue for Stitch, and additional colors such as black, white, and gray for details like wheels, eyes, and accents. Acrylic yarn is an excellent choice because it’s durable, affordable, and easy to work with. If you prefer a softer texture, cotton yarn will give your amigurumi a smooth and professional finish.
Selecting the right crochet hook is important for achieving tight, even stitches. A 3.5mm or 4mm hook is recommended for this project to ensure the stuffing remains hidden and the finished piece holds its shape. Using a smaller hook can help create a more compact, polished look, especially for small details like Stitch’s ears or the car’s headlights. Always check your gauge before starting to ensure the finished size matches your expectations.
You will also need polyester fiberfill for stuffing. Use small amounts at a time to evenly fill the body of the car and Stitch without creating lumps. Safety eyes or small black beads work perfectly for Stitch’s expressive eyes, but if you’re gifting the toy to a young child, consider embroidering the eyes for added safety. A yarn needle will be essential for sewing the pieces together neatly.
Additional tools like stitch markers, scissors, and pins will help you stay organized and make assembly easier. Stitch markers are especially useful when working in rounds, as they help you keep track of the beginning of each round. Pins can hold parts in place while you sew, ensuring proper alignment and balance.
Before starting, organize your workspace. A comfortable chair with good lighting will make a significant difference during longer crochet sessions. Preparing all your materials and tools in advance will help you focus on the creative process without unnecessary interruptions.
Finally, read through the Amigurumi Stitch in Pink Car – FREE Crochet Pattern instructions completely before starting. Familiarizing yourself with the steps will help prevent mistakes and allow you to plan any customizations, such as adjusting colors or adding accessories to the car or Stitch.
Begin by crocheting the pink car. Use a magic ring to start the car’s base, then work in continuous rounds with single crochet stitches. Gradually increase your stitch count to shape the car body. Maintain even tension throughout to ensure a smooth surface. Add small details like bumpers and headlights using contrasting yarn colors to make the car look more realistic.
Once the car body is complete, crochet the wheels. Use black yarn for the wheels and gray or white for the hubcaps. Make four wheels of equal size, lightly stuff them if needed, and attach them symmetrically to the car body. Positioning them evenly ensures your amigurumi car is balanced and visually appealing. Secure the wheels tightly so they stay in place.
Next, move on to creating Stitch. Begin with his head by forming a magic ring and working in rounds. Increase stitches to shape his rounded head, then add decreases to form the top. Use blue yarn for the main body and lighter blue or white for facial details. Crochet his large, iconic ears separately, and attach them securely to the sides of the head for an authentic look.
Continue by crocheting Stitch’s body, arms, and legs. These pieces should be proportionate to his head and small enough to fit comfortably inside or next to the pink car. Stuff each piece lightly before sewing them together. Attach Stitch’s arms and legs in a way that suggests movement, as if he’s happily driving or riding in the car.
Assemble the pieces by sewing Stitch into or onto the car. Depending on your preference, you can place him sitting inside the car or leaning against it. Use pins to experiment with positioning before making the final stitches. Adding small details like a crochet steering wheel or embroidered facial features will make your project even more charming.
Take your time with assembly to ensure all parts are secure and symmetrical. Once complete, weave in any loose ends and trim excess yarn. Your Amigurumi Stitch in Pink Car – FREE Crochet Pattern is now ready to impress friends, family, or buyers at a craft fair.
One of the most enjoyable aspects of the Amigurumi Stitch in Pink Car – FREE Crochet Pattern is how customizable it is. Start by experimenting with different color combinations. While pink is a fun and eye-catching choice, you can create a blue car for a classic look, a red car for a bold style, or even a multicolored vehicle for a playful twist. Similarly, you can change Stitch’s color palette for a more whimsical or fantasy-inspired design.
Adding accessories is another way to personalize your project. Consider crocheting a small scarf for Stitch, a tiny hat, or even miniature gifts to place in the car. These small touches make your amigurumi unique and can be tailored to special occasions like birthdays or holidays. Embroidered or felt accents like headlights, taillights, or logos can give your car extra personality.
For advanced crocheters, you can modify the pattern to create different car models. Try elongating the body to make a convertible or changing the wheels to resemble an off-road vehicle. These variations allow you to create a collection of cars that showcase your creativity and crochet skills.
Another fun idea is to create a themed set. For example, you could crochet several Stitch characters in different outfits, each with a car of a different color. Displaying them together makes for an impressive and charming collection that could be a conversation starter or a craft fair highlight.
You can also experiment with textures by using specialty yarns like velvet or chenille for the car body or Stitch’s ears. These yarns can give your amigurumi a soft, plush feel and a distinctive look. Just be aware that some specialty yarns can be more challenging to work with, so practice on small swatches first.
Lastly, don’t hesitate to scale the pattern up or down by adjusting your hook size and yarn weight. A smaller version could be used as a keychain or ornament, while a larger one could become a standout decorative piece for a shelf or child’s playroom.
To keep your Amigurumi Stitch in Pink Car – FREE Crochet Pattern looking its best, proper care is essential. Spot clean the amigurumi with a damp cloth when needed, especially if it’s displayed in a high-traffic area or handled frequently. Avoid soaking the piece in water, as this can distort the stuffing or seams.
If a deeper clean is necessary, handwash gently in cool water with mild soap. Avoid wringing out the amigurumi—gently press out excess water instead. Allow it to air dry completely on a flat surface, reshaping as it dries to maintain the original form. Patience during the drying process will prevent misshaping.
When displaying your finished piece, choose a dry, clean area away from direct sunlight to prevent fading. Placing it inside a display case or on a shelf can protect it from dust and damage while keeping it visible for admiration. If gifting, consider packaging your amigurumi in a clear box or wrapping it in tissue paper for an extra-special presentation.
For long-term storage, place the amigurumi in a breathable fabric bag or box to avoid moisture buildup. Keep it in a cool, dry place away from pets, as cats or dogs might mistake it for a toy. Proper storage ensures your creation remains in excellent condition for years to come.
If your amigurumi becomes misshapen over time, gently reshape it by hand or use a light steam treatment if your yarn type allows it. Always check the yarn label to ensure it can withstand heat or moisture before applying steam. Regular maintenance will help preserve the beauty and durability of your piece.
Finally, share your finished Amigurumi Stitch in Pink Car – FREE Crochet Pattern online or within crochet communities. Showcasing your work not only inspires others but also allows you to connect with fellow crafters, exchange tips, and build your confidence in creating more advanced amigurumi projects.
Q1: Is the Amigurumi Stitch in Pink Car – FREE Crochet Pattern suitable for beginners?
Yes, it’s beginner-friendly with basic stitches, though some assembly skills are required.
Q2: What type of yarn is best for this pattern?
Worsted weight acrylic or cotton yarn works well, offering durability and vibrant colors.
Q3: How long does it take to complete this project?
Depending on experience, it typically takes 8–12 hours spread over a few days.
Q4: Can I adjust the size of the amigurumi?
Absolutely—use different yarn weights and hook sizes to create smaller or larger versions.
Q5: How can I make the piece safer for young children?
Use embroidered eyes instead of safety eyes and ensure all pieces are securely attached.
In this article, we explored the Amigurumi Stitch in Pink Car – FREE Crochet Pattern, from gathering materials and following the step-by-step process to customizing and caring for your finished piece. This project is a wonderful way to practice crochet techniques while creating something unique and playful.
Whether you’re crafting for yourself, as a gift, or for display, this pattern offers endless creative opportunities. We’d love to hear your honest opinions and suggestions about this project—share your feedback and tell us how your Stitch in a pink car turned out!


