
Amigurumi Donald Duck – FREE Crochet Pattern is one of the most delightful projects for crafters who love both Disney characters and crochet art. Creating a handmade plush toy inspired by this classic and beloved character brings joy not only to the maker but also to anyone who receives it.
With its vibrant colors, playful sailor outfit, and charming personality, Donald Duck comes to life in yarn, making it a perfect gift for children, collectors, or anyone who enjoys a touch of nostalgia. This pattern is beginner-friendly yet detailed enough to engage more advanced crocheters who enjoy adding unique touches to their work.
When working on an Amigurumi Donald Duck – FREE Crochet Pattern, the process allows you to explore creativity and skill. Amigurumi, the Japanese art of crocheting small stuffed toys, focuses on bringing characters to life through carefully shaped pieces and thoughtful stitching.
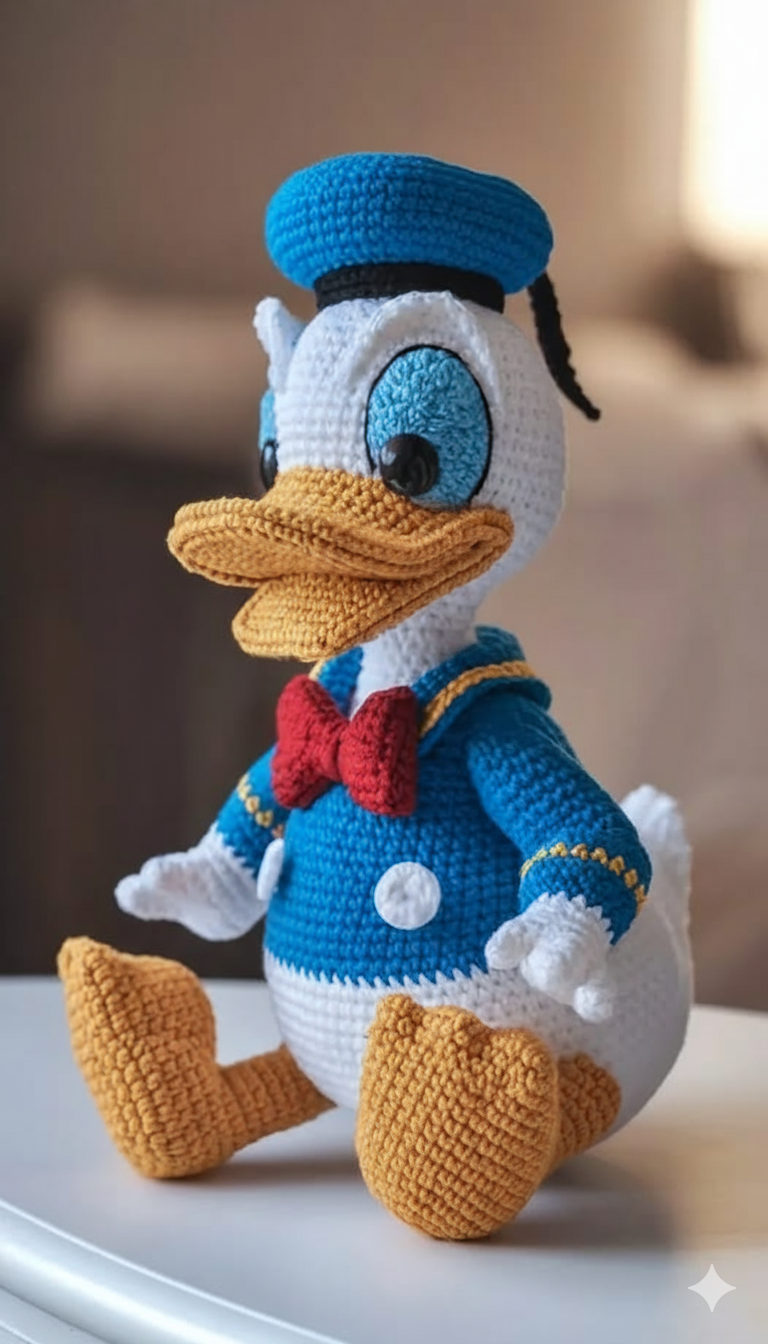
With Donald Duck, the recognizable sailor hat, bow tie, and little tail give you fun opportunities to experiment with details and textures. The finished piece is not just a toy but also a handmade collectible, representing countless hours of patience and care.
This project is perfect for crocheters who want to expand their skills while enjoying the satisfaction of completing a recognizable character. Whether you plan to keep it as part of your own collection or gift it to a loved one, this Amigurumi Donald Duck – FREE Crochet Pattern offers a rewarding experience.
Before diving into the step-by-step instructions, let’s explore the tools, materials, and techniques that will make your Donald Duck come alive in the most charming way.
1. Materials and Tools for the Amigurumi Donald Duck
To create a beautiful Amigurumi Donald Duck – FREE Crochet Pattern, it is important to start with the right materials. The recommended yarn is usually cotton or acrylic, as they hold shape well and provide durability for the finished doll. White, blue, yellow, red, and black yarns will form the basis of Donald’s design, capturing his iconic sailor outfit and beak. Cotton yarn is particularly popular because of its smooth texture and defined stitches, which make the character’s details stand out.
A good crochet hook is equally essential. Typically, a 2.5 mm to 3.5 mm hook works well for amigurumi projects, ensuring tight stitches that prevent stuffing from showing through. The hook size may vary depending on the yarn weight chosen, but maintaining a firm tension is always key. Beginners can use ergonomic hooks to make the crocheting process more comfortable, especially when working on longer projects like character amigurumi.
Stuffing is another crucial material. Polyester fiberfill is commonly used because it is soft, lightweight, and easy to distribute inside the crocheted pieces. A yarn needle will be needed for sewing parts together, while stitch markers help keep track of rounds in amigurumi. Safety eyes are a popular option for this project, but if the toy is meant for small children, embroidered eyes may be a safer choice.
Other useful accessories include scissors for trimming yarn, pins for positioning body parts before sewing, and a measuring tape to ensure consistency. With all materials prepared in advance, the crocheting process becomes more enjoyable and efficient. Having a dedicated project bag or container for your tools and yarn will help keep everything organized.
Before moving on to the next stage, it’s important to emphasize that quality materials can significantly improve the final result. Even if you are a beginner, investing in smooth yarn and good hooks will make the stitches neater and the process more enjoyable. With the tools ready, you’ll be well-prepared to bring your Donald Duck amigurumi to life.
2. Step-by-Step Instructions for Crochet Pieces
The Amigurumi Donald Duck – FREE Crochet Pattern is built by creating different parts separately and then assembling them together. Like most amigurumi designs, the body, head, arms, legs, and accessories are crocheted in continuous rounds. The magic ring technique is often used to start each piece, ensuring a neat, closed circle with no gaps.
The head is usually the starting point, crocheted in white yarn to capture Donald’s face and round shape. Increasing stitches gradually creates the spherical structure, while decreases toward the end help form a balanced shape. The beak, worked in yellow, is stitched separately and attached firmly to the face, giving Donald his recognizable charm. Safety eyes or embroidered eyes are then added to bring expression to the character.
The body is worked in blue yarn to represent Donald’s sailor outfit. To enhance the effect, a small white trim may be crocheted along the edges, replicating the cartoon’s design. The arms and legs are created separately in white and yellow yarns, with small details like cuffs or foot shapes added before attaching them to the body. A little tail in white yarn completes the back view.
Donald Duck’s sailor hat is one of the most fun accessories to make. Typically crocheted in white with a black band and a small blue detail, it gives the doll an authentic personality. The hat can be sewn onto the head or left removable, depending on preference. A red bow tie is also essential and adds a pop of color to the design, making Donald instantly recognizable.
Throughout the process, careful attention to stitch count ensures proportional parts. Beginners can follow the pattern row by row, while advanced crocheters may add personal modifications such as larger hats, different facial expressions, or even a playful pose. With each part completed, the excitement of assembling Donald Duck grows stronger.
3. Assembly and Finishing Touches
Once all the parts are completed, the most rewarding step of the Amigurumi Donald Duck – FREE Crochet Pattern begins: assembly. This process transforms individual crocheted pieces into a complete character, and patience is key. The head is sewn firmly onto the body, ensuring it is centered and secure. Using pins before sewing helps achieve better alignment, especially for beginners.
The arms and legs are positioned symmetrically, giving the toy balance. The beak should be attached with precision to match the placement of the eyes, ensuring Donald’s facial expression looks friendly and accurate. The tail is added to the back, providing extra cuteness and making the amigurumi more true to the original character.
Adding accessories like the hat and bow tie gives the project its final personality. These pieces can be securely sewn or lightly attached to allow for repositioning. For those who enjoy extra details, embroidering small lines or adding extra trim can make the toy even more unique. Each crafter can decide how much detail to include, depending on their preference and time.
Stuffing plays a big role at this stage as well. Distributing the fiberfill evenly ensures the doll maintains its shape and softness. Overstuffing can make the toy stiff, while under-stuffing may leave it floppy. Finding the right balance is key to a cuddly yet firm amigurumi. Using a pencil or small stick helps push stuffing into narrow parts like the arms or legs.
Finishing touches include weaving in yarn ends, checking for loose stitches, and adjusting the positioning of parts. Once complete, Donald Duck can stand proudly as a handmade creation full of charm. For many crafters, this moment brings immense satisfaction, as their effort and creativity come together in a joyful finished product.
4. Tips for Success and Creative Variations
To make the most of the Amigurumi Donald Duck – FREE Crochet Pattern, there are several tips and tricks that can help beginners and advanced crocheters alike. First, always count stitches carefully and use stitch markers to avoid mistakes in continuous rounds. Consistency in tension also ensures a professional finish, especially when combining multiple parts.
For beginners, it may be helpful to practice smaller amigurumi shapes before starting Donald Duck. Learning how to make spheres, ovals, and tubes builds confidence and prepares you for more complex projects. Watching your skills progress makes this character project even more rewarding. Patience is key—amigurumi requires precision, but the result is worth every effort.
Advanced crocheters may enjoy customizing their Donald Duck with creative variations. For example, changing the size of the yarn and hook can produce different-sized dolls, from keychain minis to larger huggable plushies. Some crafters like to add clothing details such as suspenders or alternate facial expressions, giving the toy more personality.
Color variations can also add fun. While traditional Donald Duck colors are classic, playful alternatives such as pastel shades or holiday-themed outfits make the amigurumi unique. A Christmas version with a tiny scarf or a Halloween-themed Donald in orange and black could be exciting additions to your collection. The possibilities are endless.
Sharing your finished amigurumi with friends, family, or crochet communities online spreads joy and inspires others to start their own projects. Documenting your progress with photos along the way can also motivate you and serve as a helpful reference. Every completed Donald Duck adds to the rich tradition of handmade crafts that celebrate creativity and dedication.
Finally, remember that the process is as important as the outcome. Enjoy each step, from the first stitch to the last finishing touch. The skills you develop with this project will carry over into countless future amigurumi adventures. With practice, patience, and creativity, your Donald Duck will become a cherished handmade treasure.
FAQ – Amigurumi Donald Duck – FREE Crochet Pattern
What skill level is required for this pattern?
This pattern is suitable for beginners with basic crochet knowledge and intermediate crafters who enjoy detail work. The step-by-step instructions make it accessible for different skill levels.
How long does it take to complete the Amigurumi Donald Duck?
Depending on your crochet speed and experience, it may take anywhere from 6 to 12 hours to complete the project, spread over several sessions.
What yarn is best for this pattern?
Cotton or acrylic yarn works best. Cotton provides sharper stitch definition, while acrylic is softer and easier to work with for beginners.
Can I use different colors for the project?
Yes! While the traditional colors capture Donald Duck’s classic look, you can customize the amigurumi with any shades you like for a fun twist.
Is it safe for children?
If making the toy for small children, avoid using safety eyes and instead embroider the eyes for safety reasons. Always ensure parts are securely sewn.
Can I sell finished Donald Duck amigurumi from this pattern?
Yes, many crafters sell their handmade pieces at craft fairs or online, but it’s recommended to credit the pattern source when doing so.
Conclusion
The Amigurumi Donald Duck – FREE Crochet Pattern is a delightful project that blends creativity, skill, and nostalgia. From choosing materials and crocheting each part to assembling the final toy, the process is filled with joy and satisfaction. Whether you are a beginner or an experienced crocheter, this project allows you to grow your skills and create a charming handmade keepsake.
I’d love to hear your thoughts—have you ever tried making character amigurumi? Share your honest opinion, tips, or suggestions in the comments, and let’s inspire each other in this wonderful crochet journey!


