
Macrame Heart Bracelet - Free Tutorial

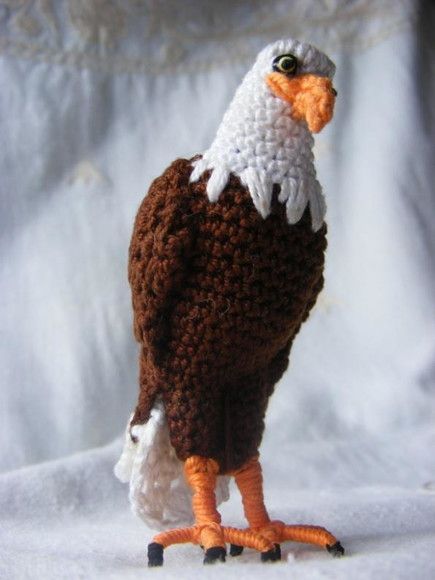
If you’re a fan of amigurumi, you’ll love this Amigurumi Eagle Pattern! The eagle is an iconic symbol of strength and freedom, and now you can bring this majestic bird to life with your crochet skills.
In this tutorial, we’ll guide you step-by-step through the process of creating an amigurumi eagle. Whether you’re new to amigurumi or an experienced crocheter, this project will help you hone your skills while making a stunning and unique crochet piece.
Amigurumi is the art of crocheting small, stuffed animals or objects, and it’s a craft that’s taken the world by storm. With its increasing popularity, there are countless patterns to explore, but making an eagle is particularly exciting due to the bird’s detailed features and majestic presence.
In this guide, we’ll cover everything you need to know, from selecting the right yarn to assembling the pieces. Let’s soar through this amigurumi eagle pattern together!
This Amigurumi Eagle Pattern not only teaches you how to crochet the body, wings, and beak of the eagle, but it also includes helpful tips and tricks to make your creation come to life.
With simple stitches and a little patience, you’ll be able to craft an impressive eagle that can stand proudly in your collection. Whether you’re gifting it to someone special or keeping it as a personal treasure, the completed project will undoubtedly be a standout piece. Let’s dive in!
Before starting any crochet project, it’s essential to gather the right materials. For the Amigurumi Eagle Pattern, you’ll need the following supplies:
Once you have your materials ready, it’s time to begin crocheting!
Now that you’re prepared with your supplies, let’s get started with the basic structure of the eagle. The pattern follows a simple but detailed process to create the body, head, wings, and tail.
To ensure that your Amigurumi Eagle Pattern turns out as realistic as possible, here are some pro tips:
Once you’ve crocheted all the individual pieces, it’s time to assemble your eagle. Start by attaching the wings to the sides of the body, ensuring they’re even and facing outward. Next, sew the head onto the top of the body, positioning it so the eagle looks forward with strength. Add the tail to the back, ensuring it furls out naturally. Finally, attach the beak to the front of the face, and don’t forget to embroider or attach the eyes if you haven’t done so already.
It’s important to pay attention to the positioning of each part to give your eagle an impressive stance. Take a moment to step back and assess the overall look, making sure it’s balanced and visually appealing. Your eagle should now be fully assembled and ready to show off!
Q1: Can I use a different yarn weight for this pattern?
A1: Yes, you can experiment with different yarn weights, but be sure to adjust your hook size accordingly. Using a thicker yarn will result in a larger eagle, while thinner yarn will create a smaller version.
Q2: How do I ensure the wings are securely attached?
A2: Use a yarn needle to sew the wings firmly into place. Make sure the stitches are tight to prevent the wings from falling off or shifting. You can also add a few extra stitches for extra security.
Q3: What’s the best way to shape the eagle’s body?
A3: To shape the eagle’s body, stuff it gently but firmly to achieve a rounded shape. You can add extra stuffing in areas that need more definition, such as the chest or around the neck.
Q4: Can I customize the colors of the eagle?
A4: Absolutely! While the traditional colors for an eagle are brown and white, you can use any color combination you like. Have fun experimenting with vibrant colors to create your own unique version of the amigurumi eagle.
Q5: How long does it take to finish this pattern?
A5: The time it takes to finish the Amigurumi Eagle Pattern will depend on your skill level and experience. On average, it can take anywhere from 4 to 6 hours to complete, but beginners may take longer.
Join our VIP broadcast list and gain access to exclusive patterns, all for free. As a VIP member, you’ll receive the best patterns daily, delivered directly to your device. ✨📱 It’s a unique opportunity to stay up-to-date with the latest trends and designs, curated just for you. Don’t miss out on enhancing your projects and discovering new inspirations with the best patterns every day! 🎨🔝
The Amigurumi Eagle Pattern is a fun and rewarding project for crocheters of all levels. Whether you’re a beginner or an experienced crafter, you’ll enjoy bringing this majestic bird to life through crochet. By following the step-by-step instructions, you can create an eagle that’s both charming and realistic. Don’t forget to have fun with the process and make the pattern your own by customizing the colors and adding your unique touches.
We’d love to hear your thoughts on this pattern! Please feel free to leave a comment with your feedback, share your finished eagle creations, and offer any suggestions or improvements for future patterns. Happy crocheting!


