
Macrame Heart Bracelet - Free Tutorial

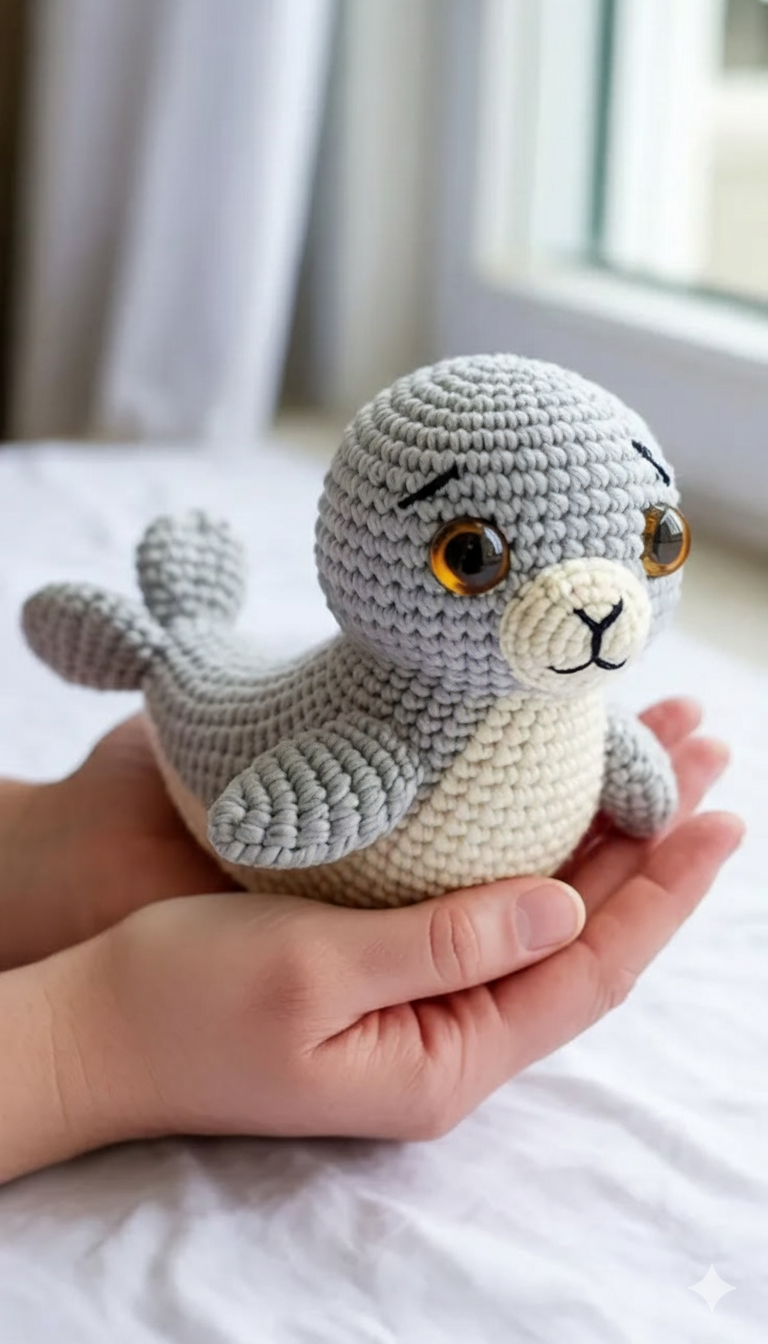
Amigurumi Seal – FREE Crochet Pattern is a charming and delightful project perfect for anyone who loves to crochet adorable sea-themed toys. Whether you are a seasoned crafter or just starting your amigurumi journey, this pattern offers an exciting opportunity to create a cute handmade seal.
Using the Amigurumi Seal – FREE Crochet Pattern as your guide, you can make a soft and huggable friend that is perfect for gifts, nursery decorations, or even as a collector’s piece. Its simple structure and customizable features make it a go-to choice for anyone looking to expand their amigurumi skills.
One of the reasons the Amigurumi Seal – FREE Crochet Pattern is so popular among crocheters is its combination of simplicity and charm. The pattern uses basic stitches and techniques, making it accessible to beginners while still being engaging for experienced crocheters.
Amigurumi projects like this allow you to experiment with color combinations, yarn textures, and creative details. The small size of the seal makes it a quick project, ideal for crafters who want a satisfying result in a short amount of time. Plus, seals are beloved sea animals, which adds to the appeal of making this cute little creature.
Another wonderful feature of the Amigurumi Seal – FREE Crochet Pattern is its versatility. You can create the seal in various sizes simply by changing your yarn thickness or hook size. Want a tiny seal for a keychain? Use thinner yarn and a smaller hook. Prefer a cuddly stuffed animal? Choose thicker yarn and a larger hook.
This flexibility allows you to create multiple seals for different purposes, whether they’re for personal use, gifts, or even for selling at craft fairs. Handmade amigurumi toys like this seal are always a hit because of their uniqueness and sentimental value.
To begin working on your Amigurumi Seal – FREE Crochet Pattern, you will need a few essential supplies. Choose a soft, medium-weight yarn in gray, white, or a color of your choice to bring your seal to life. A 3.5 mm or 4.0 mm crochet hook is commonly recommended for amigurumi projects to ensure tight, even stitches. Fiberfill stuffing is necessary to give your seal a plump and adorable shape. Make sure you have a yarn needle on hand for sewing pieces together and weaving in loose ends.
You may also want to use safety eyes to give your seal a professional and polished look. If you are making the toy for a young child, you can embroider the eyes with black yarn or embroidery floss for extra safety. The Amigurumi Seal – FREE Crochet Pattern works well with both approaches, so choose the method that best suits your project. Adding a small embroidered nose or whiskers can further enhance the seal’s cute expression.
Scissors and stitch markers are other important tools. Stitch markers will help you keep track of your rounds, especially since amigurumi is usually worked in continuous spirals. The Amigurumi Seal – FREE Crochet Pattern suggests marking the first stitch of each round to avoid confusion and maintain accuracy. Having sharp scissors makes trimming yarn ends easier and cleaner.
For extra flair, you can gather some optional materials like small felt pieces for decorative accents or ribbons to tie around the seal’s neck. Some crocheters even add tiny accessories, such as a crocheted fish or a mini scarf, to personalize their projects. The Amigurumi Seal – FREE Crochet Pattern provides plenty of room for creativity, so don’t be afraid to make your seal unique.
Before starting, ensure your workspace is well-lit and organized. Keeping your yarn untangled and tools within easy reach will make the crafting process more enjoyable. Preparing your materials in advance allows you to fully focus on the joy of crocheting your Amigurumi Seal – FREE Crochet Pattern without interruptions.
Lastly, it’s always a good idea to read through the entire pattern before beginning. Understanding the steps ahead of time can prevent mistakes and help you visualize the final product. The Amigurumi Seal – FREE Crochet Pattern is straightforward, but a little preparation can go a long way in ensuring success.
Start by creating the seal’s body using your chosen yarn color. Work in continuous rounds, increasing and decreasing stitches as instructed by the Amigurumi Seal – FREE Crochet Pattern to achieve the desired shape. Keeping your stitches tight will ensure the stuffing does not show through. The body should be smooth and evenly stuffed for the best result.
Next, crochet the seal’s flippers. These are usually small oval shapes that are attached to the sides of the body. Position them symmetrically to give your seal a balanced and realistic look. The Amigurumi Seal – FREE Crochet Pattern recommends lightly stuffing the flippers or leaving them flat, depending on your preference.
The tail is another essential part of your amigurumi seal. Crocheting the tail involves shaping two small fins and joining them together. Attach the tail securely to the back of the body. Proper placement is key to maintaining the seal’s charming silhouette. The Amigurumi Seal – FREE Crochet Pattern allows you to adjust the size of the tail slightly to suit your design.
For the seal’s head, you will need to crochet a separate round shape that will later be sewn onto the body. This is where the character of your amigurumi comes to life. Add the eyes, nose, and any facial embroidery before attaching the head. Following the Amigurumi Seal – FREE Crochet Pattern, make sure the features are evenly placed to achieve a friendly and appealing expression.
Once all the parts are crocheted, use a yarn needle to assemble your seal. Take your time sewing the pieces together to ensure they are secure and neatly attached. The Amigurumi Seal – FREE Crochet Pattern suggests using invisible stitches to create a seamless finish. After assembly, gently shape your seal with your hands to perfect its form.
Finally, double-check for any loose yarn ends or gaps in the stitches. Tidy up your work by weaving in all ends and trimming any excess yarn. At this point, your Amigurumi Seal – FREE Crochet Pattern creation should be complete and ready to admire or gift.
The Amigurumi Seal – FREE Crochet Pattern is incredibly versatile, making it perfect for a variety of uses. One popular idea is to create these seals as gifts for friends and family. Handmade toys carry a personal touch that store-bought gifts simply can’t replicate. A crocheted seal makes a memorable present for baby showers, birthdays, or holidays.
You can also use these seals as charming nursery decorations. Arrange a group of seals in different sizes on a shelf to create a whimsical ocean-themed display. The Amigurumi Seal – FREE Crochet Pattern can easily be adapted with different colors to match any nursery palette. Adding small accessories, like bows or scarves, can make each seal unique.
Another creative use is turning your seals into keychains or bag charms. By using thinner yarn and a smaller hook, you can make miniature versions that are easy to carry. The Amigurumi Seal – FREE Crochet Pattern is perfect for these small projects, and they make excellent party favors or stocking stuffers.
Craft fairs and online shops are great places to showcase your seals. Handmade amigurumi toys are always popular among shoppers looking for unique and heartfelt items. Using the Amigurumi Seal – FREE Crochet Pattern, you can create a collection of seals in different colors and sizes to appeal to a wide audience.
These seals can also serve as educational tools for children. Pair your amigurumi seal with a short story or fun facts about marine life to create an engaging learning experience. The Amigurumi Seal – FREE Crochet Pattern isn’t just a craft—it can spark curiosity about the ocean and its creatures.
Lastly, you can use your seals as photo props for holiday cards, social media posts, or even baby photography sessions. Their cute appearance adds charm and warmth to any photo. The Amigurumi Seal – FREE Crochet Pattern offers endless opportunities for creativity and personalization.
To get the best results with your Amigurumi Seal – FREE Crochet Pattern, pay attention to your tension. Tight, even stitches are crucial for amigurumi projects, as they prevent stuffing from showing through. Practice maintaining consistent tension before starting if needed.
Experiment with different yarn textures to give your seal a unique look. For example, using a slightly fuzzy yarn can mimic the appearance of a real seal’s fur. The Amigurumi Seal – FREE Crochet Pattern works well with various yarn types, so feel free to explore different options.
Consider personalizing your seal by adding accessories. A tiny crocheted fish, a miniature scarf, or a felt heart can add character and make your seal one-of-a-kind. The Amigurumi Seal – FREE Crochet Pattern encourages creativity, so don’t be afraid to experiment with embellishments.
If you’re a beginner, take your time and don’t rush through the steps. Reading the entire pattern beforehand and working carefully will help avoid mistakes. The Amigurumi Seal – FREE Crochet Pattern is designed to be beginner-friendly, but patience is key to achieving a polished result.
Joining online crochet groups or forums can provide valuable tips and support. Sharing your finished seal with others can inspire fellow crafters and help you improve your skills. The Amigurumi Seal – FREE Crochet Pattern is a great project to showcase in crafting communities.
Above all, enjoy the process of creating. Crocheting is meant to be a relaxing and fulfilling hobby. The Amigurumi Seal – FREE Crochet Pattern not only results in a cute toy but also offers the satisfaction of crafting something special with your own hands.
Q: Is the Amigurumi Seal – FREE Crochet Pattern suitable for beginners?
A: Yes, it’s beginner-friendly and uses basic stitches, making it accessible to new crocheters.
Q: How long does it take to make an amigurumi seal?
A: Depending on your skill level, it typically takes 2–4 hours to complete one seal.
Q: What yarn is best for this pattern?
A: Soft acrylic or cotton yarn works well, with worsted weight being a popular choice.
Q: Can I make the seal larger or smaller?
A: Absolutely, adjust the hook size and yarn weight to change the size of your seal.
Q: Are these seals safe for babies and toddlers?
A: Yes, but embroider the eyes instead of using safety eyes to avoid choking hazards.
Q: Can I sell items made from this pattern?
A: Yes, handmade seals can be sold, but remember to give credit to the pattern source if required.
The Amigurumi Seal – FREE Crochet Pattern is a delightful project that combines creativity, craftsmanship, and versatility. Whether you’re making a thoughtful gift, a charming decoration, or a unique item to sell, this pattern provides everything you need to create an adorable seal.
With simple materials, easy-to-follow steps, and endless opportunities for personalization, it’s a perfect choice for crocheters of all skill levels. We’d love to hear your honest opinion and suggestions—share your thoughts and inspire others to try the Amigurumi Seal – FREE Crochet Pattern for their next crochet adventure!


