
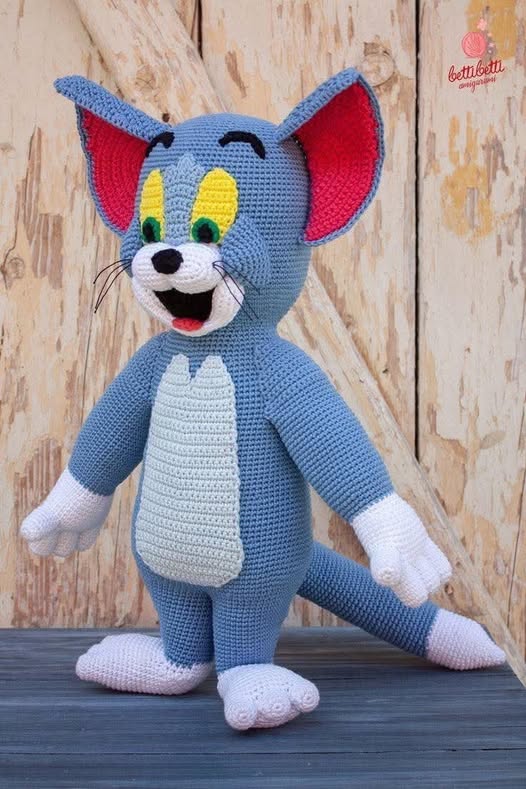
Amigurumi Tom Cat Free Crochet Pattern is a delightful project that brings joy to both crochet enthusiasts and fans of classic cartoon characters. Whether you’re a beginner or have years of experience with yarn, this pattern offers a fun and rewarding way to bring the beloved character Tom to life in amigurumi form.
With just a hook, some yarn, and a little patience, you can create a soft, cuddly version of Tom that’s perfect for gifting or keeping as a nostalgic collectible.
In this detailed guide, we’ll explore each step of creating the Amigurumi Tom Cat Free Crochet Pattern, from gathering your supplies to assembling the final product.
You’ll learn essential techniques, tips for shaping, and even ways to customize your own version of Tom. This is more than just a pattern—it’s a creative journey full of inspiration and charm.
The Amigurumi Tom Cat Free Crochet Pattern is especially appealing because it blends childhood memories with the joy of handmade crafts.
Plus, amigurumi projects like this one are perfect for relaxing evenings or weekend activities. If you love cartoons, crochet, or simply enjoy cute handmade items, you’re in the right place.
1. Materials and Tools for Your Amigurumi Tom Cat
Before diving into the Amigurumi Tom Cat Free Crochet Pattern, it’s essential to prepare the right materials. High-quality yarn, a reliable crochet hook, and the right stuffing make all the difference in the final look and feel of your amigurumi.
Choose medium-weight cotton or acrylic yarn in classic Tom Cat colors: gray, white, yellow, black, and pink. These shades will help you capture his signature cartoon features and make your creation easily recognizable.
A 2.5mm or 3mm crochet hook is ideal for amigurumi projects. A smaller hook ensures tight stitches, preventing the stuffing from poking through and giving your Tom Cat a neat finish.
You’ll also need fiberfill stuffing to bring your Tom Cat to life. Be generous when filling the head and body, but keep limbs slightly softer for flexibility.
Plastic safety eyes are recommended for durability and child safety. If the toy is intended for a baby, consider embroidered eyes as a safe and soft alternative.
A yarn needle is necessary for sewing parts together, weaving in ends, and attaching facial features. Stitch markers can help you keep track of your rounds, especially when working in continuous spirals.
Finally, a pair of sharp scissors is a must. Clean cuts ensure that yarn tails are easy to weave in and prevent fraying.
2. Crocheting the Head and Body
The head and body are the foundation of the Amigurumi Tom Cat Free Crochet Pattern. They are usually worked in continuous spirals, which create a smooth, seamless shape.
Begin with the magic ring method to create the top of the head. This technique allows you to pull the center tight, avoiding any holes in the crown of the head.
Increase gradually to form a round head shape. Once you reach the widest point, continue in even rounds before beginning to decrease. This gives the head its classic ball-like form.
Stuff the head firmly before completely closing it. You want it to hold its shape and support the facial features you’ll add later.
The body is typically started from the bottom and worked upward. It has a slightly elongated oval shape, narrower at the top where it will be joined to the head.
Crochet the body in one piece or in two sections, depending on your chosen pattern variation. Be sure to stuff it well and evenly as you go.
Once both the head and body are complete, sew them together with a strong whip stitch or mattress stitch. Secure tightly for a stable base.
3. Crafting the Limbs, Tail, and Ears
These components are what give your Amigurumi Tom Cat Free Crochet Pattern its personality and animation. They may be small, but they’re full of character and charm.
Start with the arms and legs. These are typically made with tight rounds of single crochet stitches. They can be lightly stuffed or left soft for a floppy look.
Shape the feet and hands with slight increases and decreases. Some crafters like to add small yarn claws or contrasting color pads for realism.
The tail is an essential feature of Tom Cat. Crochet it long and slightly curved. You can insert pipe cleaners inside if you want it to be poseable.
The ears are triangular and slightly curved. Begin with a magic ring and shape with increases and decreases. Use a contrasting inner color to mimic Tom’s cartoon ears.
Position the limbs symmetrically and sew them carefully to the body. Use pins to hold everything in place before attaching permanently.
Once everything is attached, gently steam or block the figure if needed. This helps the yarn settle and ensures a polished look.
4. Adding the Face and Final Details
The face is where your Amigurumi Tom Cat Free Crochet Pattern truly comes alive. Getting the expression just right can take some patience, but it’s the most rewarding part.
Use black embroidery floss to outline the eyebrows and mouth. This adds emotion and mimics Tom’s classic cartoon smirk or surprise.
For the eyes, safety eyes or crochet circles can be used. White for the eyeball and black for the pupil works well. Don’t forget to add a small white dot to mimic cartoon-style light reflection.
Add Tom’s signature pink nose using a small oval piece of crochet or embroidery. Position it centrally and secure well.
Create thin black whiskers using embroidery or felt. Whiskers give your Tom Cat extra charm and tie the face together.
Use pink yarn for the inside of the ears and a touch on the cheeks if desired. Blush adds warmth and character to your creation.
Check all seams and attachments, and trim any excess yarn. Give your Tom Cat a final fluff, and he’s ready to display or gift!
FAQ – Common Questions About the Amigurumi Tom Cat Free Crochet Pattern
Can beginners make this pattern?
Yes! The Amigurumi Tom Cat Free Crochet Pattern is beginner-friendly if you know the basics like single crochet, increasing, and decreasing. Just take it step by step.
What type of yarn works best?
Medium-weight cotton or acrylic yarn in gray, white, black, yellow, and pink works best. Stick to the color scheme for a classic look.
Can I make a smaller or larger Tom Cat?
Absolutely. Use thinner yarn and a smaller hook for a smaller version or chunky yarn and a larger hook to make a big cuddly Tom.
Are safety eyes safe for all ages?
Safety eyes are secure but may not be ideal for babies. For a baby-safe toy, opt for embroidered eyes instead.
How long does it take to finish the project?
Depending on your experience and time, this project can take between 6 to 10 hours. It’s perfect for a weekend craft!
Can I customize the pattern to create Jerry too?
Yes! Once you master Tom, you can adapt the same pattern techniques to create a matching Jerry. It’s a fun duo to make.
Conclusion
In this article, we’ve explored the Amigurumi Tom Cat Free Crochet Pattern step by step, from gathering materials to final facial details. With a little yarn and imagination, you can bring this beloved cartoon character to life in a soft, handmade form. We covered essential techniques, offered helpful tips, and addressed common questions to support crafters at every level.
Now it’s your turn! Grab your hook, pick your yarn, and start creating your own Tom Cat. If you followed this guide and made your own version, we’d love to hear from you. Please leave your honest opinion, share your experience, and suggest what other characters or patterns you’d love to see featured next!
Happy crocheting!


