
Caddy Dolls – Free Pattern is one of the most creative and functional crochet projects you can explore today. These charming dolls are more than just decorative pieces—they are clever organizers designed to hold essential items in their tiny pockets.
If you love crochet, organization, and handmade gifts, this project will combine all three into one delightful creation.
The idea behind Caddy Dolls – Free Pattern is simple: take the concept of a cute, cuddly doll and turn it into a storage solution. Whether you want to keep your crochet hooks, scissors, pens, or even kids’ art supplies organized, this crochet pattern offers a whimsical and practical solution.
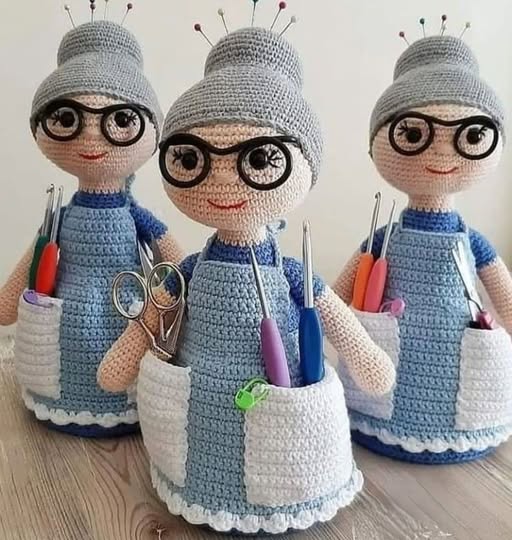
Each doll is crafted with soft yarn and styled with colorful pockets, aprons, or skirts that can store various small items.
Many crafters enjoy this pattern not only because it’s adorable, but also because it’s useful. Having a crochet doll organizer on your work desk or sewing table brings a touch of warmth and creativity.
It also makes for a perfect handmade gift for teachers, crafters, or anyone who appreciates cute and functional accessories. In this tutorial, we’ll walk you through the essential steps, tips, and tricks to help you master this Caddy Dolls – Free Pattern.
1. Materials Needed for Your Caddy Doll
Before you begin crocheting your own Caddy Dolls – Free Pattern, gather all your supplies to ensure a smooth crafting session. Choosing the right materials will help give your doll the ideal structure and softness.
Start by selecting a soft, medium-weight cotton yarn. Cotton yarn is durable and holds its shape well, which is important when creating the structural pockets for the doll. Acrylic yarn is also a popular choice and is often more budget-friendly.
For the crochet hook, use the size recommended for your chosen yarn. Usually, a 3.5mm or 4mm hook works great for tight stitches, which are necessary for creating amigurumi-style pieces that hold stuffing well.
You’ll also need fiberfill stuffing to give your doll its plump and cuddly form. Use small amounts of stuffing and pack it tightly to maintain the shape, especially for the head, body, and arms.
Additional supplies include stitch markers, a yarn needle for sewing parts together, scissors, and safety eyes if you prefer them over embroidered features. Don’t forget small buttons or ribbons for decorating the outfit and pockets of your doll.
Finally, consider what you want your caddy doll to hold. This will help determine how big the pockets should be and where to place them. Pockets can be sewn onto aprons, skirts, or directly onto the doll’s body.
Once you have everything ready, prepare your workspace with good lighting and plenty of space. Having a tidy area helps you stay focused and enjoy the process of making your Caddy Dolls – Free Pattern.
2. Step-by-Step Instructions for Crocheting the Doll
Now that your materials are ready, it’s time to begin your Caddy Dolls – Free Pattern project. Follow each step carefully, and feel free to customize as you go to reflect your own style.
Start with the head of the doll using the magic ring method. Work in continuous rounds, increasing evenly to create a smooth, round shape. Use stitch markers to keep track of your rounds for better accuracy.
Once the head is complete, continue down to crochet the body. You can change yarn colors to give your doll a shirt or dress. The body should be firm but flexible enough to attach the arms and legs later.
For the arms and legs, crochet each limb separately. They are usually made using basic single crochet stitches. Stuff them lightly and attach them securely to the body. Make sure they are symmetrical and well-aligned.
Add the doll’s facial features next. You can either use safety eyes or embroider them with black thread. Embroider a simple smile or use felt cutouts for expressive details. Personal touches bring character to your Caddy Dolls – Free Pattern.
Now create the doll’s hair and outfit. Hair can be made with yarn strands looped and tied onto the head, then styled into braids or pigtails. The outfit can include a dress, apron, or pants depending on your chosen design.
Lastly, sew on the small pockets. Place them strategically so they’re both accessible and cute. You can add one or two on the skirt, chest, or back. Make sure they are large enough to hold pens, tools, or craft items securely.
3. Customization Ideas for Your Caddy Doll
A great thing about the Caddy Dolls – Free Pattern is how easy it is to personalize. This allows you to create a doll that matches your personality, home decor, or gift recipient’s taste.
Choose a unique color palette. Instead of traditional pinks or blues, try earthy tones, bold primaries, or even ombre effects. Color blocking can also help define the outfit and pocket areas more clearly.
You can create themed dolls. For example, make a “Teacher Caddy Doll” with tiny pockets for chalk and pens or a “Sewing Caddy Doll” that holds spools and measuring tape. This makes the pattern even more engaging and specific.
Add accessories to bring your doll to life. Crochet a mini purse, scarf, or even a pair of glasses. Buttons, lace trims, and tiny embroidered names give your doll a story and a personality.
Think about scale and proportions. If you need to store larger items, scale up your pattern using thicker yarn and a larger hook. This flexibility makes the Caddy Dolls – Free Pattern useful for multiple functions.
Don’t forget the back of the doll. You can add a strap or loop so the doll can hang on a wall, door handle, or craft cart. This increases its usability as a true organizer.
Lastly, involve kids in the process. Let them choose the colors or design elements. A caddy doll made together becomes a memory and a treasured item they’ll love using and displaying.
4. Tips for Perfecting the Crochet and Assembly
Making your Caddy Dolls – Free Pattern look neat and polished takes a bit of practice, but these tips will help you create a beautiful result every time.
Work with tight, even stitches. This is especially important for holding the fiberfill inside without gaps. Practice tension control to achieve a consistent texture throughout your doll.
Use invisible decrease stitches when shaping the head or body. These prevent holes from forming and give your project a cleaner look. Learning these techniques can elevate the quality of your finished piece.
Stuff the limbs and head firmly, but not so much that it stretches the fabric. Proper stuffing helps the doll sit upright and keeps the shape durable over time.
Use locking stitch markers to keep track of rounds and avoid mistakes. Marking key points also helps when aligning arms or sewing on pockets later in the process.
Take your time with sewing. Neat seams and well-positioned parts make a big difference. Use matching yarn when attaching pieces and secure each knot carefully to ensure long-term durability.
Finally, block your finished doll if needed. Light steaming can help shape the doll, especially the skirt or apron. This finishing touch adds to the professional look of your Caddy Dolls – Free Pattern.
FAQ: Frequently Asked Questions
1. What is a Caddy Doll used for?
A caddy doll is a crochet doll designed with built-in pockets to hold tools, supplies, or small items. It’s both decorative and practical, ideal for craft rooms, classrooms, or kids’ desks.
2. Is this Caddy Dolls – Free Pattern suitable for beginners?
Yes! While it includes multiple parts, the stitches are mostly basic. If you know how to single crochet, increase, and decrease, you can complete this project with patience and guidance.
3. What kind of yarn works best for a caddy doll?
Cotton yarn is preferred due to its sturdiness and shape retention. Acrylic is also a good alternative if you’re looking for softer texture or affordability.
4. How long does it take to make a Caddy Doll?
On average, it takes 6–10 hours depending on your crochet speed and the complexity of the doll’s accessories and outfit.
5. Can I sell finished dolls made from this free pattern?
Yes, typically you can sell finished items as long as you credit the pattern creator if specified. Always check any designer’s copyright notes before selling.
6. Can I wash the Caddy Doll if it gets dirty?
Yes, if made with washable yarn, your doll can be gently hand-washed and air-dried. Avoid machine drying to maintain the shape and details.
Conclusion
Creating your own Caddy Dolls – Free Pattern is a rewarding experience that blends creativity, functionality, and personalization. With just yarn, a hook, and your imagination, you can make a delightful doll that not only looks adorable but also helps keep your space organized.
Throughout this tutorial, we’ve explored materials, step-by-step instructions, customization options, and expert tips to make the process easier and more enjoyable. Whether you’re crafting for yourself, a loved one, or as a thoughtful handmade gift, this pattern offers endless possibilities.
We’d love to hear from you! Leave your honest opinion about this pattern in the comments and share any suggestions or improvements you’ve tried. Your feedback helps us and other crafters grow together.


