
Creating cute and easy crochet bunnies is a delightful and rewarding project for crochet lovers of all skill levels. Whether you are a beginner looking for a simple pattern or an experienced crocheter wanting a fun and quick project, these adorable bunnies are perfect.
Handmade crochet bunnies make great gifts, charming home decor, or even a wonderful addition to your Easter celebrations.
This tutorial will guide you through every step of making your own cute and easy crochet bunnies, from selecting materials to adding final details.
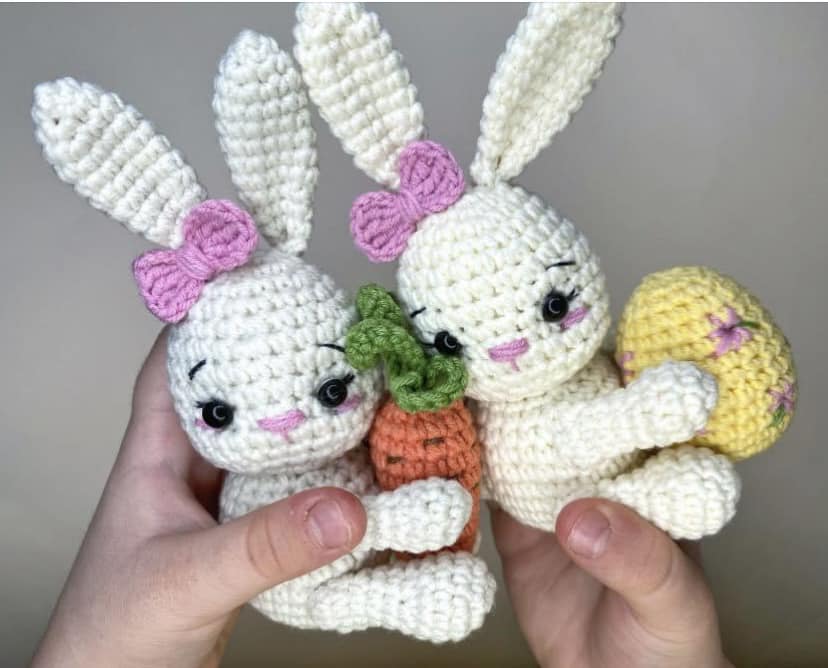
The pattern is straightforward and requires only basic crochet stitches, making it ideal for beginners. With just a bit of yarn, a hook, and a little creativity, you’ll have a lovely handmade bunny in no time!
One of the best things about crocheting these bunnies is the ability to customize them. You can experiment with different yarn colors, sizes, and even accessories to give each bunny a unique personality. Now, let’s get started on this fun crochet journey!
1. Materials and Tools Needed
Before you start crocheting your cute and easy crochet bunnies, it’s important to gather all the necessary supplies. Having everything ready will make the process smooth and enjoyable.
The first essential item is yarn. Soft, medium-weight yarn (such as cotton or acrylic) is ideal for a plush and cuddly bunny. If you prefer a fuzzy look, consider using fluffy or velvet yarn.
Next, choose an appropriate crochet hook size. Typically, a 3.5mm to 4.5mm hook works well for this project. The smaller the hook, the tighter the stitches, which helps maintain the bunny’s shape.
You will also need stuffing material. Polyester fiberfill is the best choice, as it provides a soft and even filling for your bunny, making it more huggable.
A yarn needle is essential for sewing parts together and weaving in loose ends. This ensures a neat and professional finish for your bunny.
Finally, don’t forget safety eyes or embroidery thread for the bunny’s facial features. Safety eyes create a polished look, but if you’re making a bunny for a baby, embroidered eyes are a safer option.
2. Crocheting the Bunny Body and Head
Now that you have your materials ready, it’s time to start crocheting the body and head of your cute and easy crochet bunny. This is typically done in one continuous piece.
Start with a magic ring, which is the foundation for crocheting in the round. This technique helps create a tight and seamless beginning for your bunny.
Once the magic ring is formed, work in single crochet stitches. Increasing gradually will shape the head, making it round and symmetrical. Make sure to keep your stitch count accurate to avoid a lopsided shape.
After reaching the desired head size, begin decreasing stitches to form the body. This transition should be smooth to ensure a seamless appearance between the head and torso.
Stuff the head and upper body firmly with fiberfill as you crochet. This will prevent any lumps or uneven stuffing that may distort the bunny’s shape.
Continue decreasing towards the bottom of the body. Once you reach the final stitches, close the opening securely and weave in the yarn ends neatly.
3. Making the Bunny Ears, Arms, and Legs
The ears, arms, and legs are essential parts that give your cute and easy crochet bunny its charming look. These parts are crocheted separately and then attached to the main body.
Begin with the ears. They are usually made as elongated ovals using single crochet stitches. Slightly curved ears add an expressive touch to your bunny.
Next, crochet the arms. These should be slightly shorter than the legs, giving the bunny a proportionate look. You can stuff them lightly for a softer appearance.
For the legs, use the same technique as the arms but make them slightly longer. Ensure that both legs are identical to maintain symmetry.
Once all pieces are crocheted, attach them securely to the body using a yarn needle. Positioning is key to achieving a balanced and cute bunny shape.
Before finalizing, double-check that all parts are firmly attached, especially if the bunny is meant for children. A strong attachment prevents accidental detachment of small parts.
4. Adding Facial Features and Final Touches
Now that your bunny is fully assembled, it’s time to bring it to life by adding facial features and final details. This step gives each cute and easy crochet bunny a unique personality.
Use safety eyes or embroidered stitches to create the bunny’s eyes. If using safety eyes, insert them before closing the head. For embroidered eyes, use black thread to stitch small, expressive eyes.
For the nose and mouth, a simple embroidered “Y” shape creates a classic bunny look. Pink or brown thread works well for this detail.
To add extra charm, consider giving your bunny a tiny crochet bow, scarf, or small accessories. This personalization makes each bunny special and unique.
If you want to add blushing cheeks, use a small amount of pink blush or fabric paint for a soft and adorable effect.
Lastly, fluff up the stuffing evenly and make any final adjustments to ensure your bunny looks perfect. Your cute and easy crochet bunny is now ready!
FAQ
1. What type of yarn is best for crochet bunnies?
Medium-weight cotton or acrylic yarn is best for durability and softness. Fluffy or velvet yarn can add extra texture.
2. Can beginners make crochet bunnies?
Yes! This pattern is simple and great for beginners. Basic crochet stitches like single crochet and magic rings are used.
3. How do I make my crochet bunny more unique?
You can customize colors, add accessories, or experiment with different eye placements for unique expressions.
4. Is stuffing necessary for crochet bunnies?
Yes, stuffing helps maintain shape and gives the bunny a soft, plush feel. Polyester fiberfill is commonly used.
5. What size hook should I use?
A 3.5mm to 4.5mm hook is ideal, depending on your yarn thickness and desired stitch tightness.
6. How can I make my crochet bunny child-safe?
Use embroidered eyes instead of safety eyes and ensure all parts are securely attached to avoid choking hazards.
Join our VIP broadcast list and gain access to exclusive patterns, all for free. As a VIP member, you’ll receive the best patterns daily, delivered directly to your device. ✨📱 It’s a unique opportunity to stay up-to-date with the latest trends and designs, curated just for you. Don’t miss out on enhancing your projects and discovering new inspirations with the best patterns every day! 🎨🔝
Conclusion
Creating cute and easy crochet bunnies is a fun and rewarding project for any crochet enthusiast. With simple stitches, a few materials, and some creativity, you can make adorable handmade bunnies perfect for gifts, decorations, or keepsakes. This tutorial has guided you through the entire process, from gathering materials to adding final touches.
We would love to hear from you! Leave a comment below sharing your experience with crocheting these bunnies, any modifications you made, or suggestions for future tutorials. Happy crocheting!


